Advertisement
Quick Links
Advertisement

Related Manuals for NXP Semiconductors FRDM-MCXA156


Summary of Contents for NXP Semiconductors FRDM-MCXA156
- Page 1 Quick Start Guide MCUXpresso Developer Experience FRDM-MCXA156 development board...
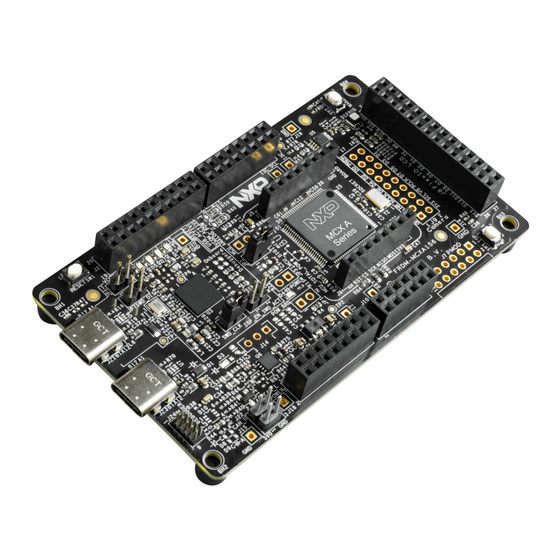
- Page 2 Get to know the FRDM-MCXA156 development board debugger debugger MCU-Link MCU-Link header header NXP’s MCUXpresso Developer Experience SW1 RESET SW1 RESET provides you with button button MCU-Link MCU-Link cost-effective MCU debugger debugger development boards. Easy I/O access supports J2 header...
- Page 3 Quick Start Guide FRDM-MCXA156 MC2_CUR_DCB P1_10 19 20 P0_17 D19/SCL P2_7 MC1_ENC_B MC2_VOLT_DCB P2_3 17 18 P0_16 D18/SDA IOREF P3V3 3 P2_20 MC1_ENC_A MC2_BEMF_C P2_6 15 16 VDDA AREF RESET P1_29 P3_11 MC1_PWM_CB MC2_BEMF_B P2_5 13 14 P3V3 P3_10 MC1_PWM_CT...
- Page 4 How to get started Setup 1. Connect the FRDM-MCXA156 board to a PC using the USB Type-C® cable 2. The board comes preprogrammed with a blinky LED demo 3. Get started at nxp.com/FRDM-MCXA156/start Software and expansion boards 4. Use different headers to connect sensors, Arduino shields and more 5.
Need help?
Do you have a question about the FRDM-MCXA156 and is the answer not in the manual?
Questions and answers