
Related Manuals for LUCCI Air HAVANA II


Summary of Contents for LUCCI Air HAVANA II
- Page 1 LUCCI AIR HAVANA II OSCILLATING HANGING FAN ⚫INSTALLATION ⚫OPERATION ⚫MAINTENANCE ⚫WARRANTY INFORMATION CAUTION READ INSTRUCTIONS CAREFULLY FOR SAFE INSTALLATION AND FAN OPERATION. V1.0-AU (05/2024)
-
Page 2: Safety Precautions
HAVANA II Installation Instructions THANK YOU FOR PURCHASING Thank you for purchasing this quality Lucci product. To ensure correct function and safety, please read and follow all instructions carefully before assembly, installation and use of this ceiling fan. Please keep instructions for future reference. - Page 3 HAVANA II Installation Instructions A single-pole switch on the active of the receiver input of remote control must also be included in the wiring, and located the same room as the ceiling fan. The structure to which the fan is to be mounted must be capable of supporting a weight of 16kg.
-
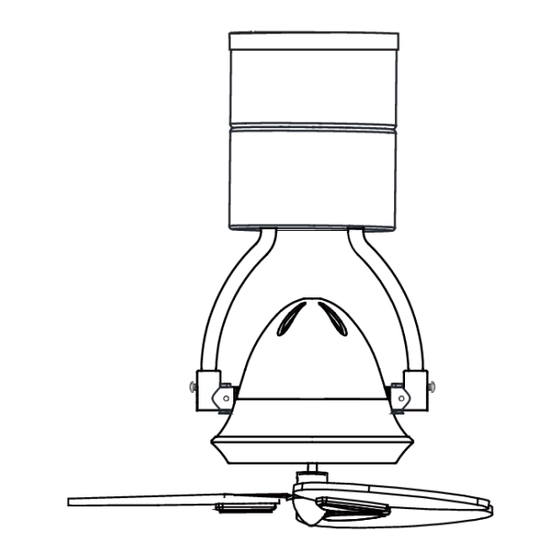
Page 4: Parts List
HAVANA II Installation Instructions PARTS LIST • Unpack your ceiling fan carefully. Remove all parts and hardware. • Lay out all the components on a smooth surface and make sure there are no components missing before assembling. If parts are missing, return the complete product to the place of purchase for inspection or replacement. -
Page 5: Clearance Requirement
HAVANA II Installation Instructions CLEARANCE REQUIREMENT • The fan must be installed so that the lowest point of the fan blade must be 2.1m from the floor. NOTE: The lowest point of the fan blade is when the fan head is adjusted to 45°. -
Page 6: Installing The Fan
HAVANA II Installation Instructions INSTALLING THE FAN TOOLS REQUIRED: Phillips / flat head screwdriver Pair of pliers Adjustable spanner Step ladder Wire cutter Wiring, supply cable as required by local provincial and national wiring codes and regulations INSTALLING THE MOUNTING BRACKET •... - Page 7 HAVANA II Installation Instructions HANGING THE FAN ASSEMBLY TO MOUNTING BRACKET • Install the decorative ring (1) onto the fan assembly. (Fig.3) • Lift the fan assembly up to the mounting bracket. Hang the fan assembly onto the J-hook (2) of the mounting bracket.
- Page 8 HAVANA II Installation Instructions Fig. 5 From mains supply to mounting bracket terminal block: (Fig. 5) 1. Connect the live supply wire to the “L” terminal of the terminal block on the mounting bracket. 2. Connect the neutral supply wire to “N” terminal of the terminal block on the mounting bracket.
- Page 9 HAVANA II Installation Instructions INSTALL THE FAN ASSEMBLY TO THE MOUNTING BRACKET • After completing the electrical connection at the mounting bracket terminal block, connect the ceiling fan wiring via the quick connector plugs. NOTE: Ensure the earth wiring is secure and correct, by performing an earthing continuity test from the fan’s accessible metal body back to the earth terminal at the terminal block on the mounting...
- Page 10 HAVANA II Installation Instructions • Slide the decorative ring up onto the hanging canopy screws(1)&(2) and attach it on top of hanging canopy(3). (Fig 9& Fig10) Fig. 10 Fig. 9 INSTALLATION OF THE ASSEMBLED FAN-BLADES • Loose the 3 set screws (2) from assembled fan-blades. (Fig.11) Fig.
- Page 11 HAVANA II Installation Instructions ADJUSTMENT OF THE FAN HEAD • Loosen the two set screws on both sides of the motor; (Fig.13) • Rotate the fan head and adjust the desired angle. (The angles available: from 0° to 90°, or, from 0° to -90°). (Fig.13) NOTE: Do not rotate/twist the fan head more than 180, as this may damage the joint or the internal wiring.
-
Page 12: Using Your Ceiling Fan
HAVANA II Installation Instructions USING YOUR CEILING FAN Your ceiling fan is controlled via the remote control. There are 4 buttons (HI, MED, LOW, OFF) to control the fan speed and one button to control light on/off. Fig. 15 Before operating the remote, the following must be considered. -
Page 13: After Installation
HAVANA II Installation Instructions OPERATING THE REMOTE: Before you start using the remote, take the time to read through this section and get familiar with the buttons and function of each button. (Fig.17) LED Indicator The red LED indicator on the top of the transmitter will flash when the buttons are active. -
Page 14: Care And Cleaning
HAVANA II Installation Instructions CARE & CLEANING NOTE: Always turn OFF the power at the mains switch before performing any maintenance or attempting to clean your fan. • Every 6 months periodic cleaning of your ceiling fan is the only maintenance required. Use a soft brush or lint free cloth to avoid scratching the paint finish. - Page 15 HAVANA II Installation Instructions LUCCI CEILING FAN WARRANTY DETAIL LUCCI FAN WARRANTY CONTACT INFORMATION: Online Warranty Form: https://www.beaconlighting.com.au/warranty-claims Email: warranty@beaconlighting.com.au Lucci Fan Warranty Hotline: (Free Call) 1800 602 243 THIS WARRANTY IS VALID IN AUSTRALIA ONLY In the event of service being required, please call the Lucci Fan Warranty Hotline on 1800 602 243 between 9am & 5pm (EST) Monday to Friday.
- Page 16 HAVANA II Installation Instructions CEILING FAN WARRANTY INFORMATION LUCCI FAN WARRANTY CONTACT INFORMATION: Online Warranty Form: https://www.beaconlighting.com.au/warranty-claims Email: warranty@beaconlighting.com.au Lucci Fan Warranty Hotline: (Free Call) 1800 602 243 Complete and retain this form for your personal records and warranty purposes.
Need help?
Do you have a question about the HAVANA II and is the answer not in the manual?
Questions and answers