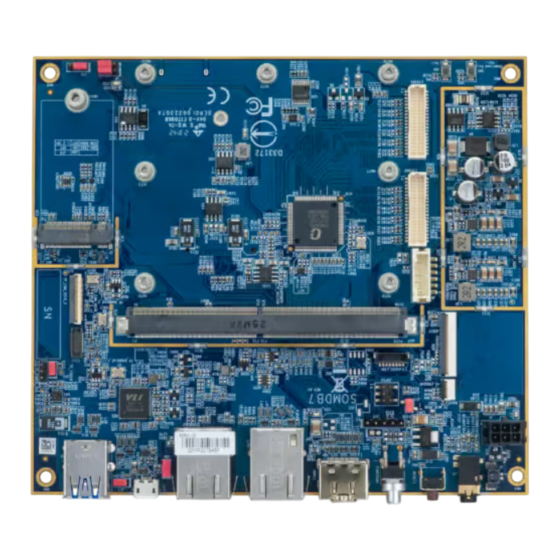
VIA Technologies SOM-5000 Quick Start Manual
Android 13.0 evk
Hide thumbs
Also See for SOM-5000:
- Quick start manual (11 pages) ,
- User manual (53 pages) ,
- Quick start manual (20 pages)
Table of Contents
Advertisement
Quick Links
Advertisement
Table of Contents

Summary of Contents for VIA Technologies SOM-5000
- Page 1 QUICK START GUIDE VIA SOM-5000 Android 13.0 EVK 1.00-13082024...
- Page 2 VIA Technologies, Inc. reserves the right the make changes to the products described in this manual at any time without prior notice.
- Page 3 VIA SOM-5000 Android 13.0 EVK Quick Start Guide Revision History Version Date Remarks 1.00 13/08/2024 Initial release...
-
Page 4: Table Of Contents
VIA SOM-5000 Android 13.0 EVK Quick Start Guide Table of Contents Introduction ..............................1 EVK Package Contents ........................... 1 1.1.1 Firmware Folder Contents ......................1 1.1.2 Document Folder Contents ......................1 1.1.3 Tool Folder Contents ........................1 Version Information and Supported Features ..................2 Image Installation ............................ -
Page 5: Introduction
The VIA SOM-5000 Evaluation Kit includes the VIA SOM-5000 module and VIA SOMDB7 reference carrier board. The VIA SOM-5000 Android 13.0 EVK is developed based on the MediaTek Android 13.0 BSP, and it enables the hardware features of the VIA SOM-5000 Evaluation Kit. -
Page 6: Version Information And Supported Features
VIA SOM-5000 Android 13.0 EVK Quick Start Guide 1.2 Version Information and Supported Features • Kernel version: 5.15.94 • Evaluation image: Android 13.0 • Development based on MediaTek Android 13.0 BSP • Supports eMMC boot • Supports HDMI 4K display and audio outputs •... -
Page 7: Image Installation
Connect the Windows 10 host machine and the VIA SOM-5000 Evaluation Kit through the Micro USB 2.0 port using a Micro USB cable. The Micro USB 2.0 port is located on the back panel of the VIA SOM-5000 Evaluation Kit. - Page 8 1 Step 6 Next, press and hold the SW2 download key located on the top layer of the VIA SOM-5000 Evaluation Kit, and plug in the AC-to-DC power adapter. The VIA SOM-5000 Evaluation Kit will automatically power on and start formatting its storage.
- Page 9 Sending 'mmc0' (32 KB) OKAY [ 0.000s] Writing 'mmc0' OKAY [ 0.078s] Finished. Total time: 0.178s Rebooting OKAY [ 0.000s] Finished. Total time: 0.000s D:\VIA_SOM-5000_Android_13.0_EVK> Step 8 Unplug the AC-to-DC power adapter to power off the VIA SOM-5000 Evaluation Kit.
- Page 10 Next, press and hold the SW2 download key, and plug in the AC-to-DC power adapter. The VIA SOM-5000 Evaluation Kit will automatically power on. Note: After powering on the VIA SOM-5000 Evaluation Kit, make sure the Windows 10 host machine detects it as an ADB device. Step 11 Messages will start printing to show that the flashing process is loading and will then pause to find the VIA SOM-5000 Evaluation Kit in bootloader mode.
- Page 11 VIA SOM-5000 Android 13.0 EVK Quick Start Guide flashing vbmeta_a=vbmeta.img < waiting for any device > Sending 'vbmeta_a' (8 KB) OKAY [ 0.002s] Writing 'vbmeta_a' OKAY [ 0.005s] Finished. Total time: 1.660s flashing vbmeta_system_a=vbmeta_system.img Sending 'vbmeta_system_a' (4 KB) OKAY [ 0.027s]...
- Page 12 Finished. Total time: 0.000s D:\VIA_SOM-5000_Android_13.0_EVK> Step 13 Unplug the AC-to-DC power adapter to power off the VIA SOM-5000 Evaluation Kit. Step 14 Unplug the Micro USB cable, press the Power Button for 2 seconds and release it to power on the VIA SOM- 5000 Evaluation Kit.
-
Page 13: Hardware Functions
Step 1 Connect the Windows 10 host machine and the VIA SOM-5000 Evaluation Kit through the "J14" debug port using the provided debug cable. The "J14" debug port is located on the front panel of the VIA SOM-5000 Evaluation Kit. -
Page 14: Changing The Kernel Debug Level
VIA SOM-5000 Android 13.0 EVK Quick Start Guide 3.2 Changing the Kernel Debug Level To disable the kernel messages, modify the debug level using the following command: console:/ # su console:/ # echo 3 > /proc/sys/kernel/printk 3.3 Checking the BSP Version To check the BSP version, navigate to "Settings >... -
Page 15: Display
If an optional CSI camera module was connected correctly to the VIA SOM-5000 Evaluation Kit before booting the VIA SOM-5000 Evaluation Kit, a "Camera" APK can be found on the Android desktop. Click to open it and test the camera functions. -
Page 16: Mtk Neuropilot Ai Apu Hardware Acceleration
We recommend running the "PoseDetector_Image.apk" sample program for testing MTK NeuroPilot AI APU hardware acceleration. To install the program, follow the steps below: 1. Copy the "PoseDetector_Image.apk" file to a USB drive and connect the USB drive to the VIA SOM-5000 Evaluation Kit. - Page 17 VIA SOM-5000 Android 13.0 EVK Quick Start Guide 4. After installation, double-click "PoseDetector" to run the program. 5. Check the Pose Detection inference time on the bottom left corner of the program: − If the inference time is less than 200ms, MTK NeuroPilot AI APU hardware acceleration is enabled and running correctly.
- Page 18 Taiwan Headquarters Japan China 1F, 531 Zhong-zheng Road, 940 Mission Court 3-15-7 Ebisu MT Bldg. 6F, Tsinghua Science Park Bldg. 7 Xindian Dist., New Taipei City 231 Fremont, CA 94539, Higashi, Shibuya-ku No. 1 Zongguancun East Road, Taiwan Tokyo 150-0011 Haidian Dist., Beijing, 100084 Japan China...


Need help?
Do you have a question about the SOM-5000 and is the answer not in the manual?
Questions and answers