Table of Contents
Advertisement
Available languages
Available languages
Quick Links
EN
|
NL
|
FR
|
DE
|
ES
|
IT
|
PL
|
SV
|
CMS 30603
|
Wireless security
camera set
PARTS DESCRIPTION /
ONDERDELENBESCHRIJVING /
EN
NL
DES PIÈCES /
DE
TEILEBESCHREIBUNG /
ES
DESCRIPCIÓN DE LAS PIEZAS /
IT
DESCRIZIONE DELLE PARTI /
PL
OPIS CZĘŚCI /
1
2
3
7
4
5
6
12
16
17
18
21
23
Technical data:
Wireless technology
Operating Frequency: 2,4Ghz
Max Radio Frequency power: 13.02dBm.
Power adaptor monitor:
Output: 12V ---- 2A
Power adaptor camera:
Output: 12V---- 1.0A
"Use only the power adaptors supplied"
Smartlife app
EN
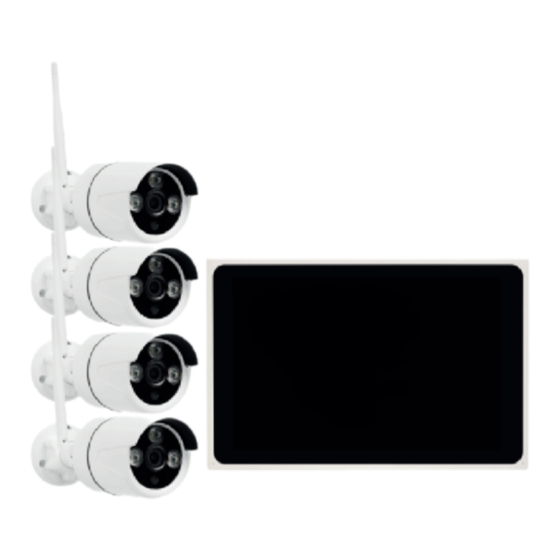
PARTS DESCRIPTION
1.
Instruction manual
2.
Gebruiksaanwijzing
3.
Mode d'emploi
4.
Bedienungsanleitung
5.
6.
Manual de usuario
7.
Manuele utente
8.
Instrukcja obsługi
9.
Bruksanvisning
10. LCD Screen
11. Power/ Indicator LED
12. On/off button for display
13. Speaker
14. Stand
15. Hard drive
16. USB slot for mouse
17. HDMI port (not for use with this model)
18. Power/network Adaptor port
19. Power/network Adaptor
20. Power port (monitor)
21. Network port (monitor)
22. Power adaptor (monitor)
DESCRIPTION
FR
23. USB mouse
24. UTP Network cable (1meter)
SV
BESKRIVNING AV DELAR
CONNECTION AND INSTALLATION
12V 1A
8
Before mounting the camera/s it is recommended
9
that you first connect the camera/s to the monitor.
Up to 8 cameras can be paired with the monitor.
This set comes with 4 pre-paired cameras, if you
wish to pair additional cameras follow the
instructions under the section "Pairing additional
cameras.
13
1.
10
2.
14
15
3.
4.
5.
12V 2A
19
22
6.
20
7.
8.
24
9.
Log in
When the monitor is powered on you will be
prompted to log in –
1.
2.
3.
4.
Instruction manual
Antenna
Infrared LED lights
Lens
Day/night sensor
Adjustable mounting bracket
Microphone
Power port (camera)
Pairing button
Power adaptor (camera)
Screw on the antenna to the camera/s.
Connect the power adaptor from the camera/s
(8) to the power port on the camera/s (7).
Plug in the camera/s to the wall socket/s.
Attach the stand at back of the monitor if
desired.
Connect the power adaptor from the monitor
(22) to the power port (20) on the power/
network adaptor (19).
Connect the UTP cable from your router to the
UTP port on the power/ network adaptor (21).
Plug in the power /network adaptor (19) to the
monitor.
Plug in the adaptor from the monitor to a wall
socket.
The device will boot automatically and is ready
for login when the login menu appears on the
monitor.
Left click with the mouse on the user name edit
box and enter the user name of the local login,
the default factory set user name is admin.
Left click with the mouse on the password edit
box with and enter your password, the default
factory-set password is admin.
Left click on "OK" with the mouse to complete
the login.
The Set-up wizard will appear.
Setup wizard
After successful login, the system will automatically
open the "Setup Wizard" interface to guide you in
creating basic settings. You can choose to keep the
default settings or change them as you desire. Edit
the details as desired and press "NEXT" or press
"SKIP" then press "OK" to keep the default settings.
The monitor will now be showing live images from
the connected cameras.
Using the camera with the Smartlife app
For live viewing or viewing the recordings from your
smart phone, download the Smartlife app.
Downloading the Smartlife app
If the app is already downloaded you can skip this
step, otherwise please download the Smartlife app
from the Apple Appstore or Google Play Store.
Optionally you can scan the "Download APP" QR
code on the monitor. If this is not shown on the
monitor click on the QR code icon on the top right
corner of your monitor screen to open the QR code
for scanning.
NOTE: The Wi-fi on your mobile phone must be
operating on the same network as the monitor.
Adding the device to the app
•
To add the device manually open the Smartlife
app and press the + icon then press "'Add
Device".
•
The app will search for nearby devices, when
"AI wireless nvr" is shown select it by pressing
the blue + icon.
•
Alternatively, you can use the QR code
scanner on the top right corner in the app and
scan the P2PID QR code on the monitor. Click
on the QR code icon in the right corner of your
monitor screen then scan the P2PID QR code.
•
When the device is successfully added it will be
shown in the app as "AI wireless nvr".
•
Follow the in-app instructions to pair the
camera-set to your smartphone
Mounting the camera/s
For the best wireless range result, is recommended
to place the monitor in the centre of the surveillance
area and avoid obstacles between the camera/s
and the monitor.
•
Determine the appropriate location to mount
the camera/s. Make sure there are no wires or
pipes in the vicinity or within the walls.
•
Determine and mark the position of the 3 fixing
holes on the mounting bracket.
•
Drill 3 holes and insert the 3 supplied plugs into
the holes.
•
Place the mounting bracket over the holes and
use the supplied screws to secure the
mounting bracket to the wall.
Recording
The default recording setting is - Motion detection
recording (EVENT).
To change the recording settings, go to Main Menu
by right clicking anywhere on the monitor screen
then click on Record mode.
Restore Default
Advertisement
Table of Contents

Related Manuals for Smartwares CMS-30603


Summary of Contents for Smartwares CMS-30603
- Page 1 Instruction manual Setup wizard After successful login, the system will automatically open the "Setup Wizard" interface to guide you in PARTS DESCRIPTION creating basic settings. You can choose to keep the default settings or change them as you desire. Edit Antenna Instruction manual the details as desired and press “NEXT”...
-
Page 2: Beschrijving Van Onderdelen
More information is available at the following internet gebruikersnaam is admin. aan de muur te bevestigen. address: www.smartwares.eu and search for Wireless Klik met de linkermuisknop op het invoerveld voor Camera Set CMS-30603 het wachtwoord en voer je wachtwoord in; het... -
Page 3: Meer Informatie
BESKRIVNING AV DELAR Klicken Sie mit der linken Maustaste auf das Meer informatie is beschikbaar op het volgende Eingabefeld für den Benutzernamen und geben internetadres: www.smartwares.eu en zoek op Sie den Benutzernamen für die lokale Wireless Camera Set CMS-30603 12V 1A Anmeldung ein;... -
Page 4: Weitere Informationen
Internetadresse: www.smartwares.eu und suchen Sie champ d'édition du nom d'utilisateur et saisissez le aufstellen und darauf achten, dass sich keine nach Wireless Camera Set CMS-30603 nom d'utilisateur de la connexion locale ; le nom Hindernisse zwischen Kamera und Monitor befinden. -
Page 5: Plus D'informations
Déterminez et marquez la position des trois à l'adresse Internet suivante : www.smartwares.eu trous de fixation sur le support de montage. et recherchez "Wireless Camera Set CMS-30603" • Percez 3 trous et insérez les 3 fiches fournies dans les trous. -
Page 6: Información Adicional
INFORMACIÓN ADICIONAL smartphone Puede obtener más información en la siguiente dirección de Internet: www.smartwares.eu y busque el Equipo de Montaje de la/s cámara/s Cámara Inalámbrica CMS-30603 Para obtener el mejor resultado del alcance inalámbrico,... - Page 7 Se si desidera, collegare il supporto al retro del • Per aggiungere il dispositivo manualmente monitor. aprire l'app Smartlife, premere l'icona + e Connettere l'adattatore di alimentazione quindi premere “Aggiungi dispositivo”. collegato al monitor (22) con la porta di • L'app cerca i dispositivi vicini;...
- Page 8 Aby zmienić ustawienia nagrywania, przejdź do Menu Sono disponibili ulteriori informazioni al seguente fabryczne to admin. Głównego, klikając prawym przyciskiem myszy w indirizzo internet: www.smartwares.eu e cercare Wireless Aby ukończyć logowanie, kliknij lewym przyciskiem dowolne miejsce na ekranie monitora, a następnie kliknij Camera Set CMS-30603 myszy „OK”.
- Page 9 Dag/natt-sensor standardinställningarna eller ändra dem efter Justerbart monteringsfäste önskemål. Redigera detaljerna efter önskemål och Mikrofon tryck på "NÄSTA" eller tryck på "HOPPA ÖVER" Strömport (kamera) och tryck sedan på "OK" för att behålla Parkopplingsknapp standardinställningarna. Bildskärmen visar nu Instruction manual Strömadapter (kamera) livebilder från anslutna kameror.
-
Page 10: Mer Information
Systemet genererar då automatiskt en slumpmässig kod. Skicka den slumpmässiga koden till leverantörens kundtjänst och begär ett nytt inloggningslösenord. MER INFORMATION Det finns mer information på följande webbadress: www.smartwares.eu och sök efter trådlös kamerauppsättning CMS-30603...
Need help?
Do you have a question about the CMS-30603 and is the answer not in the manual?
Questions and answers