Billion BiGuard S10 Quick Start Manual
Ssl vpn security gateway
Hide thumbs
Also See for BiGuard S10:
- Administration manual (182 pages) ,
- Specifications (2 pages) ,
- Product manual (20 pages)
Advertisement
Table of Contents
1
1
The BiGuard S10
LAN
12V DC
RESET
OFF ON
4
3
2
1
WAN
11
10
9
8
7
2
2
Warranty Card
Carefully unpack the BiGuard S10
and check that the following items
are included.
2.
3.
4.
1. BiGuard S10
2. Power adapter x 1
3. Warranty card x 1
4. Mounting brackets x 2
1.
5. Mounting screws x 4
6. Software CD x 1
7. Ethernet cable x 1
8. Quick Start Guide x 1
8.
7.
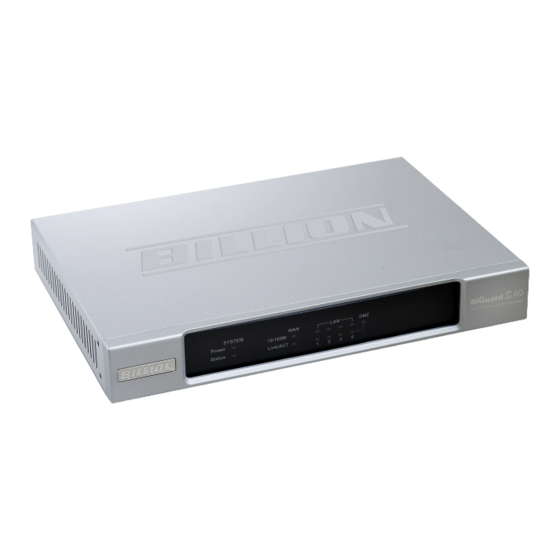
1. Power LED
2. Status LED
3. WAN 10/100 LED
4. LINK/ACT LED
12 3 4
5
6
5. LAN 1~4 LEDs
6. DMZ LED
7. ON/OFF switch
SYSTEM
WAN
LAN
DMZ
Power
10/100M
8. DC 12V connector
Status
Link/ACT
1
2
3
4
9. RESET button
10. WAN RJ-45 connector
11. LAN 1~4 RJ-45 connectors
4
3
2
1
WAN
11
10
9
NOTE:
Ensure that the BiGuard S10
is turned off before beginning
setup.
Ensure that your hardware is
powered off, including the
BiGuard S10.
Connect an RJ-45 Ethernet
cable to the WAN port on
the BiGuard S10, connect the
other end to an ADSL or cable
modem or another router.
5.
Connect switches, hubs, and
servers to the four LAN ports
on the BiGuard S10.
Connect the power adapter
cable to the DC 12V connector
on the BiGuard S10. Connect
6.
the power adapter to an
electrical outlet.
E.
Press that power switch on the
rear of the BiGuard S10. The
LEDs all blink once and then
the LAN LEDs blink in sequence
from right to left. The status
Front view
LED lightsand turns off when the
BiGuard S10 is ready for operat-
ion.
iBusiness Security Gateway
12V DC
RESET
OFF ON
You configure and manage the
8
7
BiGuard S10 with the Web Manager.
The Web Manager is a web-based
interface that you can access from any
web browser.
In the Address field of your Web
browser, type the default IP
address: 192.168.1.254.
Advertisement
Table of Contents

Related Manuals for Billion BiGuard S10


Summary of Contents for Billion BiGuard S10
- Page 1 Connect an RJ-45 Ethernet are included. cable to the WAN port on the BiGuard S10, connect the other end to an ADSL or cable 1. BiGuard S10 modem or another router. 2. Power adapter x 1 3. Warranty card x 1 Connect switches, hubs, and 4.
- Page 2 SSL VPN default group is accessible from outside your network. If you select Connect on IP Address field. Type the default user name and Before a user can access the SSL VPN, a Group user account must be set Demand, the following Idle up for them. password: Timeout field is available.
Need help?
Do you have a question about the BiGuard S10 and is the answer not in the manual?
Questions and answers