Chapters
Table of Contents

Related Manuals for German pool RHZ Series


Summary of Contents for German pool RHZ Series
- Page 1 Chimney Type Range Hood RHZ Series Online Warranty Registration RHZ-6450G / RHZ-7450G / RHZ-9450G Please read these instructions and warranty information carefully before use and keep them handy for future reference. U S E R M A N U A L...
- Page 2 請即進行保用登記! 有關保用條款細則,請看說明書最後一頁。 Please register your warranty information now ! For Warranty Terms & Conditions, please refer to the last page of this user manual.
-
Page 3: Table Of Contents
Table of Contents Warnings & Safety Precautions Product Structure Installation Instructions Operation Instructions Cleaning & Maintenance Troubleshooting Technical Specification Warranty Terms & Conditions... -
Page 4: Warnings & Safety Precautions
Unplug this product from the power source before cleaning and maintenance. • Contact German Pool authorized service technician for repair or maintenance of this product. WARNING! ELECTRIC SHOCK HAZARD! Read and follow the safety and warnings outlined in this user guide before operating this appliance. - Page 5 15. If the power supply cord is damaged, it must only be replaced by professional service technicians from German Pool Customer Service & Repair Centre. 16. Use a dedicated power outlet: the power cord must not be connected to an extension cord or multi-socket power board.
-
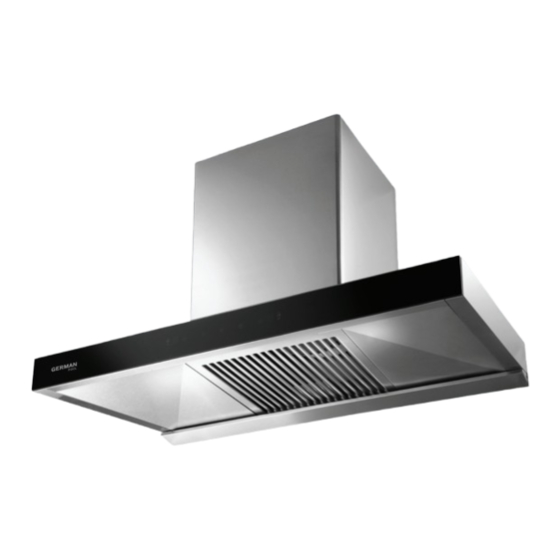
Page 6: Product Structure
Product Structure Motor Cover (not detachable) Control Panel Exhaust Air Inlet Body Lighting Accessories Check valve assembly x 1 Exhaust duct adaptor x 1 Check valve gasket x 1 Wall plate x 1 Oil cup x 1 Screw package x 1 Note: The screws and plugs are to be used in concrete or brick walls only. -
Page 7: Installation Instructions
Installation Instructions Things To Check Before Installation • To avoid the constant danger when using electrical appliance, it is important to properly install this range hood and read the safety instructions carefully to avoid misuse and danger. We recommend that you keep this instruction manual for future reference and pass it to any future owners. After unpacking the range hood, check that the range hood is intact. - Page 8 Installation Instructions Installation Steps Note: Please read the entire instructions before installing the range hood. Wall Central axis Ø170 598/698/898 Schematic diagram cutout dimensions for exhaust pipe Use five 4*10 screws to secure the wall plate onto the back of the range hood...
- Page 9 Installation Instructions Wall Induction cooker/ Countertop ceramic cooker Installation reference of range hood and cooker Installation of range hood Note: • The exhaust duct opening size illustrated in the diagram is the recommended value for cabinet or ceiling openings. It can be adjusted according to actual conditions. It is recommended to position the opening directly above the range hood exhaust outlet.
- Page 10 Installation Instructions WARNING! • This product is heavy and requires two persons for installation. • Failure to install the screws or fixing device in accordance with these instructions may result in electrical hazards. • This product can only be mounted on the wall. It is strictly prohibited to install this product directly on the kitchen cabinet.
-
Page 11: Operation Instructions
Operation Instructions Control Panel Decrease Key Display Panel Lighting Key Sensor Sensor Booster Key Increase Key Self-Cleaning On/Off Key Function • Tap this key once to turn on the product. Range hood enters standby state, all keys light up constant •... - Page 12 Operation Instructions Gesture Control Within a distance of 5cm from the front of the control panel, Wave to turn on or turn off the hood. When waving the gesture range needs to cover the entire control panel Waving from left to right: When range hood is off, waving from left to right will turn on the hood, and hood will run in gear level 1;...
-
Page 13: Cleaning & Maintenance
Cleaning & Maintenance WARNING! • Turn off the range hood and unplug the power cord before cleaning and maintenance. • Wear protective gloves during cleaning and maintenance to prevent getting cut by the metal parts. • Handle parts gently when taking them off for cleaning to avoid deformation and damage. •... -
Page 14: Troubleshooting
If user encounters problems when using this product, please check the table below to see it the problem can be solved. If problem persists, please contact German Pool Customer Service & Repair Centre. DO NOT disassemble or repair this product by yourself. -
Page 15: Technical Specification
Turn off and unplug the range Range hood runs unevenly when damaged hood immediately, and contact turned on German Pool Customer Service & Repair Centre Internal parts may be loose Turn off and unplug the range hood immediately, and contact Unusual noise during operation German Pool Customer Service &... - Page 16 目錄 警告及注意事項 產品結構 安裝說明 使用說明 清潔與保養 故障檢修 技術規格 保用條款 P.16...
-
Page 17: 警告及注意事項
警告及注意事項 警告! 使用本產品前,請仔細閱讀所有說明。 • 本產品只限家居室內日常使用,如產品作任何商業、工業、出租或其他用途,保用證即告失 效。 • 請勿讓兒童或身體有殘障、精神不健全及對本產品缺乏經驗或知識的人士單獨使用本產品;如 需使用,必須要在負責任的成年人監管下方可使用。 • 應照顧好兒童,確保他們不會玩耍本產品。 • 無成年人監管下,勿讓兒童清潔及維護本產品。 • 使用前,請先檢查所有電壓是否與本產品標籤上的電壓相符。 • 如果電源線損壞,為免發生意外,電源線必須由廠方、廠方指定的維修中心或同等合格的技術 人員進行更換。 • 清潔或檢查本產品前,必須先關機及拔掉插頭。 • 請聯繫德國寶授權的技術人員進行維修或保養本產品。 警告!觸電危險! 1. 使用本產品前必須閱讀並遵循本說明書中概述的安全守則和警告。 2. 嚴禁用濕手觸摸電源插頭、電氣元件,或操作電源開關。 3. 嚴禁改動內部接線,除非由專業維修人員進行。 4. 清潔時嚴禁讓摩打、開關、連接器等電氣元件受潮。否則可能導致死亡、觸電、火災或人身傷 害。 5. 必須監督兒童,確保他們不玩耍本產品。 重要安全說明 警告! 使用本產品時,必須採取基本的安全預防措施,包括下列內容。 1. 清潔或檢查本產品時,必須斷開電源。 2. 嚴禁損壞電源線或在電源線上放置重物。 3. 當抽油煙機與燃燒氣體或其他燃料的器具同時使用時,房間必須有足夠的通風(如房間內真空... - Page 18 警告及注意事項 11. 本產品僅適用於安裝在不超過四個爐頭元件的爐具上。 12. 有關清潔方法,請參閱本說明書中「清潔及維護」部份的說明,定期清潔本產品。 13. 如不依照指示進行清潔,會有火災危險。 14. 如由合格人員安裝本產品,必須對產品進行測試以確認操作正常,並向使用者解釋本產品的正 確使用方法。 15. 如電源線損壞,必須由德國寶客戶服務及維修中心的專業維修人員更換,以避免危險。 16. 必須使用專用的電源插座;電源線嚴禁連接到延長線或多插座拖板上。必須可靠接地,電源線 長度應為200cm。 17. 必須遵守有關空氣排放的規定。 18. 本產品採用外置排煙,空氣及煙霧經由排風管排出室外。為了正確排出空氣,請確保排風管筆 直。 19. 嚴禁清潔抽油煙機內部。如您需要清潔內部,請聯絡德國寶客戶服務及維修中心。 20. 本產品應能在下列環境條件下正常運作:溫度(15℃-40℃),相對濕度≤90%(25℃時),海 拔≤1000m。 21. 使用前必須除去所有包裝,包括保護貼等。 22. 注意:與煮食用具一起使用時,本產品的可觸及零件可能會變熱。 P.18...
-
Page 19: 產品結構
產品結構 裝飾煙通(不可拆卸) 控制面板 照明燈 吸風口 集油杯 機身 配件 出風口配件x1 排風管轉換口x1 出風口配件墊片x1 掛壁支架x1 集油杯x1 螺絲包x1 注意: 螺絲和膠塞只能用於混凝土或磚牆,其他類型的牆壁結構將需要不同的固定裝置。 P.19... -
Page 20: 安裝說明
安裝說明 安裝前注意事項 • 為避免在使用時存在危險,請務必正確安裝此抽油煙機,並仔細閱讀安全說明,以避免誤操作 和危險,請保留此說明書以備將來參考,並將其傳遞給任何使用者。 • 檢查包裝,並確保列出了所有零件。 • 打開抽油煙機包裝後,請檢查抽油煙機是否完好無損。如有疑問,請勿使用該設備。 • 如果本產品包含玻璃,請小心安裝或搬運,以免造成人身傷害或產品損壞。 • 請確定適合安裝產品的位置。 • 在本設備上的規格銘牌顯示所有訂購更換零件所需的識別資訊。 • 如果您出售、送贈或丟棄本設備,請確保將本說明書交到新使用者,以便熟悉本設備及其安全 警告。 安裝工具 十字螺絲批 水平尺 拉尺 電鑽 電鑽頭 鉛筆 絕緣膠帶 (Ø8mm) 安裝方法 注意: 安裝抽油煙機前必須先閱讀完整安裝說明。 牆壁 中心軸 Ø170 598/698/898 排風管開孔尺寸圖 P.20... - Page 21 安裝說明 用5個4x10螺絲將掛壁支架 固定在抽油煙機背面 牆壁 電磁/電陶爐 枱面 抽油煙機與爐具安裝示意圖 抽油煙機安裝圖 P.21...
- Page 22 安裝說明 注意: • 圖中所示排風管開孔尺寸為在廚櫃或天花開孔的建議值,可按實際情況調整,建議開孔位置位 於抽油煙機排風口的正上方。 • 抽油煙機兩側與廚櫃之間的間隙距離建議預留尺寸≥10mm。 • 圖中所示的抽油煙機與電磁/電陶爐之間的距離僅適用於電爐,若將抽油煙機安裝在燃氣爐具 上方,則抽油煙機的安裝高度必須參照該燃氣爐具的安裝要求而定。 • 安裝尺寸圖及抽油煙機與爐具安裝示意圖上的尺寸僅供參考。 警告! • 本產品較重,必須由兩人進行安裝。 • 不按照說明安裝螺絲或固定裝置可能會導致電氣危險。 • 本產品僅可掛牆安裝,嚴禁將本產品直接安裝在廚櫃上。 安裝位置 1. 室內必須保持良好通風,無易燃、易爆、腐蝕性物品。 2. 安裝抽油煙機的牆壁必須有足夠的強度和平坦的表面。 3. 在牆壁上鑽孔時,必須遠離水、電、燃氣管道,以免發生觸電或燃氣洩漏等危險。 安裝掛壁支架及抽油煙機 1. 按照掛壁支架的安裝位置,將掛壁支架水平放在牆壁上,畫出鑽孔位置記號,嚴禁左右傾斜。 2. 用直徑Ø8的鑽頭在牆上記號鑽4個55mm深的孔,鑽孔時如孔徑過大,嚴禁使用,以免膨脹螺絲 鬆動而導致墜落。將膨脹螺絲安裝到牆壁的孔中。 3. 用5顆4x10的螺絲把掛壁支架固定在抽油煙機背面。必須確保抽油煙機與掛壁支架緊固貼合, 無晃動或鬆脫。 4. 用4顆木螺絲將掛壁支架連抽油煙機緊固在牆壁已預先開好的4個直徑Ø8的孔上。 安裝集油杯 將集油杯沿著機身底部的集油杯卡槽推入,直至完全裝入整個集油杯。 安裝出風口配件及接駁排風管 1. 在抽油煙機頂部的出風口,用8顆M4*20螺絲將出風口配件及墊片擰緊。...
-
Page 23: 使用說明
使用說明 減鍵 顯示屏 照明鍵 感應器 感應器 超頻模式鍵 加鍵 電熱除油鍵 開關鍵 按鍵 說明 • 按鍵1次開機,抽油煙機進入待機模式,所有按鍵常亮 開關鍵 • 產品運行期間按鍵1次進入3分鐘倒數關機功能;在3分鐘倒數關機功能 結束前,再按1次直接關機,所有按鍵熄滅 • 每次按鍵提升風速檔位1級,運行時顯示屏輪流顯示實時轉速及風速檔 加鍵 位 • 最高風速檔位為8檔 • 每次按鍵減低風速檔位1級,運行時顯示屏輪流顯示實時轉速及風速檔 減鍵 位 • 最低風速檔位為1檔 • 按鍵開啟或關閉照明燈 照明鍵 • 長按此鍵3秒進行時間設置 • 長按此鍵3秒啟動電熱除油清潔功能,進入11分鐘倒數,前10分鐘為加 電熱除油鍵 熱溶解機內油污,最後1分鐘為摩打運行排走油污 • 電熱除油清潔期間再按1次「電熱除油鍵」可退出電熱除油清潔功能 • 按鍵啟動超頻模式,抽油煙機以最高風速運行,自動進行3分鐘倒數,... -
Page 24: 清潔與保養
清潔與保養 警告! • 清潔及保養前,必須開機及拔除電源插頭。 • 清潔及保養時必須戴上橡膠手套,以免被金屬零件割傷。 • 清潔及保養時所取下的零件必須輕放,以免變形或損壞。 • 按使用頻率和廚環環境,定期對抽油煙機進行清潔及保養。 清潔主機 1. 每當使用抽油煙機後,應用軟布擦拭主機表面。 2. 為保護主機表面塗層,擦拭時請使用中性清潔劑和軟布,嚴禁使用牙膏、洗刷等鬃毛刷。 3. 嚴禁使用汽油、酒精等腐蝕性化學試劑或牙膏、洗碗精、洗衣粉等具有研磨功能的清潔劑擦拭 產品表面。 清潔集油杯 雙手水平握住集油杯向外拉,即可將集油杯取下。當集油杯內存油達到一定量時必須及時清洗,以 防溢出。 清潔葉輪 1. 清洗葉輪時必須特別小心。嚴禁碰撞或丟棄葉片上的夾具,以免葉輪轉動時平衡變差,造成機 身震動與異響。 2. 建議每三個月清潔一次葉輪。 P.24... -
Page 25: 故障檢修
故障檢修 警告! 每當本產品出現問題時,請檢查是否可以按照下表解決問題。如果問題仍然存在,請聯繫德國寶客 戶服務及維修中心,嚴禁私自拆卸維修。 故障情況 可能原因 解決方法 電源插頭未插入或連接不正確 正確插入電源插頭 電源插座無電供應 恢復供電或聯絡專業電工維修 產品無法接通電源 電源未連接或保險絲熔斷 恢復供電或聯絡專業電工維修 恢復供電,檢查是否使用正確 電源未連接或電壓不正確 電壓 產品不運作 開機後未選擇風速檔位 按「風速鍵」選擇風速檔位 未有開啟照明燈 按「照明鍵」開啟照明燈 照明燈不運作 聯絡德國寶客戶服務及維修中心 照明燈燒壞 更換照明燈 重新安裝抽油煙機,並確保安 主機未牢固地安裝在牆壁上 裝穩妥 聯絡德國寶客戶服務及維修中心 摩打損壞 更換摩打 產品異常震動 聯絡德國寶客戶服務及維修中心 扇葉損壞 更換扇葉 螺帽鬆動 擰緊螺帽 使用抽油煙機時門窗打開太大或 根據需要打開或關閉門窗以確保 完全關閉... -
Page 26: 技術規格
技術規格 RHZ-6450G RHZ-7450G RHZ-9450G 型號 220-240 V~ 50 Hz 220-240 V~ 50 Hz 220-240 V~ 50 Hz 電壓/頻率 220 W ± 10% 220 W ± 10% 220 W ± 10% 功率(最大) 照明燈 1,220 RPM 1,220 RPM 1,220 RPM 摩打轉速 1,000m³/h 1,000m³/h 1,000m³/h 排風量... -
Page 27: Warranty Terms & Conditions
保用條款 Warranty Terms & Conditions Under normal operations, the product will gurantee a 1-year full 此保用提供德國寶產品之機件在正常使用下壹年保 warranty provided by German Pool (effective from the date of purchase). 用(自購買日起計算)。 This warranty is not valid until customer registration information is *貴戶須在購機十天內,以下列其中一種方式向本公司 received by our Service Centre within 10 days of purchase via 登記資料,保用手續方正式生效﹕... - Page 28 German Pool (Hong Kong) Limited HONG K ONG TOP BRAND TEN YEAR ACHIEVEMENT AWARD © All rights reserved. Copying, reproducing or using the contents of this manual is not allowed without prior authorization from German Pool, violators will be prosecuted. www.germanpool.com RHZ Series-M-24(1)
Need help?
Do you have a question about the RHZ Series and is the answer not in the manual?
Questions and answers