Chapters
Table of Contents

Related Manuals for German pool RDC-7356-SC


Summary of Contents for German pool RDC-7356-SC
- Page 1 RDC-7356-SC Chimney Type Range Hood RDC-7457-SC Online Warranty Registration Please read these instructions and warranty information carefully before use and keep them handy for future reference. U S E R M A N U A L...
-
Page 2: Table Of Contents
Table of Contents Warnings & Safety Instructions Product Structure Installation Instructions Operation Instructions Operation Instructions: Smart Connect Care and Maintenance Troubleshooting Recycling and Disposal Technical Specification Warranty Terms & Conditions... -
Page 3: Warnings & Safety Instructions
Warnings & Safety Instructions For safety purpose, you should read the instructions carefully before using the appliance for the first time. Save the instructions for future reference. The appliance is designed for domestic use and may only be installed and operated in accordance with these instructions for use. Warning: •... - Page 4 Warnings & Safety Instructions • Please dispose of the packing material carefully. • Do not use flammable sprays in close vicinity to the appliance. • We recommend that great care be taken during use and cleaning. Read the cleaning and maintenance sections for this appliance carefully.
-
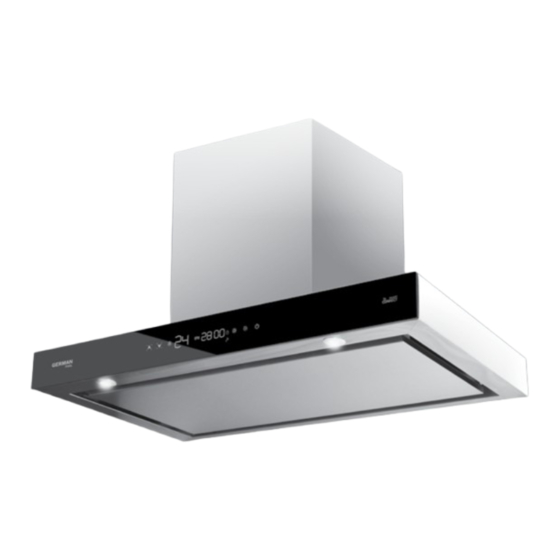
Page 5: Product Structure
Product Structure 1. Motor cover (Optional) 2. Control panel 3. Body 4. LED Light 5. Rectification plate (oil collector inside) -
Page 6: Installation Instructions
Installation Instructions Things to check before installation • To avoid the constant danger when using electrical appliance, it is important to properly install this range hood and read the safety instructions carefully to avoid misuse and danger. We recommend that you keep this instruction manual for future reference and pass it to any future owners. - Page 7 Installation Instructions Installation Steps Type of installation: Ducted option; Failure to install the screws or fixing device in accordance with these instructions may result in electrical hazards. Mark on the wall the hole positions as shown in diagram (pic 2); The wall plugs supplied are suitable for solid walls only.
- Page 8 Installation Instructions Before use Switch on the appliance at the switched fused connection unit. The appliance is ready for use.
-
Page 9: Operation Instructions
Operation Instructions Touch Control Panel ICON DESCRIPTION Gear-Up / Gear-Down Key Press key once to gear up or gear down 1 level. Booster Key Press to enter Turbo Boost Mode, Gear Display shows “hf” and product will start a 3-minute countdown. After 3 minutes, range hood will return to the gear level set prior to entering Turbo Boost Mode. -
Page 10: Operation Instructions: Smart Connect
Operation Instructions: Smart Connect RDC-SC range hoods are part of our Smart Connect Home Appliance Series. This range hood can be used independently on its own, or paired with our Smart Connect cooktops to achieve the unsurpassed user convenience Smart Connect technology can bring. Scan this QR code for the latest information on our Smart Connect Home Appliance Series: Note: This range hood can only be paired with cooktops that have “Smart Connect”... - Page 11 Operation Instructions: Smart Connect Step 3: Turn On Your Cooktop Long-press On/Off Key of the The left cook hob display panel will left cook hob for 3 seconds to turn show “- - - -”. on the product. Cooktop buzzer will beep once.
- Page 12 Operation Instructions: Smart Connect Step 6: Pairing Sequence Completed lights up constant in red When Smart Connect indicator on range hood changes from blue to red and lights up constant, it means pairing sequence is completed. Gentle Reminder: Smart Connect indicator on range hood remains blinking in blue, please repeat steps 4-6. Step 7: Exit Pairing After pairing sequence is successful, The left cook hob display panel...
- Page 13 Operation Instructions: Smart Connect Quick Guide For Pairing Step Related Products Induction Cooktop Range Hood 1 Induction Cooktop Range Hood Step Display Display No display Blinks in blue 2 Blinks in blue 3 - - - - Blinks in blue 4...
- Page 14 Operation Instructions: Smart Connect Smart Connect Function Operation Note: • When Smart Connect function is activated, both cook hobs will simultaneously activate Smart Connect function. Likewise, when Smart Connect function is deactivated, both cook hobs will simultaneously exit Smart Connect. •...
- Page 15 Operation Instructions: Smart Connect Deactivate Smart Connect Function When Smart Connect is activated, pressing any key (except from the Lighting Key) on the range hood or if user issues any command by Gesture Control, product will deactivate Smart Connect, and Smart Connect Indicator Light on the range hood will turn from red to blue: 1.
-
Page 16: Care And Maintenance
Care & Maintenance Cleaning of Oil Cup To avoid fire, please clean the oil cup thoroughly every month or every time after using the self-cleaning function. To do this, remove the oil cup and soak it in hot water and detergent for an hour. If using a dishwasher, do not exceed 65°C. -
Page 17: Recycling And Disposal
Technical Specification Model RDC-7356-SC RDC-7457-SC Voltage / Frequency 220 - 240 V ~50 / 60 Hz 220 - 240 V ~50 / 60 Hz... - Page 18 目錄 警告及注意事項 產品結構 安裝說明 使用說明 使用說明:智能同步 清潔與維護 故障檢修 回收和處理 技術規格 保用條款 P.18...
-
Page 19: 警告及注意事項
警告及注意事項 為安全起見,初次使用產品前請先細閱本說明書,並保存說明書,以便作參考之用。本產品 只供家居使用。請必須依照本說明書內的指示安裝及操作。 警告: • 所有安裝工作必須由合格人員或合格的電工來執行。 • 必須嚴格按照製造商的說明,由具有適當資格的人員正確安裝本設備。 • 本設備符合所有當前的安全規例,但製造商必須強調,此合規性不能防止設備表面在使用過程 中發熱並在運行過程中保持高溫。 • 在使用過程中,易觸及部件可能會變熱,幼兒應遠離,並應小心避免觸摸設備。 • 製造商強烈建議將本設備放在嬰兒和小孩接觸不到的地方。 • 如果對本產品進行安全監督或指導並瞭解其危害,則可以由8歲以上的兒童以及肢體、感覺或 精神能力較弱或缺乏經驗和知識的人員使用本產品。兒童不得玩耍本產品,除非8歲以上的兒 童並在有成人監督的情況下,否則兒童不得進行清潔和維護。 • 請將本產品及其電源線放在8歲以下兒童觸摸不到的地方。 • 定期檢查電源插頭和電源線是否損壞。如果電源線損壞,則必須由製造商、其服務代理商或具 有類似資格的人員進行更換,以免發生危險或傷害。 • 請勿使電源線接觸設備的高溫部件。 • 確保電源線沒有被夾在設備下面或內部,並避免損壞電源電纜。 • 請勿將本設備安裝在潮濕的地方或容易漏水的地方,例如水槽下方或附近。萬一漏水,請讓機 器自然乾燥。 警告: • 未按照這些說明安裝螺絲或固定裝置可能會導致電氣危險。 • 同時運行抽油煙機和帶電的設備時,房間內的負壓不得超過4Pa。 • 請妥善處理包裝材料。 • 請勿在設備附近使用易燃噴霧劑。 •... - Page 20 警告及注意事項 警告: • 有關煙氣出口的資訊,請參閱當地法例。請勿將通風櫃連接至通風或熱風管道。請與地方當局 確認房間通風是否適當,並確保房間中設備的最大抽氣流量不超過4 Pa。如果將抽油煙機與以 天然氣或其他燃料運行的器具同時使用,則房間必須有足夠的通風,不得將空氣排放到用於排 出燃燒氣體或其他燃料的煙道中。必須遵守有關抽氣的規定。 • 連接抽油煙機之前,請關閉電源,並檢查提供的電壓和頻率是否與設備銘牌上指示的電壓和頻 率一致。 • 在靜電釋放(例如閃電)期間,通風櫃可能會停止工作。此安全無損壞風險。請關閉抽油煙機 的電源,一分鐘後重新連接。 • 為避免火災危險,請定期清潔金屬過濾網,並密切觀察和調節盛有熱油的鍋具。 • 如果抽油煙機有損壞或瑕疵,請不要使用,並聯絡客戶服務中心。 • 禁止在本設備下方進行火焰狀烹飪。 • 安裝設備時,請確保遵守以下規定,爐具頂部與抽油煙機底部之間的距離為:燃氣 爐:750mm;電爐:650mm。 • 對於因誤用或錯誤安裝本設備而造成的人身或財產損失,製造商不承擔任何責任。 • 關於安裝方面的資訊,請參閱本手冊的以下段落。 警告: • 如果不按照指示進行清潔,則有觸電和火災的危險。 P.20...
-
Page 21: 產品結構
產品結構 1. 裝飾煙通(另購) 2. 操作面板 3. 機身 4. LED照明燈 5. 整流板(內附集油杯) P.21... -
Page 22: 安裝說明
安裝說明 安裝前注意事項 • 為避免在使用時存在危險,請務必正確安裝此抽油煙機,並仔細閱讀安全說明,以避免誤操作 和危險,請保留此說明書以備將來參考,並將其傳遞給任何使用者。 • 檢查包裝,並確保列出了所有零件。 • 打開抽油煙機包裝後,請檢查抽油煙機是否完好無損。如有疑問,請勿使用該設備。 • 如果本產品包含玻璃,請小心安裝或搬運,以免造成人身傷害或產品損壞。 • 請確定適合安裝產品的位置。 • 在本設備上的規格銘牌顯示所有訂購更換零件所需的識別資訊。 • 如果您出售、送贈或丟棄本設備,請確保將本說明書交到新使用者,以便熟悉本設備及其安全 警告。 安裝工具 1. 十字螺絲批 2. 水平尺 3. 拉尺 4. 電鑽 5. 電鑽頭(Ø8mm) 6. 鉛筆 7. 絕緣膠帶 8. 轉接器(Ø150mm轉Ø120mm)及M4*8螺絲2顆 P.22... - Page 23 安裝說明 安裝步驟 只能選擇外排出風方式;未按照這些說明安裝螺絲或固定裝置可能會導致電氣危險。 在牆上標記孔的位置(如圖2);隨附的牆壁插頭僅適用於實心牆壁。當固定在任何其他類型 的牆壁上時,請使用合適的替代固定裝置。 爐具頂部與抽油煙機底部之間的距離為:燃氣爐:750mm;電爐:650mm。(如圖3) 在牆上標記好的位置鑽孔,並固定四個螺絲,螺絲頭離牆壁的距離保持2mm左右。(如圖4) 在掛好抽油煙機後,鎖緊內部2顆安全螺絲。(如圖5) 打開抽油煙機擋板,安裝油杯。(如圖6) 用膠帶或卡箍固定102,125mm或152mm的排風管(如有需要可使用Ø150mm轉120mm轉接器)。 (如圖7) 如果有選配裝飾管,將其放在抽油煙機頂部。(如圖8) 去除機身所有保護膜後,安裝完成。(如圖9) Unit: mm Unit: mm 抽煙管隱藏在廚櫃內 抽煙管非隱藏在廚櫃內 >150 600-1170 600-1170 (Electric Hob) (Electric Hob) (Gas Hob) (Gas Hob) Unit: mm P.23...
- Page 24 安裝說明 使用前注意事項 在帶開關的保險絲連接器上啟動設備,當設備已準備就緒即可以開始使用。 P.24...
-
Page 25: 使用說明
使用說明 控制面板 按鍵 說明 風速增 / 減鍵 每次按鍵,風速檔位提升1級或降低1級。 超頻模式鍵 按鍵後摩打進入Turbo Boost超頻模式,風速檔位顯示「hf」,並進行3分鐘倒計時,計時結束後回 復之前的檔位。 風速檔位顯示 • 顯示實時風速檔位。 • 使用Turbo Boost超頻模式時顯示「hf」。 RPM轉速實時顯示 / 倒數顯示 • 顯示實時RPM轉速。 • 使用Turbo Boost超頻模式或3分鐘延時關機時,關機倒計時和轉速將交替顯示。(注:當延時關 機指示燈熄滅時,抽油煙機直接關閉。) 延時關機指示燈 • 熄滅代表3分鐘延時關機功能關閉。 • 紅色常亮代表3分鐘延時關機功能啟用中。 • 在待機狀態下,長按電源鍵5秒開啟或關閉3分鐘延時關機功能。 智能同步指示燈 • 熄滅代表未使用或已取消「智能同步」功能。 • 紅色常亮代表處於「智能同步」功能中。 • 藍色常亮代表已退出「智能同步」功能。 照明鍵... -
Page 26: 使用說明:智能同步
使用說明:智能同步 本產品為Smart Connect系列抽油煙機,配備「智能同步」功能,除獨立使用之外,亦 可與同樣配備「智能同步」功能的Smart Connect系列爐具進行連接,貴客可隨時加購 或升級Smart Connect系列爐具或抽油煙機,以使用「智能同步」功能。有關最新的 Smart Connect系列產品資訊,請掃描右方二維碼。 注意: 本抽油煙機只可與配備「智能同步」功能之Smart Connect系列爐具進行連接,其他沒有「智能同 步」功能的爐具一概不能與本抽油煙機進行連接及同步。 與爐具對頻 初次使用「智能同步」功能時,抽油煙機必須先與電磁爐進行對頻: 注意: • 對頻只在初次使用「智能同步」功能時進行,或更換新的配備「智能同步」功能的爐具或抽油 煙機時才需要重新對頻;當成功對頻後,往後使用「智能同步」功能時,無需再次進行對頻。 • 對頻操作必須在抽油煙機及爐具均在待機狀態(即已連接電源而沒有任何操作的情況)下方能 進行。如抽油煙機或爐具正在操作中,將無法進行對頻。 步驟1:連接電源 將有「智能同步」功能的電磁爐及 抽油煙機連接電源。 步驟2:啟動抽油煙機「智能同步」 藍色閃爍 同步長按抽油煙機 「照明鍵」 抽油煙機蜂鳴器發出提示聲響一 和 「電源鍵」2-3秒。 聲,抽油煙機顯示屏上的 「智能同步指示燈」以藍色閃爍。 P.26... - Page 27 使用說明:智能同步 步驟3:開啟電磁爐 長按左邊電磁爐頭 「電源鍵」 左邊電磁爐頭顯示屏顯示「----」。 3秒開機,電磁爐蜂鳴器發出提示 聲響一聲。 步驟4:啟動電磁爐「智能同步」 長按左邊電磁爐頭 「定時/抽油 左邊電磁爐頭顯示屏顯示「CH--」。 煙機連接鍵」3秒,電磁爐蜂鳴器 發出提示聲響一聲。 步驟5:進行對頻 短按左邊電磁爐頭 「鎖定鍵」1秒 左邊電磁爐頭顯示屏顯示「A--A」。 進入對頻模式。 溫馨提示(顯示屏出現 LoC 的情況): 如左邊電磁爐頭顯示屏出現 LoC,代表你按 「鎖定鍵」時間過長而錯 誤啟動童鎖,再長按 「鎖定鍵」3-5秒取消童鎖,然後重覆第5步驟繼 續進行對頻。 P.27...
- Page 28 使用說明:智能同步 步驟6:對頻完成 紅色常亮 當抽油煙機顯示屏上的 「智能 同步指示燈」由藍色變成紅色常 亮,表示對頻成功。 溫馨提示: 如 「智能同步指示燈」維持藍色,請重覆第4-6步驟進行對頻。 步驟7:退出對頻 對頻成功後,短按左邊電磁爐頭 左邊電磁爐頭顯示屏顯示「CH--」 「鎖定鍵」1秒退出對頻。 ,表示「智能同步功能」已啟動。 溫馨提示: 對頻需在3分鐘內完成,如抽油煙機在 「智能同步指示燈」閃爍3分鐘內未接收到對頻訊號,將 自動退出對頻狀態,必須由第2步驟開始重新進行對頻。 P.28...
- Page 29 使用說明:智能同步 簡易對頻快速指南 相關產品 電磁爐 抽油煙機 步驟 1 步驟 對頻程序按鍵 電磁爐顯示 抽油煙機顥示 沒有顯示 2 以藍色閃爍 3 - - - - 以藍色閃爍 4 C H - - 以藍色閃爍 5 & 6 A - - A 以紅色常亮 以紅色常亮 C H - - 代表對頻完成 代表對頻完成...
- Page 30 使用說明:智能同步 「智能同步」功能操作 注意: • 「智能同步」功能為整機同步,左右爐頭將同時進入或同時退出「智能同步」功能。 • 在「智能同步」功能下關閉電磁爐,重啟電磁爐後將自動進入「智能同步」功能;在非「智能 同步」功能下關閉電磁爐,重啟電磁爐後不會進入「智能同步」功能,需手動進入「智能同 步」功能。 • 電磁爐頭上必須放置合適的導磁鍋具(鍋內必須有水),電磁爐頭方會啟動。 在「智能同步」功能下,抽油煙機檔位會按照電磁爐加熱檔位自動進行調整: 減 加 減 加 減弱 加強 爐具檔位(左右爐頭檔位雙加) 抽油煙機檔位 9-10 11-12 當電磁爐關機或加熱檔位調節為0檔時,抽油煙機將自動於3分鐘後關機(如抽油煙機延時關機 功能 關閉時,則抽油煙機將即時關機)。 P.30...
- Page 31 使用說明:智能同步 手動操作抽油煙機(退出「智能同步」功能) 在「智能同步」功能下,如果對抽油煙機進行任何按鍵(開關照明燈除外)或使用Gesture Control 手勢操控,將退出「智能同步」功能,此時抽油煙機顯示屏上的 「智能同步指示燈」由紅色變成 藍色常亮: 1.調整風速 2.自動電熱 3.強制關機 除油 4.關機 •在抽油煙機運作期間,按抽油煙機 「風速增/減鍵」或 「超頻模 1.調整風速 式鍵」調整風速後,須按抽油煙機 「電源鍵」重新進入「智能同步」功 能。 •按抽油煙機 「自動電熱除油」鍵,如完成整個自動電熱除油過程後,抽 油煙機將自動重新進入「智能同步」功能,抽油煙機 「智能同步指示燈」 2.自動電熱除油 由藍色變成紅色常亮。 •自動電熱除油期間,如再按抽油煙機 「自動電熱除油鍵」取消此功能, 須按抽油煙機 「電源鍵」重新進入「智能同步」功能。 •在任何情況下,長按抽油煙機 「電源鍵」3秒或從右往左揮手,抽油煙機 3.強制關機 將即時關機,須按抽油煙機 「電源鍵」或從左至右揮手,重新進入「智 能同步」功能。 •在延時關機功能啟用中( 延時關機指示燈以紅色常亮),按抽油煙機 「電源鍵」關機,等待3分鐘後關機或再按抽油煙機 「電源鍵」直接關機 後,抽油煙機將自動重新進入「智能同步」功能,抽油煙機 「智能同步...
-
Page 32: 清潔與維護
清潔與維護 清洗集油杯 為避免起火,每月或每次使用電熱除油功能後,請徹底清潔集油杯。卸下集油杯後,以熱水和清潔 劑浸泡一小時。如果使用洗碗機清潔,清洗溫度請勿高於65℃。 1. 用十字螺絲刀逆時針旋轉擰鬆螺絲後,將抽油煙機擋板往下拉。(如圖1) 2. 將集油杯輕輕往外拉,取出集油杯。(如圖2) 警告: 如每天使用抽油煙機2小時以上,請增加集油杯清潔/更換頻率,並始終使用原裝集油杯。 P.32... -
Page 33: 故障檢修
故障檢修 故障現象 原因分析 處理方法 設備未正確安裝在支架上 取下設備並檢查其是否正確固定 過度振動 風扇葉片已損壞 關閉設備,聯絡客戶服務中心 風扇摩打未牢固固定 風扇葉片被卡住 燈亮但摩打不運作 摩打損壞 燈泡損壞 燈和摩打不運作 電源連接不穩固 檢查電源 速度檔位可能太低 選擇更高的速度檔位 抽油煙機與爐頭之間的距離太大 重新調整距離至: 燃氣爐:750mm 抽吸性能低 電爐:650mm 頂部通風孔可能被阻塞 清除任何障礙物 可選的排氣套件可能會扭曲 確保所選排氣套件符合製造商的說明 回收和處理 廢棄電子產品不應與生活垃圾一起處理,請向地方當局或零售商諮詢 有關回收的建議。 產品或其包裝上的符號表示該產品不能作為普通家庭垃圾處理,該產 品必須移交給電氣和電子設備收集點以進行回收。 在確保正確處理本產品時,您將避免由於不正確處理本產品而對環境 和公眾健康造成的負面影響。要獲取有關此產品回收的更詳細資訊, 請與政府、廢物處理服務或購買該產品的商店聯繫。 P.33... -
Page 34: 技術規格
技術規格 RDC-7356-SC RDC-7457-SC 型號 電壓 / 頻率 220 - 240 V ~50 / 60 Hz 220 - 240 V ~50 / 60 Hz 303 W 303 W 功率 (最大) 1.5W*2 1.5W*2 照明燈 摩打轉速 Max. 2,800 RPM Max. 2,800 RPM 排風量... -
Page 35: Warranty Terms & Conditions
- the serial number is modified, damaged or removed from the product. - 機身編號被擅自塗改、破壞或刪除。 4. German Pool will, at its discretion, repair or replace any defective part. 4. 總代理有權選擇維修或更換配件或其損壞部份。 5. This warranty will be void if there is any transfer of 5. - Page 36 Fax:+853 2875 2661 HONG KONG TOP BRAND TEN YEAR ACHIEVEMENT AWARD © All rights reserved. Copying, reproducing or using the contents of this manual is not allowed without prior authorization from German Pool, violators will be prosecuted. www.germanpool.com RDC-SC-M-22(2) P.36...
Need help?
Do you have a question about the RDC-7356-SC and is the answer not in the manual?
Questions and answers