
Related Manuals for Electrolux UH500


Summary of Contents for Electrolux UH500
- Page 1 EWE351QX-W4 EWE451QB-W4 EWE381QX-G4 EWE361QX-W3 EWE451QX-W4 EWE361QB-W4 EWE481QX-G4 EWE361QB-G7 EWE601QX1G4 EWE241QX-W4 UH500 ELECTRIC WATER HEATER INSTALLATION GUIDE & USER MANUAL...
-
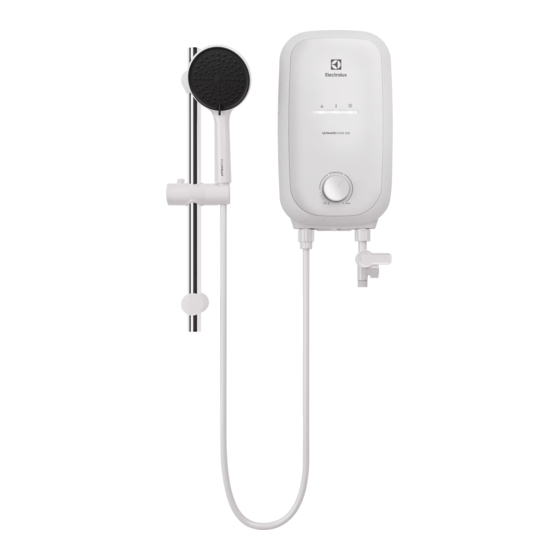
Page 2: Parts Identification
1. PARTS IDENTIFICATION Main Product 1. ELCB (Earth Leakage Circuit Breaker) Indicator 2. Power/heater Indicator 3. Earth Indicator 4. Temperature knob* 5. Water outlet 6. Water inlet 7. 3 in 1 Stop Valve 8. Stop Valve Lever 9. Built-in-Filter 10. Test button 11. -
Page 3: Safety Information
2. SAFETY INFORMATION Distinct change in performance. Products manufactured by Electrolux are safe Water leakage from inside. provided they are installed, used and maintained in good working order in... - Page 4 2. SAFETY INFORMATION(Continued) Before using the Electric Water Heater, it is The built-in ELCB (Earth Leakage Circuit advisable to test and adjust the water Breaker) will automatically cut off the power temperature according to your preference. supply in case of current leakage over 15mA. During lightning or thunderstorms, switch off the The thermostat will automatically cut off the power supply to the Electric Water Heater in...
-
Page 5: Installation
3. INSTALLATION 3.1 Product Mounting 5. Use a 6mm diameter drill bit and make the wall plug holes with a depth of 34mm for 1. Select a suitable position in the bathroom. mounting the Electric Water Heater. Note: The bottom of the water heater should 6. - Page 6 3. INSTALLATION(Continued) Select a suitable position for the slider rail Fix the Slider Rail by tightening screw B on Rail shower set then mark 2 screws point (1 on top Bracket, then reinstall the caps as shown and 1 on bottom). It is recommended that the below.
- Page 7 3. INSTALLATION(Continued) Select a suitable position for the slider rail Press the Slider Rail into the Rail Bracket Base shower set then mark 4 screw points (2 on top and reinstall the Rail Bracket Cover. and 2 on bottom). It is recommended that the Top Rail Bracket position at a height of 1950mm to the floor and Bottom Rail Bracket 1300mm to the floor.
- Page 8 3. INSTALLATION(Continued) Install rail shower head, hand shower head, 3.3 Plumbing Procedure and connect PVC hose to the water inlet of the CAUTION! Selector Valve as shown below: This Electric Water Heater is a single-point system, and the “Water Outlet” can only be fitted to the Hose and Hand shower set provided.
- Page 9 3. INSTALLATION(Continued) IMPORTANT! 1. Lead the power cable from MCB to an “ON/OFF’’ double-pole switch having a For Pump Models, it is highly recommended to contact separation of at least 3mm in all poles connect the Water Inlet Connection to a outside the bathroom, then lead a cable to the storage supply tank;...
- Page 10 3. INSTALLATION(Continued) 3. Connect the mains cable to the Terminal b. Ensure Earth wire connection is properly Block as follows: fixed If earth light still does not light up, please BROWN or RED --LIVE (L) contact electrician to check household earth BLUE or BLACK --NEUTRAL (N) connection.
-
Page 11: Usage Instruction
ELCB (Earth Leakage Circuit Breaker) having problem during performing testing. If any issue occurs, turn off the mains supply and turn it on again. If the issue persists, contact local Electrolux Service or authorized service technicians. - Page 12 4. USAGE INSTRUCTION(Continued) Temperature Control Pump feature (For model with pump feature only) Turn on the Temperature control knob to ‘ON’, the 3 LED indicators "Earth," "Power/Heater," Basic Pump Function and "ELCB" will light up amber, and the outlet Turn on the Pump Control Knob to increase the water will become warmer within a few water flow rate when necessary.
-
Page 13: Maintenance
Turn off the water supply before removing the Circuit Breaker) Test Button, switch OFF the filter. mains supply and contact Electrolux Consumer Clean the Mesh Filter regularly to prevent Care Centre for repair service. Special skill is blockage. Remove the Built-in Filter by turning its required for repairing. -
Page 14: Wiring Diagram
6. WIRING DIAGRAM UH500 series with ELCB (Earth Leakage Circuit UH500 series with ELCB (Earth Leakage Circuit Breaker), no display, no pump models Breaker), no display, with pump models UH500 series with ELCB (Earth Leakage Circuit UH500 series with ELCB (Earth Leakage Circuit... -
Page 15: Consumer Care
WE’RE THINKING OF YOU Thank you for purchasing an Electrolux Office Fax : (+60 3) 7955 5511 appliance. You’ve chosen a product that Consumer Care Center Address: Lot C6, No. brings with it decades of professional 28, Jalan 15/22, Taman Perindustrian Tiong experience and innovation. - Page 16 www.electrolux.com/shop...
Need help?
Do you have a question about the UH500 and is the answer not in the manual?
Questions and answers
Where is the bottun to swuich off the power after the shower? (Product: Water Heater UltimateHome 500 Series)