Table of Contents
Advertisement
Quick Links
Advertisement
Table of Contents

Related Manuals for LifeSize Team 200


Summary of Contents for LifeSize Team 200
- Page 1 ® LifeSize Team 200 Installation Guide...
- Page 2 LifeSize Communications. Trademark Acknowledgments LifeSize® is the trademark of LifeSize Communications Inc. All other trademarks are the property of their respective owners. Patent Notice For patents covering LifeSize®...
-
Page 3: Preparing For Installation
Preparing for Installation As you prepare to install LifeSize Team 200, consider the physical conditions of the room, compatibility with displays and your network configuration and settings. LifeSize recommends you collect your network settings and system identification information before you begin installation. -
Page 4: Supported Display Types And Resolutions
Supported Display Types and Resolutions LifeSize video communications systems connect to HD displays (720p minimum), including: • Plasma flat panel displays • CRT monitors (720p displays) • Large screen rear projection TV displays (720p displays) • Front projection displays •... -
Page 5: Placement Behind A Firewall
Poor audio and video quality may result from insufficient bandwidth on your network. LifeSize recommends that your network be capable of at least 1 Mb/s for a high definition video call. During video calls with lower bandwidths, LifeSize systems automatically select the best resolution that can be achieved with the available bandwidth. -
Page 6: Initial Configuration
Initial Configuration During the installation process, your LifeSize system prompts you to configure it for the first time. LifeSize recommends that you gather all the necessary information prior to installation. The following sections provide guidelines for collecting and a means of recording this data. - Page 7 VoIP uses H.323 or SIP, Touch Tone uses PSTN. The default is VoIP. When placing a call using the Voice button on a LifeSize Phone connected to the system and voice dialing is set to touch tone, you can only dial phone numbers using PSTN connectivity.
- Page 8 Network Settings By default, DHCP is enabled on LifeSize systems. If you choose Disabled for the DHCP preference, you must enter an IP address (the locally configured IP address if not assigned by a DHCP server), Subnet Mask (used to partition the IP address into a network and host identifier), and Default Gateway (the IP address of the default gateway the system uses).
- Page 9 Video Call Audio Output and Voice Call Audio Output preferences are set to Line Out. If you are using LifeSize Phone for audio, set these preferences to Phone. By default, Video Call Audio Output is set to Line Out; Voice Call Audio Output is set to Phone.
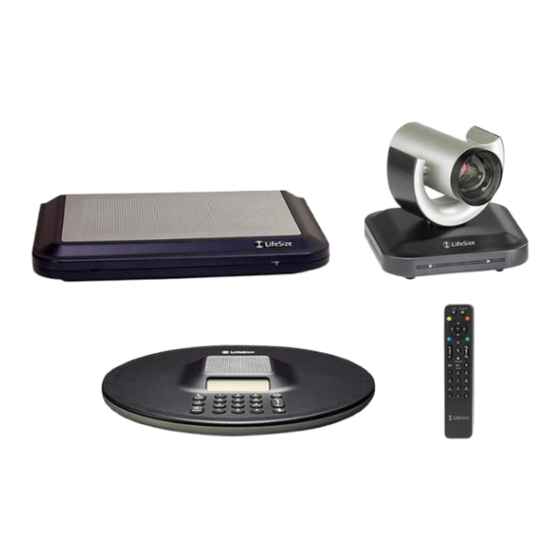
- Page 10 • Standard 2.9 M (9.5 ft) cable, optional 7.5 M (24.6 ft) or 15 M (49.2 ft) cables • LifeSize Team 200 Codec—high definition audio and video compression and decompression unit with stand • LifeSize Remote Control—wireless remote control including three AAA batteries •...
- Page 11 3. To connect to a LifeSize Camera or LifeSize Focus, insert the camera cable into the port on the rear side of the camera and plug the opposite end into the port marked with the camera symbol on the back panel of the codec.
- Page 12 Configure your system using the LifeSize video communications system interface. b. If you are using the LifeSize MicPod for audio, insert the end of the cable from the LifeSize MicPod into the microphone port marked with the microphone symbol the back of the codec.
-
Page 13: Connecting A Pstn Phone Line
The LifeSize system starts and illuminates a blue LED on the front of the codec. See “Status Icons” on page 20 for more information about the state of the system as it boots or as conditions change. -
Page 14: Configuring A Second Display
If you use a VGA projector as Display 2, navigate to Administrator Preferences : Appearance : Displays and choose Display 2 Resolution. Configure its resolution to 1280 x 768 to match the default HD configuration of Display 1. LifeSize Team 200 Installation Guide... -
Page 15: Optional Peripherals
For devices and PCs with VGA output, LifeSize includes a DVI-A to VGA cable. Audio In (Line In) 1 For use with an external line level audio input, in addition to the LifeSize Phone or LifeSize MicPod. Audio In (Line In) 2 Networker For use with LifeSize Networker. -
Page 16: Verifying Your Installation
If you connect the male end of the splitter directly to the codec, you can use none, or one extension cable to connect a LifeSize MicPod to each of the female ends of the splitter. If you use one extension cord to connect the codec to the splitter, you can use none, or one extension cable to connect a LifeSize MicPod to each of the female ends of the splitter. -
Page 17: Troubleshooting Installation Issues
If your display shows the initial configuration screen but the image is distorted and unusable or the display is blank, you must configure the display from the LifeSize Phone. Refer to “Configuring Display Output from LifeSize Phone” on page 18. -
Page 18: Configuring Display Output From Lifesize Phone
Configuring Display Output from LifeSize Phone If the initial configuration screen appears distorted and unusable or the attached display is blank, you must configure your display from the administrator interface on the LifeSize Phone. To resolve problems with monitors from the LifeSize Phone interface, follow these steps: 1. -
Page 19: Camera Issues
Administrator) Preferences : Diagnostics : High Definition Camera. Attached Video Input Device Not Working When you connect a video input device that has capabilities not supported by a LifeSize system, the status Out of range appears on the System Information page for that input. -
Page 20: Status Icons
This red indicator warns that the system temperature has exceeded the maximum allowed operating temperature and will automatically reboot in approximately 10 seconds unless the temperature decreases immediately to an allowed temperature. LifeSize Team 200 Installation Guide...
Need help?
Do you have a question about the Team 200 and is the answer not in the manual?
Questions and answers