Advertisement
CSA-DECOR3 Series
Shade Motor Bracket Installation and Motor Programming
The Crestron® CSA-DECOR3 Series with CSA-DECOR3-BRKT shade
mounting brackets allow Crestron shades to be mounted on a wall,
pocket, or window jamb. The adjustable mounting brackets allow
adjustments to the shade installation without removing the mounting
brackets from the wall. A QMT® shade motor provides precise and
reliable control of the shade.
Shade Mounting
The supplied brackets mount to the wall or window jamb. The roller
shade assembly and end caps then attach to the brackets.
CAUTIONS:
There is risk of personal injury and equipment damage if the
l
shade or associated parts fall during mounting. Use care when
mounting. Use proper mounting hardware for the mounting
surface (for example, screws or bolts) when securing the
brackets to the surface.
Two or more people are required to properly mount the shades.
l
Three or more people are required to properly mount large
shades and medium-sized coupled shades.
NOTES:
The screws provided with the mounting brackets are intended for
l
use on walls (or jambs) with wood or metal blocking. These
screws should not be used for hollow drywall or masonry
installations. It is the responsibility of the installer to make sure
that the mounting method used is secure.
Ensure that all mounting brackets are level and on the same
l
plane.
All shades must be aligned along a single axis (no off-angle
l
positioning).
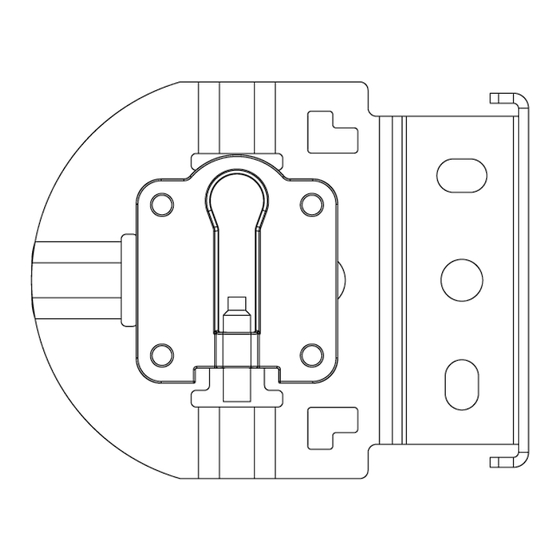
Swap the Idler and Motor Ends
The roller shade assembly can be mounted so that the idler and motor
ends are located in the ends of the tube opposite where they were when
received from the factory (i.e., the idler end is on the left and the motor
end is on the right). When the idler bracket is mounted, the keyhole in
the idler bracket must be parallel with the wall; the head of the
adjustment screw must face down. Rotate the keyhole so that it is in the
correct vertical orientation. Refer to the illustrations below for details.
Swapping the hardware requires a Phillips screwdriver.
Left-Side Idler Bracket Wall Mount
Right-Side Idler Bracket Wall Mount
1
Advertisement
Table of Contents

Related Manuals for Crestron CSA-DECOR3 Series


Summary of Contents for Crestron CSA-DECOR3 Series
- Page 1 Shade Motor Bracket Installation and Motor Programming The Crestron® CSA-DECOR3 Series with CSA-DECOR3-BRKT shade All shades must be aligned along a single axis (no off-angle mounting brackets allow Crestron shades to be mounted on a wall, positioning). pocket, or window jamb. The adjustable mounting brackets allow adjustments to the shade installation without removing the mounting brackets from the wall.
- Page 2 Quick Start CSA-DECOR3 Series Shade Motor Bracket Installation and Motor Programming Left- or Right-Side Idler Bracket Ceiling or Header Mount Rotate the Keyhole When the idler bracket is mounted, the keyhole in the idler mount must be vertical and the head of the adjustment screw must face up. Rotate the keyhole so that it is in the correct vertical orientation.
-
Page 3: Mount The Brackets
Quick Start CSA-DECOR3 Series Shade Motor Bracket Installation and Motor Programming 3. Secure the idler mount with the screws removed in step 1. NOTE: End caps are used only when the shade is outside mounted is used. If inside mounted, end caps are not required unless the shade brackets protrude from the window opening. - Page 4 Quick Start CSA-DECOR3 Series Shade Motor Bracket Installation and Motor Programming Without Endcaps Without Endcaps (Inside Frame) With Endcaps (Inside Frame)
- Page 5 Quick Start CSA-DECOR3 Series Shade Motor Bracket Installation and Motor Programming Outside Mount 3. Mount the brackets to the outside of the window frame (outside mount) or the inside of the window frame (inside mount). Use hardware that is appropriate for the mounting surface. Make sure the brackets are level and mounted to a flat surface.
- Page 6 Quick Start CSA-DECOR3 Series Shade Motor Bracket Installation and Motor Programming Inside Mount Attach the Rear Covers Attach the rear covers to the inside of each bracket. 1. Place the cover on the inside of the bracket and insert the cover pins...
- Page 7 Quick Start CSA-DECOR3 Series Shade Motor Bracket Installation and Motor Programming Mount the Roller Shade Assembly 2. Move the cover so that the pins slide to the thinner groove of the bracket slots and the cover clicks into place. Mount the roller shade assembly to the mounting brackets.
- Page 8 Quick Start CSA-DECOR3 Series Shade Motor Bracket Installation and Motor Programming Level and Center the Shade Assembly 4. Push the tab on the motor end of the shade assembly into the motor slot of the motor bracket. When the shade is properly seated, the...
-
Page 9: Motor Wiring
Quick Start CSA-DECOR3 Series Shade Motor Bracket Installation and Motor Programming A foreign object is stuck to the shade fabric (for example tape, bugs, dust, etc.). Motor Wiring To prevent telescoping: Make sure there are no obstructions near the window area that the... -
Page 10: Making The Connections
Quick Start CSA-DECOR3 Series Shade Motor Bracket Installation and Motor Programming Making the Connections Cresnet QMT® Shade Motor with the Power and Control Coming from Separate Sources NOTES: When making the connections, do not use CRESNET-HP cable with the small connector. When using CRESNET-HP cable, replace the connector on the motor pigtail with the larger connector that is supplied with the shade. -
Page 11: Motor Programming
Controls and Indicators The Crestron QMT® shade motors have UP, SET, and DN (down) push buttons that are used to program the shade. The shade motors have a multicolor LED that lights red, amber, green, blue, or white to provide confirmation, operating mode, and error state feedback. -
Page 12: Wireless Communications
The shade fabric contacts the mounting brackets or building Wireless Communications materials. The device connects to the Crestron network using the Cresnet® wired The shade fabric telescopes. communications protocol. A CEN-GWEXER or CENI-GWEXER, CEN- 4. - Page 13 NOTE: A device can be acquired by only one gateway. White LED Communications Status 1. Put the gateway into Acquire mode from the unit itself, Crestron Turns on The device is communicating with the control system. Home® Setup app, or from Crestron Toolbox.
-
Page 14: Troubleshooting
CSA-DECOR3 Series Shade Motor Bracket Installation and Motor Programming Error State Crestron QMT shade motors display error codes using the red LED on Troubleshooting the interface. The LED flashes a pattern to indicate the error. Use the following sections to view corrective actions for possible issues NOTE: The error code does not flash while the motor is in a sleep and error states. - Page 15 Development Tools License Agreement. Crestron product operating system software is licensed to Crestron dealers, CSPs, and end-users under a separate End-User License Agreement. Both of these Agreements can be found on the Crestron website at www.crestron.com/legal/software_license_agreement. The product warranty can be found at www.crestron.com/warranty.
Need help?
Do you have a question about the CSA-DECOR3 Series and is the answer not in the manual?
Questions and answers