HIKVISION DS-K1T502 Series User Manual
Access control terminal
Hide thumbs
Also See for DS-K1T502 Series:
- User manual (106 pages) ,
- Quick start manual (12 pages) ,
- Instructions (5 pages)
Table of Contents
Advertisement
Quick Links
Advertisement
Table of Contents

Related Manuals for HIKVISION DS-K1T502 Series


Summary of Contents for HIKVISION DS-K1T502 Series
- Page 1 DS-K1T502 Series Access Control Terminal User Manual...
- Page 2 ● Products described in this Document, which may include licenses obtained from third parties. Any part of the Document, including text, pictures, graphics, etc., belongs to Hikvision. No part ● of this Document may be excerpted, copied, translated, or modified in whole or in part by any means without written permission.
- Page 3 LOSS OF DOCUMENTATION, WHETHER BASED ON BREACH OF CONTRACT, TORT (INCLUDING NEGLIGENCE), PRODUCT LIABILITY, OR OTHERWISE, IN CONNECTION WITH THE USE OF THE PRODUCT, EVEN IF HIKVISION HAS BEEN ADVISED OF THE POSSIBILITY OF SUCH DAMAGES OR LOSS. YOU ACKNOWLEDGE THAT THE NATURE OF THE INTERNET PROVIDES FOR INHERENT SECURITY ●...
- Page 4 DS-K1T502 Series Access Control Terminal User Manual Symbol Conventions The symbols that may be found in this document are defined as follows. Symbol Description Indicates a hazardous situation which, if not avoided, will or could Danger result in death or serious injury.
- Page 5 DS-K1T502 Series Access Control Terminal User Manual Regulatory Information FCC Information Please take attention that changes or modification not expressly approved by the party responsible for compliance could void the user’s authority to operate the equipment. FCC compliance: This equipment has been tested and found to comply with the limits for a Class B digital device, pursuant to part 15 of the FCC Rules.
- Page 6 DS-K1T502 Series Access Control Terminal User Manual EU Conformity Statement This product and - if applicable - the supplied accessories too are marked with "CE" and comply therefore with the applicable harmonized European standards listed under the EMC Directive 2014/30/EU, the RoHS Directive 2011/65/EU 2012/19/EU (WEEE directive): Products marked with this symbol cannot be disposed of as unsorted municipal waste in the European Union.
- Page 7 DS-K1T502 Series Access Control Terminal User Manual rayonnée équivalente (p.i.r.e.) ne dépasse pas l'intensité nécessaire à l'établissement d'une communication satisfaisante. This equipment should be installed and operated with a minimum distance 20cm between the radiator and your body. Cet équipement doit être installé et utilisé à une distance minimale de 20 cm entre le radiateur et...
- Page 8 DS-K1T502 Series Access Control Terminal User Manual Safety Instruction These instructions are intended to ensure that user can use the product correctly to avoid danger or property loss. The precaution measure is divided into Dangers and Cautions: Dangers: Neglecting any of the warnings may cause serious injury or death.
- Page 9 Improper use or replacement of the battery may result in hazard of explosion. Replace with the ● same or equivalent type only. Dispose of used batteries according to the instructions provided by the battery manufacturer. You can view the device License via the website: http://opensource.hikvision.com/Home/List? ● id=46. viii...
- Page 10 DS-K1T502 Series Access Control Terminal User Manual Available Models The access control terminal contains the following models: Product Name Model Wireless Access Control Terminal DS-K1T502DBWX-C 13.56 MHz Card Presenting Frequency, Wi-Fi, 2.4G,Bluetooth DS-K1T502DBFWX-C 13.56 MHz Card Presenting Frequency, Wi-Fi, 2.4G,Bluetooth DS-K1T502DBFWX 13.56 MHz Card Presenting...
-
Page 11: Table Of Contents
DS-K1T502 Series Access Control Terminal User Manual Contents Chapter 1 Overview ........................1 1.1 Overview ..........................1 1.2 Features ..........................1 1.3 Appearance Description ......................1 Chapter 2 Installation ......................... 4 2.1 Installation Environment ......................4 2.2 Install without Gang Box ......................4 Chapter 3 Device Wiring ...................... - Page 12 DS-K1T502 Series Access Control Terminal User Manual 7.4.2 View Online Help Document ..................20 7.5 Logout ..........................20 7.6 Quick Operation via Web Browser ..................20 7.6.1 Set Security Question ....................20 7.6.2 Select Language ......................20 7.6.3 Time Settings ....................... 21 7.6.4 Privacy Settings ......................
- Page 13 DS-K1T502 Series Access Control Terminal User Manual 7.10.2 View Device Information via PC Web ................ 45 7.10.3 Set Time ........................45 7.10.4 Set DST ........................46 7.10.5 Change Administrator's Password ................47 7.10.6 Account Security Settings via PC Web ............... 47 7.10.7 Online Users ......................
- Page 14 DS-K1T502 Series Access Control Terminal User Manual 8.5 Configuration ........................68 8.5.1 View Device Information ..................... 68 8.5.2 Time Settings ....................... 68 8.5.3 Set DST ........................69 8.5.4 User Management ...................... 69 8.5.5 Network ........................70 8.5.6 User Management ...................... 72 8.5.7 Event Search ........................
-
Page 15: Chapter 1 Overview
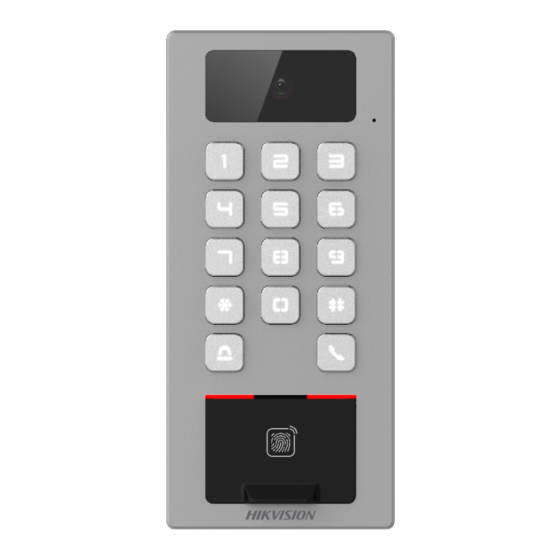
DS-K1T502 Series Access Control Terminal User Manual Chapter 1 Overview 1.1 Overview Access control terminal is a kind of access control terminal for authentication. It supports two-way audio, remote live view, picture capture, video recording through NVR, and so on. - Page 16 DS-K1T502 Series Access Control Terminal User Manual Note The pictures here are for reference only. Table 1-1 Appearance Description Description Loudspeaker Camera (Supported by parts of Device Models) Fingerprint Module (Supported by parts of Device Models) Card Presenting Area Tamper...
- Page 17 DS-K1T502 Series Access Control Terminal User Manual Description Wiring Terminal Debugging Port (For debugging only)
-
Page 18: Chapter 2 Installation
DS-K1T502 Series Access Control Terminal User Manual Chapter 2 Installation 2.1 Installation Environment Install the device at least 2 meters away from the light, and at least 3 meters away from the ● window or the door. Make sure the environment illumination is more than 100 Lux. - Page 19 DS-K1T502 Series Access Control Terminal User Manual Figure 2-1 Secure Mounting Plate 2. Route the cable through the cable hole of the mounting plate, and connect to corresponding external devices' cables. 3. Apply Silicone sealant among the joints between the device rear panel and the wall (except the...
- Page 20 DS-K1T502 Series Access Control Terminal User Manual Figure 2-2 Apply Silicone Sealant on the Side 4. Align the device with the mounting plate, and secure the device on the mounting plate with 1 supplied screw (SC-KM3X6-T10-SUS).
- Page 21 DS-K1T502 Series Access Control Terminal User Manual Figure 2-3 Secure Device...
-
Page 22: Chapter 3 Device Wiring
DS-K1T502 Series Access Control Terminal User Manual Chapter 3 Device Wiring 3.1 Terminal Description The terminals contains power input, alarm input, alarm output, RS-485, Wiegand output, and door lock. The terminal's diagram is as follows: Figure 3-1 Terminal Diagram The descriptions of the terminals are as follows:... -
Page 23: External Device Wiring
DS-K1T502 Series Access Control Terminal User Manual Group Function Color Name Description Group D Door Lock White/Purple Lock Wiring (NC) White/Yellow Common White/Red Lock Wiring (NO) Yellow/Green SENSOR Door Contact Black Ground Yellow/Gray Exit Door Wiring 3.2 External Device Wiring Wire the external device. -
Page 24: Wire Secure Door Control Unit
DS-K1T502 Series Access Control Terminal User Manual Figure 3-2 External Device Wiring 3.3 Wire Secure Door Control Unit You can connect the terminal with the secure door control unit. The wiring diagram is as follows. - Page 25 DS-K1T502 Series Access Control Terminal User Manual Figure 3-3 Secure Door Control Unit Wiring Note The secure door control unit should connect to an external power supply separately. The ● suggested external power supply is 12V, 0.5A. For scenarios with high safety requirement, use the secure door control unit wiring first.
-
Page 26: Chapter 4 Activation
DS-K1T502 Series Access Control Terminal User Manual Chapter 4 Activation You should activate the device before the first login. After powering on the device, the system will switch to Device Activation page. Activation via the device, SADP tool and the client software are supported. -
Page 27: Activate Via Web Browser
Get the SADP software from the supplied disk or the official website http:// ● www.hikvision.com/en/ , and install the SADP according to the prompts. The device and the PC that runs the SADP tool should be within the same subnet. -
Page 28: Activate Device Via Ivms-4200 Client Software
DS-K1T502 Series Access Control Terminal User Manual 2. Find and select your device in online device list. 3. Input new password (admin password) and confirm the password. Caution STRONG PASSWORD RECOMMENDED-We highly recommend you create a strong password of your own choosing (using a minimum of 8 characters, including upper case letters, lower case letters, numbers, and special characters) in order to increase the security of your product. - Page 29 DS-K1T502 Series Access Control Terminal User Manual Steps Note This function should be supported by the device. 1. Enter the Device Management page. 2. Click on the right of Device Management and select Device. 3. Click Online Device to show the online device area.
-
Page 30: Chapter 5 Identity Authentication
DS-K1T502 Series Access Control Terminal User Manual Chapter 5 Identity Authentication After network configuration, system parameters configuration and user configuration, you can go back to the initial page for identity authentication. The system will authenticate person according to the configured authentication mode. - Page 31 DS-K1T502 Series Access Control Terminal User Manual Note The card can be normal IC card, or encrypted card. ● If the QR Code Scanning function is enabled, you can put the QR code in front of the device ● camera to authenticate via QR code.
-
Page 32: Chapter 6 Call And Video Intercom
DS-K1T502 Series Access Control Terminal User Manual Chapter 6 Call and Video Intercom Set the SIP server IP, calling and video intercom between devices are available. Set Device A as SIP server, and set Device A's IP as SIP server IP. For details, see . All other devices that need to call each other should be registered to the server. -
Page 33: Chapter 7 Operation Via Web Browser
Answer the security questions. E-mail Verification 1. Export the QR code and send it to pw_recovery@hikvision.com as attachment. 2. You will receive a verification code within 5 minutes in your reserved email. 3. Enter the verification code into the verification code field to verify your identification. -
Page 34: Help
Answer the security questions. E-mail Verification 1. Export the QR code and send it to pw_recovery@hikvision.com as attachment. 2. You will receive a verification code within 5 minutes in your reserved email. 3. Enter the verification code into the verification code field to verify your identification. -
Page 35: Time Settings
DS-K1T502 Series Access Control Terminal User Manual Click in the top right of the web page to enter the Device Language Settings page. You can select a language for the device system from the drop-down list. By default, the system language is English. -
Page 36: And System Network
DS-K1T502 Series Access Control Terminal User Manual 7.6.5 No. and System Network Steps 1. Click in the top right of the web page to enter the wizard page. After previous settings, you can click Next to enter the No. and Network System Network settings page. -
Page 37: Person Management
DS-K1T502 Series Access Control Terminal User Manual Main Station IP Enter the main station’s IP address that used for communication. Private Server IP Refers to the SIP server IP. Enter the main station’s IP address that used for communication. At this time the main station is used as a SIP server. Other intercom devices should registered to this server address to realize communication. -
Page 38: Access Control Management
DS-K1T502 Series Access Control Terminal User Manual Click Add Fingerprint, and press your finger on the fingerprint module of the device to add your fingerprint. Click Save to save the settings. Add PIN Before configuring passwords, it is necessary to clarify whether the password is a device-set personal PIN or a platform-applied personal PIN. - Page 39 DS-K1T502 Series Access Control Terminal User Manual Figure 7-1 Overview Page Function Descriptions: Door Status Click to view the device live view. Set the volume when starting live view. Note If you adjust the volume when starting two-way audio, you may hear a repeated sounds.
-
Page 40: Search Event
DS-K1T502 Series Access Control Terminal User Manual You can view the event Employee ID, Name, Card No., Event Type, Time, and Operation. You can also click View More to enter the search conditions, including the event type, employee ID, the name, the card No., the start time, and the end time, and click Search. -
Page 41: Door Parameter Configuration
DS-K1T502 Series Access Control Terminal User Manual 7.8.3 Door Parameter Configuration Configure parameters for unlocking doors. Set Door Name Create door name. Click Access Control → Parameter Settings → Door Parameters to enter the settings page. Set Door Name and click Save. - Page 42 DS-K1T502 Series Access Control Terminal User Manual Set Exit Button via PC Web Set the exit button as remain open or remain closed according to the actual wiring method. Click Access Control → Parameter Settings → Door Parameters to enter the settings page.
- Page 43 DS-K1T502 Series Access Control Terminal User Manual Click Save. Note Duress code and super password can’t be duplicated, usually consisting of 4 to 8 digits. Set Dismiss Code via PC Web The administrator or specified person can enter the dismiss code to dismiss the alarm.
-
Page 44: Authentication Settings
DS-K1T502 Series Access Control Terminal User Manual 7.8.4 Authentication Settings Figure 7-3 Authentication Settings Select Main or Sub Card Reader via PC Web Set the terminal for person authentication. - Page 45 DS-K1T502 Series Access Control Terminal User Manual Click Access Control → Parameter Settings → Authentication Settings to enter the settings page. Select the terminal as main or sub card reader. Set other parameters and click Save. View Terminal Type and Model via PC Web You can view terminal type and model.
- Page 46 DS-K1T502 Series Access Control Terminal User Manual Set Authentication Interval via PC Web You can set the authentication interval of the same person when authenticating. The same person can only authenticate once in the configured interval. A second authentication will be failed. If other person authenticate in the configured interval, the person can authenticate again.
- Page 47 DS-K1T502 Series Access Control Terminal User Manual If the device support QR code recognition, you can enable QR Code and the device can read the QR code converted from the card No. Click Save. Set Communication with Controller Every via PC Web You can set communication with controller every of sub card reader.
-
Page 48: Card Settings
DS-K1T502 Series Access Control Terminal User Manual Note You should add the device to mobile App before operation. 7.8.5 Card Settings Figure 7-4 Card Settings Enable/Disable NFC Protection via PC Web After enabling, the device can read NFC card. Click Access Control → Parameter Settings → Card Settings to enter the settings page. - Page 49 DS-K1T502 Series Access Control Terminal User Manual Enable/Disable M1 Card via Web Client After enabling, the device can recognize M1 card and users can swipe M1 card via the device. Click Access Control → Parameter Settings → Card Settings to enter the settings page.
-
Page 50: Linkage Settings
DS-K1T502 Series Access Control Terminal User Manual After enabling, the device can read FeliCa card. Click Access Control → Parameter Settings → Card Settings to enter the settings page. Enable Enable FeliCa Card. Click Save. After enabling, the device can read FeliCa card. -
Page 51: Set Working Mode Via Pc Web
DS-K1T502 Series Access Control Terminal User Manual Figure 7-5 Linkage Settings 2. Click + . 3. Set event source. Select the linkage type as Event Linkage, Card Linkage or Link Employee ID. - Select Linkage Type as Event Linkage, you can select event types according to your actual needs. -
Page 52: Set Remote Verification
DS-K1T502 Series Access Control Terminal User Manual Click Access Control → Parameter Settings → Terminal Parameters to enter the settings page. Working Mode You can set the working mode as access control mode or permission free mode. Access Control Mode The access control mode is the device normal mode. -
Page 53: Privacy Settings
DS-K1T502 Series Access Control Terminal User Manual 7.8.9 Privacy Settings Figure 7-6 Privacy Settings Set Event Storage Type via PC Web Browser You can configure the event storage type. Click Access Control → Parameter Settings → Privacy Settings to enter the settings page. - Page 54 DS-K1T502 Series Access Control Terminal User Manual The earliest 5% events will be deleted when the system detects the stored events has been over 95% of the full space. Click Save. Set Picture Uploading and Storage Parameters Set picture uploading and storage parameters.
-
Page 55: Video Intercom Settings
DS-K1T502 Series Access Control Terminal User Manual 7.9 Video Intercom Settings 7.9.1 Device Management You can view the device No., type, IP, serial No., model, version, floor No., room No., No., arming status, user name, network status and operation. You can also add indoor station and sub door station on the device management page, and manage, upgrade or delete devices. - Page 56 DS-K1T502 Series Access Control Terminal User Manual The device can be used as a door station or outer door station. Select a device type from the drop-down list. Note If you change the device type, you should reboot the device.
-
Page 57: Configure Video Intercom Network Parameters Via Web Browser
DS-K1T502 Series Access Control Terminal User Manual 7.9.3 Configure Video Intercom Network Parameters via Web Browser You can set the registration password, main station IP and private server IP, and you can enable protocol 1.0 according to your actual needs. -
Page 58: Set Press Button To Call Via Pc Web
DS-K1T502 Series Access Control Terminal User Manual Figure 7-9 Call Settings Max. Communication Time The Maximum communication time when the main station and the other devices are in the call. When the communication time exceeds the configured time, the communication will stop. The Max. -
Page 59: System Configuration
DS-K1T502 Series Access Control Terminal User Manual 2. Click Add, and enter Room No. and SIP1 phone number. 3. Optional: Click Add to add the SIP number or click to delete the number. 4. ClickSave. 5. Optional: You can click Delete to delete room number and its SIP number. -
Page 60: Set Dst
DS-K1T502 Series Access Control Terminal User Manual Click System and Maintenance → System Configuration → System → System Settings → Time Settings . Figure 7-12 Time Settings Click Save to save the settings after the configuration. Time Zone Select the device located time zone from the drop-down list. -
Page 61: Change Administrator's Password
DS-K1T502 Series Access Control Terminal User Manual 7.10.5 Change Administrator's Password Steps 1. Click System and Maintenance → System Configuration → System → User Management → User Management . 2. Click 3. Enter the old password and create a new password. -
Page 62: Network Settings
DS-K1T502 Series Access Control Terminal User Manual Go to System and Maintenance → System Configuration → System → User Management → Arming/Disarming Information . You can view the device arming/disarming information. Click Refresh to refresh the page. 7.10.9 Network Settings Set Basic Network Parameters Click System and Maintenance →... - Page 63 DS-K1T502 Series Access Control Terminal User Manual If uncheck the function, you should set the IPv4 address, IPv4 subnet mask, IPv4 default gateway, IPv6 mode, IPv6 address, IPv6 subnet prefix length, IPv6 default gateway, Mac address, and MTU. If you check the function, the system will allocate the IPv4 address, IPv4 subnet mask, the IPv4 default gateway, IPv6 mode, IPv6 address, IPv6 subnet prefix length, and IPv6 default gateway automatically.
- Page 64 DS-K1T502 Series Access Control Terminal User Manual 4. Optional: Set the WLAN parameters. 1) Set the IP address, subnet mask, and default gateway. Or enable DHCP and the system will allocate the IP address, subnet mask, and default gateway automatically.
- Page 65 DS-K1T502 Series Access Control Terminal User Manual Set ISUP Parameters via PC Web Set the ISUP parameters for accessing device via ISUP protocol. Steps Note The function should be supported by the device. 1. Click System and Maintenance → System Configuration → Network → Device Access → ISUP .
- Page 66 DS-K1T502 Series Access Control Terminal User Manual Bluetooth Settings You can enable bluetooth function. Click Configuration → Network → Network Settings → Bluetooth . Open Enable Open to enable the bluetooth function. Device Name You can edit the device name connected to the bluetooth.
- Page 67 DS-K1T502 Series Access Control Terminal User Manual Figure 7-15 VoIP Account Settings Registration Password Enter the registration password for communication via SIP server. The registration password for the SIP server is configured usually in the main station’s SIP settings. Server IP Address Enter the main station’s IP address that used for VoIP communication.
-
Page 68: Set Video And Audio Parameters Via Pc Web
DS-K1T502 Series Access Control Terminal User Manual 7.10.10 Set Video and Audio Parameters via PC Web Configure Video Parameters via Web Browser You can set quality, resolution and other parameters of device camera. Click System and Maintenance → System Configuration → Video/Audio → Video to enter the settings page. -
Page 69: Image Parameters Settings
DS-K1T502 Series Access Control Terminal User Manual 7.10.11 Image Parameters Settings Figure 7-17 Display Settings... - Page 70 DS-K1T502 Series Access Control Terminal User Manual Set Brightness/Contrast/Saturation/Sharpness via PC Web You can set picture information such as brightness, contrast, saturation and sharpness of live view page. Click System and Maintenance → System Configuration → Image → Display Settings to enter the settings page.
-
Page 71: Set Event Detection Via Pc Web
DS-K1T502 Series Access Control Terminal User Manual 7.10.12 Set Event Detection via PC Web After setting the motion detection event, if there is moving objects trigger the rule, the device will report to the platform. Click System and Maintenance → System Configuration → Event → Event Detection. -
Page 72: Alarm Settings Via Pc Web
DS-K1T502 Series Access Control Terminal User Manual 7.10.13 Alarm Settings via PC Web Set the alarm output parameters. Steps 1. Click System and Maintenance → System Configuration → Event → Alarm Settings → Alarm Output . 2. Set Alarm Name and mode of Alarm Duration. - Page 73 DS-K1T502 Series Access Control Terminal User Manual Select a peripheral from the drop-down list according the actual situation. You can select from Card Reader, Extension Module, Access Controller, or Disable. Note After the peripheral is changed and saved, the device will reboot automatically.
- Page 74 DS-K1T502 Series Access Control Terminal User Manual 4. Click Save to save the settings. Note If you change the peripheral, and after you save the device parameters, the device will reboot automatically. Elevator Control via PC Web Steps 1. Click System and Maintenance → System Configuration → Access Configurations → Elevator Control Parameters .
-
Page 75: System And Maintenance
DS-K1T502 Series Access Control Terminal User Manual 7.11 System and Maintenance 7.11.1 Reboot You can reboot the device. Click System and Maintenance → Maintenance → Restart to enter the settings page. Click Restart to reboot the device. 7.11.2 Upgrade Upgrade Locally via PC Web You can upgrade the device locally. -
Page 76: Export Device Parameters Via Pc Web
DS-K1T502 Series Access Control Terminal User Manual Restore to Default Settings via PC Web You can restore device to default settings. Click System and Maintenance → Maintenance → Backup and Reset to enter the settings page. Click Restore, the device will restore to the default settings, except for the device IP address and the user information. -
Page 77: View Log Via Pc Web
DS-K1T502 Series Access Control Terminal User Manual Test Protocol via PC Web Select a protocol address, and enter the protocol to test. You can debug the device according to the response header and returned value. Go to System and Maintenance → Maintenance → Device Debugging → Protocol Testing. -
Page 78: Certificate Management
DS-K1T502 Series Access Control Terminal User Manual Select a security mode, and click Save. Security Mode High security level for user information verification when logging in the client software. Compatible Mode The user information verification is compatible with the old client software version when logging in. - Page 79 DS-K1T502 Series Access Control Terminal User Manual 3. Click Import. Import CA Certificate Before You Start Prepare a CA certificate in advance. Steps 1. Go to System and Maintenance → Safe → Certificate Management . 2. Create an ID in the Import CA Certificate area.
-
Page 80: Chapter 8 Configure The Device Via The Mobile Browser
DS-K1T502 Series Access Control Terminal User Manual Chapter 8 Configure the Device via the Mobile Browser Set Network by TCP/IP If device has connected to wired network, set the device IP address and enable the device hotspot via the Web browser. For details, see the PC web browser's settings. -
Page 81: Account Security Settings
DS-K1T502 Series Access Control Terminal User Manual Steps 1. On the login page, tap Forget Password. 2. Select Verification Mode. Security Question Verification If you have set security questions on the device or mobile web, you can enter the answers to reset the password. -
Page 82: Configuration
DS-K1T502 Series Access Control Terminal User Manual 8.5 Configuration 8.5.1 View Device Information View the device name, language, model, serial No., version, IO input number, local RS-485 number, number of alarm output, register number, Mac address, and device capacity, etc. -
Page 83: Set Dst
DS-K1T502 Series Access Control Terminal User Manual By default, the device time should be synchronized manually. You can set the device time manually. Set the NTP server's IP address, port No., and interval. 8.5.3 Set DST Steps 1. Tap → System Settings → Time Settings , to enter the settings page. -
Page 84: Network
DS-K1T502 Series Access Control Terminal User Manual regularly, especially in the high security system, changing the password monthly or weekly can better protect your product. 8.5.5 Network 可配置 有 网 参数、Wi-Fi 参数和 点参数。 Wired Network Set wired network. → Communication Settings → Wired Network to enter the configuration page. - Page 85 DS-K1T502 Series Access Control Terminal User Manual Enable DHCP Enable DHCP to Auto DNS, the device will allocate the IP and DNS automatically. Disable DHCP Manually set the IP and DNS server. 4) Tap Save. Result After Wi-Fi and WLAN settings, you can enter the WLAN IP address in the mobile browser to login the device.
-
Page 86: User Management
DS-K1T502 Series Access Control Terminal User Manual Note Hik-Connect is an application for mobile devices. With the App, you can view live image of the device, receive alarm notification and so on. 2. Check Enable to enable the function. 3. You can enable Custom to enter the server address. - Page 87 DS-K1T502 Series Access Control Terminal User Manual Steps 1. Tap → Person Management to enter the settings page. 2. Add user. 1) Tap+. Figure 8-3 Add User 2) Set the following parameters. Employee ID Enter the employee ID. The Employee ID cannot be 0 or exceed 32 characters. It can be a combination of uppercase, lowercase letters and numbers.
-
Page 88: Event Search
DS-K1T502 Series Access Control Terminal User Manual Long-Term Effective Set the user permission as long-term effective. Start Date/End Date Set Start Date and End Date of user permission. Administrator If the user needs to be set as administrator, you can enable Administrator. -
Page 89: Audio Settings
DS-K1T502 Series Access Control Terminal User Manual 8.5.8 Audio Settings You can enable or adjust the audio. → Audio. Enable Enable Voice Prompt according to actual needs. The device will prompt voice instructions. You can also adjust the audio volume. - Page 90 DS-K1T502 Series Access Control Terminal User Manual Figure 8-4 Authentication Settings 2. Tap Save. Terminal Main Card Reader You can configure the device card reader's parameters. If you select main card reader, you need to configure the following parameters: Terminal Type, Terminal Model, Enable Card Reader, Authentication, Recognition Interval (s), Minimum Card Swiping Interval (s), Max.
- Page 91 DS-K1T502 Series Access Control Terminal User Manual Card Reader Description Get card reader description. It is read-only. Enable Card Reader Enable the card reader's function. Authentication Select an authentication mode according to your actual needs from the drop-down list. Authentication Interval You can set the authentication interval of the same person when authenticating.
- Page 92 DS-K1T502 Series Access Control Terminal User Manual You can set the exit button as Remain Open or Remain Closed according to your actual needs. By default, it is Remain Open. Door Remain Open Duration with First Person Set the door open duration when first person is in. After the first person is authorized, it allows multiple persons access the door or other authentication actions.
- Page 93 DS-K1T502 Series Access Control Terminal User Manual Terminal Parameters You can set terminal parameters for accessing. → Access Control → Terminal Parameters . You can set Working Mode as Access Control Mode. The access control mode is the device normal mode.
- Page 94 DS-K1T502 Series Access Control Terminal User Manual The stop bit when the devices are communicating via the RS-485 protocol. Parity/Flow Ctrl/Communication Mode Enabled by default. Output Type Set the output type according to your actual needs. Set Card Security Configure cards for the device.
- Page 95 DS-K1T502 Series Access Control Terminal User Manual Figure 8-5 Card Security Configure card parameters, and click Save. Enable NFC Card In order to prevent the mobile phone from getting the data of the access control, you can disable NFC card to increase the security level of the data.
-
Page 96: Call Settings
DS-K1T502 Series Access Control Terminal User Manual Enable the function and set the encryption sector. Note It is recommended to encrypt sector 13. Enable EM Card Enable EM card and authenticating by presenting EM card is available. Note If the peripheral card reader supports presenting EM card, the function is also supported to... - Page 97 DS-K1T502 Series Access Control Terminal User Manual Note If the device type is Door Station or Access Control Device, the No. should be between 0 and ● After changing the device type or No., you should reboot the device to take effect.
- Page 98 DS-K1T502 Series Access Control Terminal User Manual Refers to the SIP server IP. Enter the main station’s IP address that used for communication. At this time the main station is used as a SIP server. Other intercom devices should registered to this server address to realize communication.
-
Page 99: Set Privacy Parameters Via Mobile Web
DS-K1T502 Series Access Control Terminal User Manual Note When you check Call Specified Indoor Station, you should set the linked room’s No. ● By default, you can press the button to call indoor station, and hold the button to call center. -
Page 100: View User Document
DS-K1T502 Series Access Control Terminal User Manual Restart Device → Restart Device . Tap Restart to restart the device. Upgrade → Upgrade . Tap Upgrade to upgrade the device. Note Do not power off during the upgrading. Restore Parameters → Default . -
Page 101: Log Out Of Mobile Web
DS-K1T502 Series Access Control Terminal User Manual 8.5.16 Log Out of Mobile Web Log out of the configuration page on the mobile web. On the home page, tap → Log Out , and tap OK to log out of the web. -
Page 102: Chapter 9 Other Platforms To Configure
DS-K1T502 Series Access Control Terminal User Manual Chapter 9 Other Platforms to Configure You can also configure the device via iVMS-4200 Client Software or HikCentral Access Control. For details, see the platforms' user manual. iVMS-4200 Client Software Click/tap the link to view the client software's user manual. -
Page 103: Appendix A. Tips For Scanning Fingerprint
DS-K1T502 Series Access Control Terminal User Manual Appendix A. Tips for Scanning Fingerprint Recommended Finger Forefinger, middle finger or the third finger. Correct Scanning The figure displayed below is the correct way to scan your finger: You should press your finger on the scanner horizontally. The center of your scanned finger should align with the scanner center. - Page 104 DS-K1T502 Series Access Control Terminal User Manual Environment The scanner should avoid direct sun light, high temperature, humid conditions and rain. When it is dry, the scanner may not recognize your fingerprint successfully. You can blow your finger and scan again.
-
Page 105: Appendix B. Dimension
DS-K1T502 Series Access Control Terminal User Manual Appendix B. Dimension Dimension of Device... - Page 106 UD29355B-D...
Need help?
Do you have a question about the DS-K1T502 Series and is the answer not in the manual?
Questions and answers