Table of Contents
Advertisement
Available languages
Available languages
Quick Links
Advertisement
Chapters
Table of Contents

Related Manuals for Skandika Nemo compact SF-2520


Summary of Contents for Skandika Nemo compact SF-2520
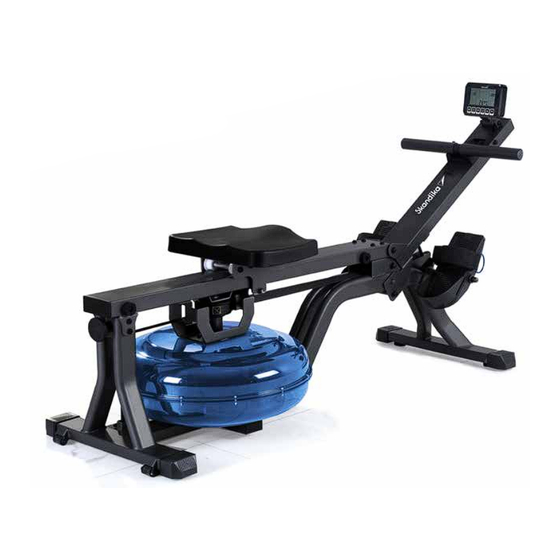
- Page 1 Nemo compact Art.Nr. SF-2520...
-
Page 2: Table Of Contents
Name SF-2520 | Nemo Compact Anleitungen zum Down- Class loaden findest Du auf Standard EN ISO 20957 Warning unserer Skandika Service Please read the user manual Seite. Für weitere Informa- carefully before use of machine Production date tionen kannst Du einfach 2019... -
Page 3: Sicherheitshinweise
SICHERHEITSHINWEISE WARNUNG Um die Verletzungsgefahr zu reduzieren, muss diese Anleitung vor dem Gebrauch vollständig gelesen und verstanden werden! Dieses Gerät ist ausschließlich für den Heimgebrauch in Übereinstimmung mit den Anweisungen in dieser Anleitung vorgesehen. Lesen Sie die Gebrauchsanleitung sorgfältig durch, bevor Sie das Gerät einsetzen und bewahren Sie die Gebrauchsanleitung für die weitere Nutzung auf. -
Page 4: Teileliste
TEILELISTE Teil Teil Bezeichnung Spezifikation Menge Bezeichnung Spezifikation Menge Hauptrahmen Rechteckiger Stopfen 40mm x 100mm Vorderer Standfuß Rechteckiger Stopfen 30mm x 60mm Führungsschiene Mutter Vorderes Gestänge Gurt Handgriff Seil Computerhalterung Rollenlager HK2010 Halterung Handgriff Tankeinfassung Computer Laufrad Sensorkabel Sitzträger Sensorhalterung Sensorhalterung Magnet Ø6*5mm... - Page 5 TEILE-LISTE Teil Bezeichnung Spezifikation Menge Tankdichtung Ø40*Ø27.4*6.8 Schaumstoffstück Ø98*Ø28*20 PC Platte OD40*ID20*0.2 Rollenabstandshalter Ø8.1 x Ø10 x 13mm Abstandhalter für Leerlaufrolle Ø14*1.5*19 Stahlscheibe OD25*ID20.1*0.3 Syphonpumpe Trichter Einsteller Ø60*M10 Einstellschraube Maulschlüssel Sicherheitsstift Ø10*119 Gummi-Ring T1,5mm Schraube ST5,5x16mm...
-
Page 6: Explosionszeichnung
EXPLOSIONSZEICHNUNG... -
Page 7: Aufbauanleitung
AUFBAUANLEITUNG SCHRITT 1 HINWEIS: Wir empfehlen, den Aufbau mit 2 Personen durchzuführen. A: Ziehen Sie den Sicherheitsstift (105) aus dem Hauptrahmen (1). B: Klappen Sie den vorderen Standfuß (2) aus. B & C: Klappen Sie dann das vordere Gestänge (4) aus und stecken Sie den Sicherheitsstift (105) ein wie abgebil- det. - Page 8 AUFBAUANLEITUNG SCHRITT 3 Montieren Sie die Computerhalterung (6) wie abgebildet mit der Schraube (69), Unterlegscheibe (83) und Mutter (88). Verbinden Sie das Sensorkabel (55) mit dem Computer (54) und befestigen Sie den Computer (54) dann auf der Computerhalterung (6) mit Hilfe der Schrauben (76). Ebener Stand: Sie können die Niveau- ausgleichsfüße (59) justieren, falls...
-
Page 9: Wassertank Befüllen / Entleeren
WASSERTANK BEFÜLLEN / ENTLEEREN WASSERTANK BEFÜLLEN / ENTLEEREN Entfernen Sie den Verschlussstopfen (21) der Tankoberseite (18). 2. Abb. A zeigt, wie der Tank mit Wasser befüllt wird. Setzen Sie den Trichter (101) in den Tank und benutzen Sie entweder einen Becher oder die mitgelieferte Siphonpumpe (100), sowie einen Eimer mit Wasser, um den Tank zu befüllen. -
Page 10: Transport & Lagerung / Batterien
TRANSPORT & LAGERUNG / BATTERIEN Um das Gerät zu bewegen, heben Sie es vom vorderen Standfuß (2) her an, bis die Transportrollen (36) den Boden berühren. So können Sie das Gerät einfach von Ort zu Ort rollen. ACHTUNG! Bewegliche Teile wie z. B. der Sitz könnten durch Verrutschen Verletzungen verursachen. - Page 11 COMPUTERBEDIENUNG Tastenfunktionen: RECOVERY: Startet die Herzerholungsratenmessung nach einem Training zur Bestimmung der Herzerholungs- rate. RESET: Einfacher Druck kehrt zurück ins Hauptmenü oder setzt bei der Eingabe von Vorgaben den Wert auf 0. Halten und Drücken für ca. 2 Sekunden führt zum Reset aller Funktionswerte. START / STOP: Startet oder beendet ein Training.
-
Page 12: Computerbedienung
COMPUTERBEDIENUNG BEDIENUNG DES COMPUTERS Nach dem Einlegen der Batterien leuchten für ca. 2 Sekunden alle Anzeigen im Display auf. Anschließend wechselt der Computer automatisch in den Einstellungsmodus für Datum und Uhrzeit (siehe Abb.). Stellen Sie nacheinander die Stunden, Minuten, Jahr, Monat und Tag mit Hilfe der Pfeiltasten und ENTER ein. -
Page 13: Übungsanleitung
Um diese Funktion nutzen zu können, müssen Sie einen zusätzlichen Brustgurt tragen. Der Computer ist ausge- stattet mit einem eingebauten Empfänger für die drahtlose PulsfrequenzÜbertragung mittels eines optionalen SKANDIKA Brustgurtes (Frequenz: 5,3 kHz). Empfohlene Reichweite: 100 - 150 cm. Beachten Sie die Anleitung des Brustgurtes. -
Page 14: Reinigung Und Pflege
ÜBUNGSANLEITUNG / REINIGUNG UND PFLEGE Trainingszeit Rudern ist eine sehr anstrengende Betätigung und darum empfiehlt es sich, mit einem kurzen und einfachen Pro- gramm anzufangen und sich langsam zu steigern. Beginnen Sie mit 5 Minuten und steigern Sie die Trainingszeit entsprechend Ihrer körperlichen Fitness. -
Page 15: Aufwärmen Und Abwärmen
AUFWÄRMEN UND ABWÄRMEN AUFWÄRMEN und ABWÄRMEN Ein erfolgreiches Trainingsprogramm besteht aus einer Aufwärmphase, einer Trainingsphase und dem Abkühlen (Abwärmen). Die Trainingshäufigkeit sollte für Anfänger bei 2- bis 3-mal die Woche angesetzt werden, immer mit mindestens einem Tag Pause zwischen den Trainingseinheiten. Nach einigen Monaten kann die Häufigkeit auf 4- bis 5-mal wöchentlich gesteigert werden. -
Page 16: Garantiebedingungen
Bitte prüfen Sie Möglichkeiten, eine Batterie anstatt der Entsorgung einer Wiederverwendung zuzuführen, beispielsweise durch die Rekonditionierung oder die Instandsetzung der Batterie. Im Zuge ständiger Produktverbesse- Für Ersatzteile kontaktieren Sie bitte folgende E-Mail-Adresse: service@skandika.de rungen behalten Der Service erfolgt durch: MAX Trader GmbH, Wilhelm-Beckmann-Straße 19, 45307 Essen, wir uns technische... - Page 17 Transportation & Storage / Batteries Computer instructions Exercise instructions Cleaning & care Warm-up and cool-down Guarantee conditions skandika.com/ service Please visit the Skandika Rowing Importer / MAX Trader GmbH responsible in EU Service portal on our machine Address Wilhelm-Beckmann-Str. 19, D-45307 Essen website for setup &...
-
Page 18: Safety Precautions
SAFETY PRECAUTIONS WARNING To reduce risk of injury, read and understand this instruction manual before using the device! This machine is intended for home use only in accordance with the instructions provided in this manual. Read the instruction manual carefully before using this device and keep the instruction manual for future use. SAFETY PRECAUTIONS Only use the unit in enclosed spaces! 13. - Page 19 PARTS LIST Part Part Description Specification Q´ty Description Specification Q´ty Main Frame Rectangular Plug 40mm x 100mm Front stand Rectangular Plug 30mm x 60mm Rail Hexagon nut Front post Strap Handlebars Bungee Cord Computer holder Needle Roller Bearing HK2010 Mounting Bracket Hand Grip Tank Brace Computer...
-
Page 20: Parts List
PARTS LIST Part Description Specification Q´ty Tank Seal Ø40*Ø27.4*6.8 Foam Spacer Ø98*Ø28*20 PC Plate OD40*ID20*0.2 Roller Spacer Ø8.1 x Ø10 x 13mm Idle Roller Short Spacer Ø14*1.5*19 Stainless Washer OD25*ID20.1*0.3 Syphon Pump Funnel Knob Ø60*M10 Knob Bolt Combination Wrench Safety Pin Ø10*119 Rubber ring T1,5mm... -
Page 21: Explosion Drawing
EXPLOSION DRAWING... -
Page 22: Set-Up Instructions
SET-UP INSTRUCTIONS STEP 1 NOTE: We recommend having 2 people to assemble the product. A: Pull the safety pin (105) out of the main frame (1). B: Fold out the front stand (2). B & C: Unfold the front post (4) and insert the safety pin (105) as shown. Lifting the main frame (1) may make this operation easier. - Page 23 SET-UP INSTRUCTIONS STEP 3 Mount the computer holder (6) as shown with the screw (69), washer (83) and nut (88). Connect the sensor cable (55) to the computer (54), then attach the computer (54) to the computer holder (6) using the screws (76). Level stand: You can adjust the adjustable feet (59), if the device is uneven.
-
Page 24: How To Fill/Empty The Tank
HOW TO FILL / EMPTY THE TANK HOW TO FILL / EMPTY THE TANK Remove the plug (21) from upper tank (18). 2. Insert the funnel (101) into the tank as shown in illustration A. Use a water cup or the syphon pump (100) and a bucket to fill the tank. -
Page 25: Transportation & Storage / Batteries
TRANSPORTATION & STORAGE / BATTERIES To move the device, lift it up and move it from the front stand (2) until the moving wheels (36) are touching the floor. This way you can easily move the unit from place to place. -
Page 26: Computer Instructions
COMPUTER INSTRUCTIONS Function buttons: RECOVERY: Activates the RECOVERY PROGRAM that will automatically evaluate your fitness immediately after your work out. RESET: Press to return to main menu or to set the value to 0 during an input procedure. Press and hold for approx. 2 seconds to set all values to 0. - Page 27 COMPUTER INSTRUCTIONS COMPUTER OPERATION After inserting the batteries, all indicators in the display light up for approx. 2 seconds. The computer then automatically switches to the setting mode for date and time (see illustration). Set the hours, minutes, year, month and day one after the other using the arrow keys and ENTER.
-
Page 28: Exercise Instructions
To use this function, you must wear an additional chest belt. The computer is equipped with a built-in receiver for wireless pulse frequency transmission using an optional SKANDIKA chest belt (frequency: 5.3 kHz). Recom- mended range: 100 - 150 cm. Follow the instructions for the chest belt. -
Page 29: Cleaning & Care
EXERCISE INSTRUCTIONS / CLEANING AND CARE Exercise time Rowing is relatively exhausting - we therefore recommend starting with a short and easy workout program. You should increase the challenges for further workouts. Start with a 5-minute workout for your first training session and increase the time slowly with further workouts until you reach 15 to 20 minutes. -
Page 30: Warm-Up And Cool-Down
WARM-UP AND COOL-DOWN WARM-UP and COOL-DOWN A successful exercise program consists of a warm-up, aerobic exercise and a cool-down. Exercise for at least two or preferably three times a week, resting for a day between workouts. After several months, you may increase the frequency to four or five times per week. -
Page 31: Guarantee Conditions
In accordance with our policy of continual product impro- For spare parts please contact: service@skandika.de vement, we reserve the right Service centre: MAX Trader GmbH, Wilhelm-Beckmann-Straße 19, 45307 Essen, to make technical and visual Germany changes without notice. - Page 32 Name SF-2520 | Nemo Compact FAQ et les instructions de Class Standard EN ISO 20957 téléchargement sur notre Warning page de service Skandika. Please read the user manual carefully before use of machine Pour plus d‘informations, Production date 2019 2020...
- Page 33 INFORMATIONS DE SÉCURITÉ AVERTISSEMENT Pour réduire les risques de blessures, veuillez lire attentivement ce mode d’emploi avant d‘utiliser l’appareil ! Cet appareil est uniquement destiné à une utilisation domestique conformément aux instructions contenues dans ce mode d’emploi. Lisez attentivement le mode d’emploi avant d’utiliser l’appareil et conservez bien ce mode d’emploi.
- Page 34 LISTE DES PIÈCES N° de N° de Description Spécifications Qté Description Spécifications Qté pièce pièce Cadre principal Capuchon 30mm x 70mm Pied avant Bouchon en plastique, 40mm x 100mm rectangulair Rail de guidage Bouchon en plastique, 30mm x 60mm Bras avant rectangulair Handle Écrou...
- Page 35 LISTE DES PIÈCES N° de Description Spécifications Qté pièce Joint de roue Ø50*Ø19*5 Joint de réservoir Ø40*Ø27.4*6.8 Pièce en mousse Ø98*Ø28*20 Plaque en PC OD40*ID20*0.2 Entretoise de rouleau Ø8.1 x Ø10 x 13mm Entretoise pour rouleau fou Ø14*1.5*19 Disque d‘acier OD25*ID20.1*0.3 Pompe à...
- Page 36 VUE EXPLOSÉE...
- Page 37 INSTRUCTIONS DE MONTAGE ÉTAPE 1 NOTE : Nous recommandons que le montage soit effectué par 2 personnes. A : Tirez la goupille de sécurité (105) hors du cadre principal (1). B : Déplier le pied avant (2). B & C : Déployez ensuite le bras avant (4) et insérez la goupille de sécurité (105) comme indiqué. Le fait de soulever le cadre principal (1) peut faciliter cette opération.
- Page 38 INSTRUCTIONS DE MONTAGE ÉTAPE 3 Montez le support d‘ordinateur (6) comme indiqué avec la vis (69), la rondelle (83) et l‘écrou (88). Connectez le câble du capteur (55) à l‘ordinateur (54), puis fixez l‘ordinateur (54) au support de l‘ordinateur (6) à l‘aide des vis (76).
- Page 39 COMMENT REMPLIR ET VIDER LE RÉSERVOIR COMMENT REMPLIR ET VIDER LE RÉSERVOIR Retirez la prise (21) du réservoir supérieur (18). 2. Insérez l’entonnoir (101) dans le réservoir comme sur l’illustration A. Utilisez une tasse d’eau ou la pompe à siphon (100) et un seau pour remplir le réservoir. Utilisez la jauge de niveau d’eau sur le côté du réservoir afin de mesurer le niveau d’eau dans le réservoir.
- Page 40 TRANSPORT ET STOCKAGE / PILES Pour déplacer l‘appareil, le soulever du pied avant (2) jusqu‘à ce que les rouleaux de transport (36) touchent le sol. Cela vous permet de faire rouler facilement l‘appareil d‘un endroit à l‘autre. ATTENTION ! Les pièces mobiles, comme le siège, peuvent causer des blessures si elles glissent.
- Page 41 MODE D‘EMPLOI DE L‘ORDINATEUR Fonctions des touches: RECOVERY: Lance la mesure du taux de récupération cardiaque après un entraînement afin de déterminer le taux de récupération cardiaque. RESET: Une simple pression permet de revenir au menu principal ou de définir la valeur sur 0 lors de la saisie de préréglages.
- Page 42 MODE D‘EMPLOI DE L‘ORDINATEUR LE FONCTIONNEMENT DE L‘ORDINATEUR Après avoir inséré les piles, tous les indicateurs de l‘écran s‘allument pendant environ 2 secondes. L‘ordinateur passe alors automatiquement en mode de réglage de la date et de l‘heure (voir illustration). Réglez les heures, les minutes, l‘année, le mois et le jour l‘un après l‘autre à...
- Page 43 L‘ordinateur est équipé d‘un récepteur intégré pour la transmission sans fil de la fréquence des impulsions à l‘aide d‘une sangle thoracique SKANDIKA (fréquence : 5,3 kHz) en option. Plage recommandée : 100 - 150 cm. Suivez les instructions relatives à la sangle de poitrine. Après avoir suivi la formation, veuillez garder la sangle de poitrine et appuyez sur „RECOVERY“.
- Page 44 INSTRUCTIONS D’ENTRAÎNEMENT / NETTOYAGE ET ENTRETIEN Durée de l’entraînement L’aviron est un exercice relativement intense et il est donc recommandé de commencer avec un programme court et simple, puis augmenter lentement le degré de difficulté. Commencez par 5 minutes et augmentez le temps d’entrainement en fonction de votre condition physique.
- Page 45 ÉCHAUFFEMENT ET RÉCUPÉRATION ÉCHAUFFEMENT et RÉCUPÉRATION Un programme d‘exercices réussi consiste en un échauffement, un exercice aérobique et une récupération Entraînez-vous de préférence au moins deux ou trois fois par semaine, avec une pause d’un jour entre les séances d‘entraînement. Après plusieurs mois, vous pouvez augmenter la fréquence à quatre ou cinq fois par semaine. Échauffement La phase améliore la circulation sanguine et aide les muscles à...
- Page 46 Dans le cadre du travail Pour d’accessoires ou de pièces de rechange, veuillez contacter : continu d’amélioration des service@skandika.de produits, nous nous réser- Centre de service clients : MAX Trader GmbH, Wilhelm-Beckmann-Str. 19, 45307 Essen, vons le droit de procéder à...
- Page 47 NOTIZEN / NOTES _____________________________________________________ _____________________________________________________ _____________________________________________________ _____________________________________________________ _____________________________________________________ _____________________________________________________ _____________________________________________________ _____________________________________________________ _____________________________________________________ _____________________________________________________ _____________________________________________________ _____________________________________________________ _____________________________________________________ _____________________________________________________...
- Page 48 Vertrieb & Service durch / Sales & Service by Ventes et services par MAX Trader GmbH Wilhelm-Beckmann-Straße 19 45307 Essen Germany SF-2520 NEMOcompact DE_GB_FR Ver. 1.3...
Need help?
Do you have a question about the Nemo compact SF-2520 and is the answer not in the manual?
Questions and answers