Advertisement
Available languages
Available languages
Quick Links
Advertisement
Chapters

Related Manuals for Skandika Foldaway X-3000 Bluetooth


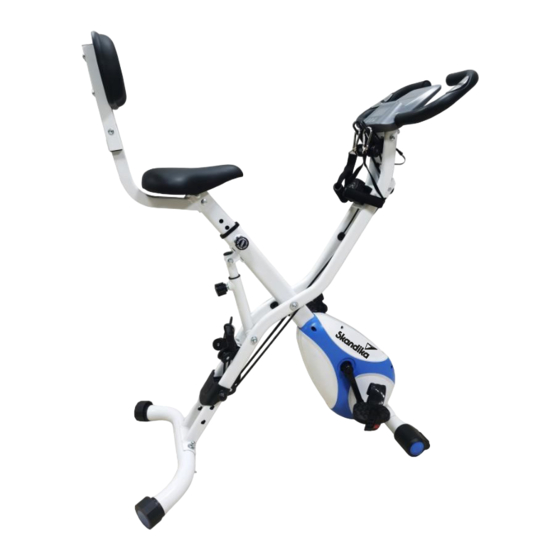
Summary of Contents for Skandika Foldaway X-3000 Bluetooth
- Page 1 Foldaway X-3000 Bluetooth Art.Nr. SF-2125...
-
Page 2: Table Of Contents
SF-2125 & SF-2126 X-3000 Artikelnummer | Name Klasse Anleitungen zum Down- Standard EN ISO 20957 loaden findest Du auf WARNHINWEIS: unserer Skandika Service Lesen Sie vor Gebrauch die Bedienungsanleitung. Seite. Für weitere Informa- Produktionsdatum tionen kannst Du einfach 2024 2025... -
Page 3: Sicherheitshinweise
SICHERHEITSHINWEISE WARNUNG Um die Verletzungsgefahr zu reduzieren, muss diese Anleitung vor dem Gebrauch vollständig gelesen und verstanden werden! Dieses Gerät ist ausschließlich für den Heimgebrauch in Übereinstimmung mit den Anweisungen in dieser Anleitung vorgesehen. Lesen Sie die Gebrauchsanleitung sorgfältig durch, bevor Sie das Gerät einsetzen und bewahren Sie die Gebrauchsanleitung für die weitere Nutzung auf. -
Page 4: Explosionszeichnung
EXPLOSIONSZEICHNUNG... -
Page 5: Teileliste
TEILELISTE Teil Nr. Beschreibung Menge Teil Nr. Beschreibung Menge Schlossschraube M8x65 Schraube M8x48 Gewölbte Unterlegscheibe ø8xø18 Endkappe Ø25,4 Federscheibe ø8xø14 Unterlegscheibe Ø8xØ18 Kopfmutter M8 Mutter M8 Verstellbare Endkappe ø50 Andruckrolle Hinterer Stabilisator ø50x395mm Kappe 15x20 Vorderer Stabilisator ø50x395mm Hinterer Hauptrahmen Vordere Rolle Ø50 Vorderer Hauptrahmen Schraube M4X20... - Page 6 Screw M5x50 Handpulse wire AUFBAUANLEITUNG Handlebars Screw M5x12 Computer SCHRITT 1 Screw M6X15 Wir empfehlen, das Gerät mit 2 Personen aufzubauen. Spring washer Ø6xØ14 Ziehen Sie den Knauf (45) aus dem Hauptrahmen und klappen Sie den Rahmen aus. Foam grip Ø25.4 Befestigen Sie den vorderen Stabilisator (7) am Vorderteil des Hauptrahmens mit 2 gewölbten Curved washer Ø6xØ14 Unterlegscheiben (2), 2 Federscheiben (3), 2 Kopfmuttern (4) und 2 Schloss-Schrauben (1).
- Page 7 AUFBAUANLEITUNG SCHRITT 2 Assembly instructions Befestigen Sie das rechte Pedal (12R) Assembly instructions am rechten Pedalarm durch Auf- schrauben im Uhrzeigersinn, das linke Pedal (12L) wird entsprechend am lin- ken Pedalarm befestigt (Schraubrich- tung entgegen dem Uhrzeigersinn). Die Pedale sind zur besseren Zuord- nung mit „R“...
-
Page 8: Aufbauanleitung
AUFBAUANLEITUNG SCHRITT 4 Assembly instructions Assembly instructions Befestigen Sie Lenker (84) am vorderen Hauptrahmen (55) wie abgebildet mit den Schrauben (87), Unterlegscheiben (75), gewölbten Unterlegscheiben (90) und Federscheiben bly instructions (88). Verbinden Sie das Sensorkabel (39) und das Handpulskabel mit dem Computer (86). Achten Sie dabei darauf, dass Sie kein Kabel einklemmen. -
Page 9: Zusammenklappen Und Transport/ Abbildungen Für Übungsbeispiele
Folding and transport ZUSAMMENKLAPPEN UND TRANSPORT / Loosen and pull out the release nut (45) to fold the device. Fix the nut (45) again into one ABBILDUNGEN FÜR ÜBUNGSBEISPIELE of the drillings. Carefully move the folded item with the transportation rolls to the desired place. Do not roll over uneven ground! ZUSAMMENKLAPPEN UND TRANSPORT Lösen und ziehen Sie den Knauf (45) heraus, um das Gerät zusammenzuklappen. -
Page 10: Computer-Bedienungsanleitung
COMPUTER-BEDIENUNGSANLEITUNG FUNKTIONSTASTEN: MODE: Durch Tastendruck können die verschiedenen Funktionen ausge- wählt werden. Drücken und halten Sie die Taste für ca. 2 Sekunden, um die Trainingszeit, die Distanz und die Kalorien auf 0 zurückzusetzen. SET: Mit Hilfe dieser Taste können die Trainingszeit, die Distanz oder die Kalorien eingestellt werden (funktioniert nicht bei aktivem Scan-Modus). -
Page 11: Aufwärmen Und Abwärmen
COMPUTER-BEDIENUNGSANLEITUNG / AUFWÄRMEN UND ABWÄRMEN TRAINING MIT ZIELWERTVORGABEN Dieser Computer verfügt über drei Zieltrainingsmodi: Sie können Vorgaben für die Funktions- werte Zeit, Distanz oder Kalorien einstellen. Um eine solche Vorgabe einzustellen, müssen Sie zunächst mit Hilfe der „Mode“-Taste die entsprechende Funktion (Time / Distance / Calories) auswählen und anschließend mit der „Set“-Taste die gewünschte Vorgabe einstellen. -
Page 12: Verbindung Zur Kinomap-App Via Bluetooth
Tippen Sie nun auf OK und kehren Sie zum Hauptmenü zurück. Sie können nun einen Kurs auswählen (je nach Art Ihres KinoMap-Kontos). Drücken Sie auf Start und beginnen Sie mit dem Training! X-3000 4. Skandika auswählen 5. Das Gerät auswählen... -
Page 13: Garantiebedingungen
Altgerät umschlossen sind, sowie Lampen, die zerstörungsfrei entnommen werden können und führen diese einer separaten Sammlung zu. Diese können giftige Schwermetalle enthalten und unterliegen der Sondermüllbehandlung. Im Zuge ständiger Für Ersatzteile kontaktieren Sie bitte folgende E-Mail-Adresse: service@skandika.de Produktverbesse- Der Service erfolgt durch: MAX Trader GmbH, Wilhelm-Beckmann-Straße 19, 45307 Essen,... - Page 14 Warm-up and cool-down Connection to the Kinomap app via Bluetooth Guarantee conditions skandika.com/ service Importeur MAX Trader GmbH Home- Please visit the Skandika Adresse Wilhelm-Beckmann-Str. 19, D-45307 Essen trainer Service portal on our Artikelnummer | Name SF-2125 & SF-2126 X-3000 Klasse website for setup &...
-
Page 15: Safety Precautions
SAFETY PRECAUTIONS WARNING To reduce risk of injury, read and understand this instruction manual before using the device! This machine is intended for home use only in accordance with the instructions provided in this manual. Read the instruction manual carefully before using this device and keep the instruction manual for future use. SAFETY PRECAUTIONS Keep children and pets away from the machine at all 13. -
Page 16: Explosion Drawing
EXPLOSION DRAWING... -
Page 17: Parts List
PARTS LIST Part nr. Description Q‘ty Part nr. Description Q‘ty Carriage bolt M8x65 Screw M8x48 Curved washer ø8xø18 End cap Ø25.4 Spring washer ø8xø14 Flat washer Ø8xØ18 Cap nut M8 Nut M8 Adjustable end cap Ø50 Press wheel Rear stabiliser ø50x395mm Cap 15x20 Front stabiliser ø50x395mm Rear main frame... - Page 18 Screw M5x50 Handpulse wire SET-UP INSTRUCTIONS Handlebars Screw M5x12 Computer STEP 1 Screw M6X15 We recommend setting up the unit with 2 people. Spring washer Ø6xØ14 Foam grip Ø25.4 Pull the knob (45) out of the main frame and unfold the frame. Fasten the front stabiliser (7) to the front part of the main frame with 2 curved washers (2), 2 Curved washer Ø6xØ14 spring washers (3), 2 cap nuts (4) and 2 carriage bolts (1).
- Page 19 SET-UP INSTRUCTIONS STEP 2 Assembly instructions Attach the right pedal (12R) to the right Assembly instructions pedal arm by screwing it on clockwise, the left pedal (12L) is attached to the left pedal arm accordingly (screwing direction counterclockwise). The pedals are marked with „R“ for right and „L“...
-
Page 20: Set-Up Instructions
SET-UP INSTRUCTIONS STEP 4 Assembly instructions Assembly instructions Attach handlebar (84) to the front main frame (55) as shown with the screws (87), washers (75), domed washers (90) and spring washers (88). Connect the sensor cable (39) and the hand bly instructions pulse cable to the computer (86). -
Page 21: Folding And Transport/ Illustrations For Exercise Examples
Folding and transport FOLDING AND TRANSPORT / Loosen and pull out the release nut (45) to fold the device. Fix the nut (45) again into one ILLUSTRATIONS FOR EXERCISE EXAMPLES of the drillings. Carefully move the folded item with the transportation rolls to the desired place. Do not roll over uneven ground! FOLDING AND TRANSPORT Loosen and pull out the knob (45) to fold the unit. -
Page 22: Computer Operating Instructions
COMPUTER OPERATING INSTRUCTIONS FUNCTION BUTTONS: MODE: The various functions can be selected by pressing the button. Press and hold the button for approx. 2 seconds to reset the training time, distance and calories to 0. SET: Press to set the training time, distance or calories (does not work when scan mode is active). -
Page 23: Warm-Up And Cool-Down
COMPUTER OPERATING INSTRUCTIONS / WARM-UP AND COOL-DOWN TRAINING WITH TARGET VALUES This computer has three target training modes: you can set targets for the function values time, distance or calories. To set such a target, you must first select the corresponding function (Time / Distance / Calories) using the „Mode“... -
Page 24: Connection To The Kinomap App Via Bluetooth
3. Home exercise bike Now tap OK and return to the main menu. You can now select a course (depending on the type of KinoMap account you have). Press Start and start training! X-3000 4. Choose Skandika 5. Select device... -
Page 25: Guarantee Conditions
Ask at your council about the respective local disposal sites. In accordance with our policy of continual product impro- For spare parts please contact: service@skandika.de vement, we reserve the right Service centre: MAX Trader GmbH, Wilhelm-Beckmann-Straße 19, 45307 Essen,... - Page 26 Artikelnummer | Name SF-2125 & SF-2126 X-3000 FAQ et les instructions de Klasse Standard EN ISO 20957 téléchargement sur notre WARNHINWEIS: page de service Skandika. Lesen Sie vor Gebrauch die Bedienungsanleitung. Pour plus d‘informations, Produktionsdatum vous pouvez simplement 2023 2024...
-
Page 27: Informations De Sécurité
INFORMATIONS DE SÉCURITÉ AVERTISSEMENT Pour réduire les risques de blessures, veuillez lire attentivement ce mode d’emploi avant d‘utiliser l’appareil ! Cet appareil est uniquement destiné à une utilisation domestique conformément aux instructions contenues dans ce mode d’emploi. Lisez attentivement le mode d’emploi avant d’utiliser l’appareil et conservez bien ce mode d’emploi. -
Page 28: Vue Éclatée
VUE ÉCLATÉE... -
Page 29: Liste Des Pièces
LISTE DES PIÈCES Description Qté Description Qté N° pièce N° pièce Vis de serrure M8x65 Vis M8x48 Rondelle bombée ø8xø18 Embout Ø25,4 Rondelle élastique ø8xø14 Rondelle Ø8xØ18 Écrou de tête M8 Écrou M8 Embout réglable ø50 Rouleau de pression Stabilisateur arrière ø50x395mm Capuchon 15x20 Stabilisateur avant ø50x395mm Cadre principal arrière... - Page 30 Screw M5x50 Handpulse wire INSTRUCTIONS DE MONTAGE Handlebars Screw M5x12 Computer ÉTAPE 1 Screw M6X15 Nous recommandons de monter l‘appareil à deux personnes. Spring washer Ø6xØ14 Foam grip Ø25.4 Retirez le bouton (45) du cadre principal et dépliez le cadre. Fixez le stabilisateur avant (7) à...
- Page 31 INSTRUCTIONS DE MONTAGE ÉTAPE 2 Assembly instructions Fixez la pédale droite (12R) sur le bras Assembly instructions de pédale droit en la vissant dans le sens des aiguilles d‘une montre, la pé- dale gauche (12L) est fixée en consé- quence sur le bras de pédale gauche (sens de vissage inverse des aiguilles d‘une montre).
-
Page 32: Instructions De Montage
INSTRUCTIONS DE MONTAGE ÉTAPE 4 Assembly instructions Assembly instructions Fixez le guidon (84) au cadre principal avant (55) comme illustré avec les vis (87), les rondelles (75), les rondelles bombées (90) et les rondelles élastiques (88). Connectez le câble du capteur bly instructions (39) et le câble du pouls manuel à... -
Page 33: Pliage Et Transport/ Illustrations Pour Des Exemples D'exercices
Folding and transport PLIAGE ET TRANSPORT / ILLUSTRATIONS Loosen and pull out the release nut (45) to fold the device. Fix the nut (45) again into one POUR LES EXEMPLES D‘EXERCICES of the drillings. Carefully move the folded item with the transportation rolls to the desired place. Do not roll over uneven ground! PLIAGE ET TRANSPORT Desserrez et tirez le bouton (45) pour replier l‘appareil. -
Page 34: Mode D'emploi De L'ordinateur
MODE D‘EMPLOI DE L‘ORDINATEUR TOUCHES DE FONCTION : MODE: Les différentes fonctions peuvent être sélectionnées en appuyant sur le bouton. Appuyez sur le bouton et maintenez-le enfoncé pendant en- viron 2 secondes pour remettre à zéro la durée d‘entraînement, la distance et les calories. -
Page 35: Échauffement Et Récupération
MODE D‘EMPLOI DE L‘ORDINATEUR / ÉCHAUFFEMENT ET RÉCUPÉRATION ENTRAÎNEMENT AVEC DES VALEURS CIBLES Cet ordinateur dispose de trois modes d‘entraînement cible : vous pouvez définir des objectifs pour les valeurs fonctionnelles temps, distance ou calories. Pour définir une telle cible, vous devez d‘abord sélectionner la fonction correspondante (Time / Distance / Calories) à... -
Page 36: Connexion À L'application Kinomap Via Bluetooth
3. Vélo d‘intérieur Tapez maintenant sur OK et revenez au menu principal. Vous pouvez main- tenant choisir un cours (selon le type de votre compte KinoMap). Appuyez sur Démarrer et commencez à vous entraîner ! X-3000 4. Choisir Skandika 5. Choisir l‘appareil... -
Page 37: Conditions De Garantie
Dans le cadre du travail Pour d’accessoires ou de pièces de rechange, veuillez contacter : continu d’amélioration des service@skandika.de produits, nous nous réser- Centre de service clients : MAX Trader GmbH, Wilhelm-Beckmann-Str. 19, 45307 Essen, vons le droit de procéder à... - Page 38 NOTES ________________________________________________________________________________ ________________________________________________________________________________ ________________________________________________________________________________ ________________________________________________________________________________ ________________________________________________________________________________ ________________________________________________________________________________ ________________________________________________________________________________ ________________________________________________________________________________ ________________________________________________________________________________ ________________________________________________________________________________ ________________________________________________________________________________ ________________________________________________________________________________ ________________________________________________________________________________ ________________________________________________________________________________ ________________________________________________________________________________ ________________________________________________________________________________ ________________________________________________________________________________...
- Page 39 NOTES ________________________________________________________________________________ ________________________________________________________________________________ ________________________________________________________________________________ ________________________________________________________________________________ ________________________________________________________________________________ ________________________________________________________________________________ ________________________________________________________________________________ ________________________________________________________________________________ ________________________________________________________________________________ ________________________________________________________________________________ ________________________________________________________________________________ ________________________________________________________________________________ ________________________________________________________________________________ ________________________________________________________________________________ ________________________________________________________________________________ ________________________________________________________________________________ ________________________________________________________________________________...
- Page 40 Vertrieb & Service durch / Sales & Service by Ventes et services par MAX Trader GmbH Wilhelm-Beckmann-Straße 19 45307 Essen Germany SF-2125 X-3000 DE_GB_FR 05/2023 Ver. 1.0...
Need help?
Do you have a question about the Foldaway X-3000 Bluetooth and is the answer not in the manual?
Questions and answers