Table of Contents
Advertisement
Available languages
Available languages
Quick Links
Technical Support
If you need any technical help, please visit our official support site and contact our support
team before returning the products, https://support.reolink.com.
Technische Unterstützung
Wenn Sie Hilfe brauchen, kontaktieren Sie bitte Reolink Support Team zuerst, bevor Sie Ihre
Bestellung zurücksenden. Meiste Fragen oder Probleme können von unserem Online Support
Center beantwortet und gelöst werden: https://support.reolink.com.
Support technique
Si vous avez besoin d'aide, veuillez contacter Reolink avant de retourner votre produit. La
plupart des questions peuvent être répondues via notre centre de support en ligne à l'adresse
https://support.reolink.com.
Supporto Tecnico
Se avete bisogno di aiuto, le chiediamo gentilmente di contattare Reolink prima di restituire il
prodotto. La maggior parte delle domande può essere risolta tramite il nostro centro di
assistenza online all'indirizzo https://support.reolink.com.
Soporte técnico
Si necesita ayuda, comuníquese con Reolink antes de devolver su producto. La mayoría de las
preguntas se pueden responder a través de nuestro centro de soporte en línea en
https://support.reolink.com.
REOLINK INNOVATION LIMITED
FLAT/RM 705 7/F FA YUEN COMMERCIAL BUILDING 75-77 FA YUEN STREET MONG KOK KL
HONG KONG
Product Ident GmbH
EU
REP
Hoferstasse 9B, 71636 Ludwigsburg, Germany
prodsg@libelleconsulting.com
APEX CE SPECIALISTS LIMITED
UK
REP
89 Princess Street, Manchester, M1 4HT, UK
info@apex-ce.com
Se p t 2 0 2 2
Q S G 1_ A
5 8.0 3 .0 05 .00 41
Operational Instruction
Apply to: Reolink Go EXT
@ReolinkTech https://reolink.com
EN/DE/FR/IT/ES
Advertisement
Table of Contents

Related Manuals for Reolink Go EXT


Summary of Contents for Reolink Go EXT
- Page 1 être répondues via notre centre de support en ligne à l'adresse https://support.reolink.com. Supporto Tecnico Se avete bisogno di aiuto, le chiediamo gentilmente di contattare Reolink prima di restituire il prodotto. La maggior parte delle domande può essere risolta tramite il nostro centro di Operational Instruction assistenza online all'indirizzo https://support.reolink.com.
-
Page 2: Table Of Contents
Contents What’s in the Box What’s in the Box Camera Introduction Set up the Camera Charge the Battery Camera Outdoor Security Rechargeable Skin Reset Needle Install the Camera Mount Battery Safety Instructions of Battery Usage Troubleshooting Specifications Notification of Compliance Surveillance Sign Quick Mounting... -
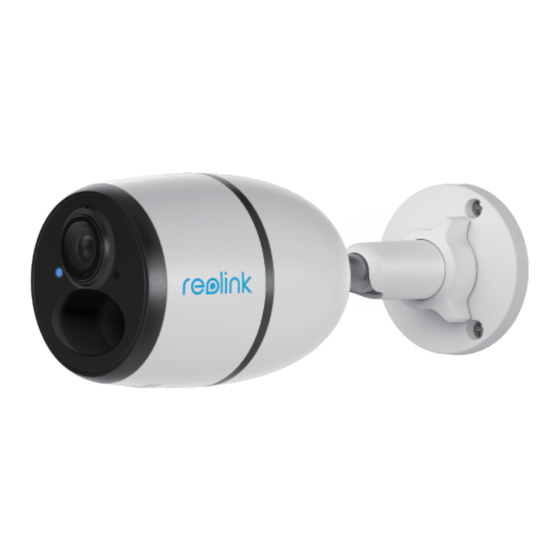
Page 3: Camera Introduction
Camera Introduction Set up the Camera Activated the SIM Card for the Camera Built-in Mic • Choose a Nano SIM card that supports WCDMA and FDD LTE. Infrared Lights • Activate the card on your smartphone or with your network carrier before inserting it into the camera. - Page 4 “Not registered on card. network. Please activate Camera fails to register Download and launch the Reolink App or Client software, and follow the onscreen 2. The signal is weak at the current your SIM card and check to the operator network.
-
Page 5: Charge The Battery
Charge the battery with a power adapter Charge the battery with the Mounting (not included). Reolink Solar Panel (not included Height: * Battery can also be charged separately. if you only purchase the camera). NOTE: If a moving object approaches the... - Page 6 Mount the Camera to Wall Attach the Camera to a Tree Drill holes in accordance with a mounting hole template and screw the security mount into the wall. If you are mounting the camera on any hard surface, insert plastic anchors into the holes first. Thread the provided strap to Attach the plate to the security Fasten the security mount to...
-
Page 7: Safety Instructions Of Battery Usage
1. Charge the rechargeable battery with a standard and high-quality DC 5V/9V battery charger or • Check the sensitivity settings and make sure Reolink solar panel. Do not charge the battery with solar panels from any other brands. it’s set up properly. -
Page 8: Specifications
Go to the System Settings on FCC Compliance Statement systems or contact the retailer where the Reolink. Learn more: your phone and allow Reolink App to send product was purchased. They can take this https://reolink.com/eula/ This device complies with Part 15 of FCC Rules. - Page 9 Lieferumfang Überblick Lieferumfang Allgemeine EINFÜHRUNG Kamera-Einrichtung Laden des Akkus Kamera Sicherheitshalterung Akku HÜLLE Nadel zum Installation der Kamera FÜR den Außenbereich Zurücksetzen Wichtige Hinweise zur Verwendung von Akkus Fehlerbehebung Technische Daten Konformitätserklärung Überwachungszeichen Kurzanleitung Montage- Schrauben Netzkabel Lochschablone (im Paket) * Kamera und Akku sind separat in einem Paket verpackt.
- Page 10 Kamera Einrichtung Allgemeine EINFÜHRUNG Tipps für Auswahl einer geeigneten SIM-Karte Internes Mikrofon Infrarot-LEDs • Wählen Sie eine Nano-SIM-Karte aus, die WCDMA und FDD LTE unterstützt. • Aktivieren Sie die Karte vor dem Einsatz in der Kamera per Smartphone oder über Ihren Anbieter. Tageslichtsensor HINWEIS: Linse...
- Page 11 1. Die Reolink App oder Client Software herunterladen und installieren. im Anbieternetz überprüfen Sie die Sie die Kamera an einem Ort mit 2. Reolink Software öffnen und die folgenden Anleitungen folgen, um die Ersteinrichtung zuschaffen. registrieren. Signalstärke“. besserem Empfang. 3. Prüfen Sie, ob Sie die korrekte •...
- Page 12 Laden Sie den Akku mit einer Laden Sie den Akku mithilfe des Installation schräg, um die effektive Netzkabel(nicht im Lieferumfang enthalten). Reolink-Solarpanels (nicht im Lieferumfang Montagehöhe: Bewegungserkennung zu gewährleisten. * Akku kann separate aufgeladen werden. enthalten, wenn Sie nur die Kamera kaufen).
- Page 13 Installation an der Wand Die Kamera an einem Baum befestigen Bohren Sie Löcher gemäß der Schablone und schrauben Sie die Halterung an die Wand. Wenn Sie die Kamera an einer harten Wand montieren wollen, müssen Sie zuerst die Dehnschrauben in die Löcher einsetzen. Ziehen Sie das Klettband Richten Sie das Klettband mit Befestigen Sie die Halterung...
- Page 14 12. Always follow the local waste and recycle laws when you get rid of the used battery. 1. Bitte laden Sie den Akku mit einem standardmäßigen und hochwertigen DC 5V oder 9V Ladegerät oder Reolink Solarpanel auf. Bitte den Akku nicht mit einem Solarpanel von anderen Marken aufladen.
- Page 15 Audiowarnung: Benutzerdefinierte Push- Benachrichtigung aktiviert ist. Warnmeldungen mit Sprachaufzeichnung • Stellen Sie sicher, dass der PIR-Zeitplan Reolink erklärt, dass dieses Gerät den HINWEIS: Wir hoffen, dass Ihnen der Neukauf Weitere Warnmeldungen: Sofortige richtig konfiguriert ist. grundlegenden Anforderungen und anderen gefällt.
- Page 16 LTE TDD: B40 (23dBM) Installer la caméra stimmen Sie den Bestimmungen dieses WCDMA: B1/B2/B5/B8 (24dBM) Endbenutzer-Lizenzvertrags („EULA“) Instructions de sécurité sur l’utilisation de batterie zwischen Ihnen und Reolink zu. Weitere Informationen: https://reolink.com/eula/ Dépannage Erklärung zur Strahlenexposition nach ISED Caracteristiques techniques Dieses Gerät entspricht den...
- Page 17 Contenu de la boîte Introduction de caméra Micro intégré LED infrarouge Capteur de lumière du jour Objectif Caméra Support de Batterie Coque Aiguille de sécurité d'extérieur rechargeable réinitialisation LED d’état Capteur de mouvement PIR intégré Haut-parleur Port Micro USB Signe de Guide de Gabarit de perçage Vis (dans...
- Page 18 1. Tournez le couvercle dans le sens antihoraire, 2. Insérez la batterie dans la caméra 2. Lancez le logiciel Reolink et suivez les instructions pour terminer la configuration. insérez la carte SIM dans la fente. surveillance et serrez le couvercle arrière.
- Page 19 Chargez la batterie avec le « Non enregistré sur le peut pas être 2. Le signal est faible à la secteur (non inclus dans l’emballage). panneau solaire Reolink (nécessite réseau. Veuillez activer enregistrée sur localisation actuelle. Veuillez * La batterie peut également être un achat séparé).
- Page 20 Installer la caméra Monter la caméra au mur • Utilisez la coque de la caméra pour une meilleure résistance aux intempéries lorsque vous installez la caméra à l'extérieur. Percez des trous selon le gabarit de perçage des trous, puis vissez le support de sécurité au mur. Si vous voulez •...
- Page 21 1. Chargez la batterie rechargeable avec un chargeur de batterie standard et de haute qualité 5V/9V en courant continu ou avec un panneau solaire Reolink. Ne chargez pas la batterie avec des panneaux solaires d'autres marques. 2. Chargez la batterie lorsque les températures sont entre 0°C et 45°C et utilisez toujours la batterie lorsque les températures sont entre -20°C et 60°C.
- Page 22 Caractéristiques feu, dans les fours à micro-ondes et les récipients sous pression. Si cela ne fonctionne pas, veuillez contacter le soutien Reolink https://support.reolink.com/ techniques 11. N'utilise pas la batterie si elle dégage une odeur, génère de la chaleur, se décolore ou se déforme, ou semble anormal de quelque façon que ce soit.
- Page 23 à la santé humaine, Contrat de licence d'utilisateur final recyclez-les de manière responsable afin de En utilisant le logiciel qui est intégré au produit Reolink, vous promouvoir la réutilisation durable des acceptez les termes de ce Contrat de Licence Utilisateur Final Déclaration de conformité...
- Page 24 Contenuti Cosa c’è nella Scatola Cosa c’è nella Scatola Presentazione della Telecamera Configurare la Telecamera Caricare la Batteria Telecamera Staffa di Sicurezza Batteria Copertura Spillo Installare la Telecamera Ricaricabile di Ripristino Uso della Batteria in Maniera Sicura Risoluzioni dei Problemi Specifiche Notifica di Conformità...
- Page 25 Configurare la Telecamera Presentazione della Telecamera Consigli su Come Selezionare la Scheda SIM Adatta Microfono Incorporato Luci a Infrarossi • Scegli una scheda Nano Sim che supporta WCDMA e FDD LTE. • Attivare la scheda tramite lo smartphone o l’operatore di rete prima di inserirla nella telecamera. Sensore Luce Diurna AVVISO: Lenti...
- Page 26 1. Scaricare e installare l’ app Reolink o il software del cliente. posizione attuale, posizionare la può essere registrata scheda SIM e controllare 2. Attivare il software Reolink e seguire le istruzioni per finire la configurazione iniziale. telecamera in un posto con alla rete di operatore. la potenza del segnale"...
- Page 27 Caricare la batteria con un’adattatore Caricare la batteria con il pannello angolarmente. di alimentazione (non incluso). solare Reolink (Non è inclusa se si Altezza * La batteria può anche essere compra solo la telecamera). di 2-3 metri caricata separatamente.
- Page 28 Montare la Telecamera a Parete Attaccare la Telecamera all’Albero Perforare a seconda della dima per fori di montaggio e fissa la staffa di sicurezza a parete. Se la montare a parete solida, bisogna mettere le viti di espansione nei fori. Infilare la cinghia a strappo Fissare la piastra infilata alla Legare la staffa su albero.
- Page 29 1. Caricare la batteria ricaricabile con un caricatore DC 5V/9V standard e di alta qualità o con il La telecamera non si accende pannello saloare Reolink. Non caricare la batteria con il pannello solare di altri marchi. Se il sensore PIR non riesce ad attivare 2.
- Page 30 Se non si riesce a ricevere qualsiasi notifica Allarme audio: esperienza aver acquistato il nostro prodotto. Reolink dichiara che questo dispositivo è in push quando si rivelano i movimenti, provare avvisi vocali personalizzabili e registrabili Nel caso non fossi soddisfatto del prodotto conformità...
- Page 31 ¿Qué Hay en la Caja? LTE FDD: B1/B3/B5/B7/B8/B20 (23dBM) questo accordo di licenza per l’utente finale WCDMA: B1/B5/B8 (24dBM) Introducción de Cámara (“EULA”) fra voi e Reolink. Scopri di più: • Gli Stati Uniti: https://reolink.com/eula/ LTE FDD: B2/B4/B12 (23dBM) Configure la Cámara WCDMA: B2/B4/B5 (25dBM) •...
- Page 32 ¿Qué Hay en la Caja? Introducción de Cámara Micrófono Incorporado Luces Infrarrojas Sensor de Luz Solar Objetivo Cámara Soporte de Seguridad Batería Cubierta Aguja para Exteriores Recargable de Reinicio LED de Estado Sensor de Movimiento PIR Incorporado Altavoz Puerto Micro USB Señal de Guía de Plantilla de...
- Page 33 1. Quite la cubierta de atrás rotándola 2. Inserte la bateria en la cámara y 2. Inicie el software de Reolink y siga las instrucciones para finalizar la configuración inicial. en sentido antihorario e inserte la SIM apriete la cubierta de atrás para en la ranura.
- Page 34 Cargue la batería con panel solar "No registrada en la red. para activar la tarjeta SIM. de corriente (no incluido). de Reolink (No se incluye si sólo La cámara no puede Active su tarjeta SIM y 2. La señal puede ser débil en su * La batería también se puede...
- Page 35 Instalación de Cámara Monte la Cámara a la Pared • Use la cubierta protectora de la cámara para un mejor redimiento resistente al agua cuando instala la cámara en exteriores. Taladre agujeros de acuerdo con la plantilla y atornille el soporte de seguridad a la pared. Si •...
- Page 36 1. Cargue la batería recargable con un cargador estándar y de alta calidad de DC 5V/9V o Panel Solar de Reolink. No cargue la batería con paneles solares de otas marcas. 2. Cargue la batería bajo temperaturas entre 0°C y 45°C y use siempre la batería bajo temperaturas entre -20°C y 60°C.
- Page 37 • Si tiene otra batería de repuesto, cambie la apropiada. • Asegúrese de que ha activado Permitir batería para intentarlo. • Puntee la aplicación Reolink y vaya a Notificaciones en su teléfono. Vaya a la Configuración del Dispositivo > Configuración Configuración del Sistema en su teléfono y Si no funciona, comuníquese con Soporte de...
- Page 38 Este equipo cumple con los límites de exposición a la radiación RSS-102 NOTA: Esperamos que disfrute de la nueva Reolink declara que este dispositivo cumple con establecidos para un entorno no controlado. compra. Pero si no está satisfecho/a con el...
Need help?
Do you have a question about the Go EXT and is the answer not in the manual?
Questions and answers