Table of Contents
Advertisement
Quick Links
Reolin k Argus
Quick Start Guide
Technical Support
For advanced setup, please download the user manual:
https://reolink.com/software-and-manual/
For more troubleshooting, please go to FAQs on our website:
https://reolink.com/faqs/
For other technical support, please contact us at
QG 1_A
support@reolink.com
Advertisement
Table of Contents

Subscribe to Our Youtube Channel
Related Manuals for Reolink Argus


Summary of Contents for Reolink Argus
-
Page 1: Quick Start Guide
Reolin k Argus Quick Start Guide Technical Support For advanced setup, please download the user manual: https://reolink.com/software-and-manual/ For more troubleshooting, please go to FAQs on our website: https://reolink.com/faqs/ For other technical support, please contact us at QG 1_A support@reolink.com... - Page 2 Welcome to Reolink Easy Setup Within Minutes!
-
Page 3: General Introduction
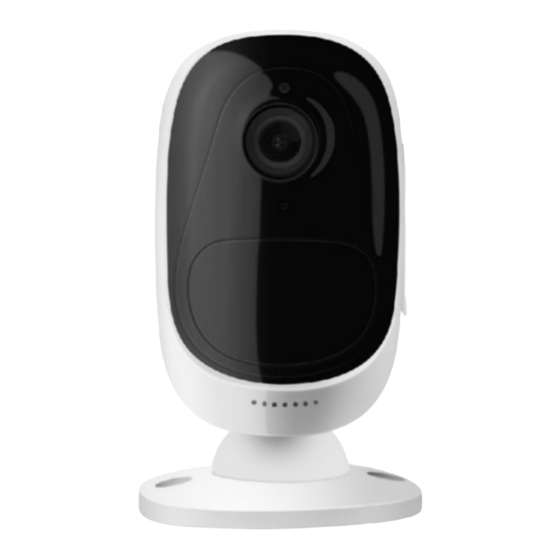
What’s in the Box General Introduction Micro SD Card Slot Reset Button Daylight Sensor Lens Status LED Reolink Argus Camera Magnetic Base Outdoor Security Mount CR 123A Batteries Built-in Mic Built-in PIR Motion Sensor Speaker Magnetic Base Reset Needle Surveillance Sign... -
Page 4: Important Safeguards On Battery Use
Important Note Step 1 Step 2 Step 3 Reolink Argus is not designed for 24/7 full capacity running or around-the-clock live streaming. It’s designed to record motion events and remotely view live streaming Please use the stick to Insert four batteries Close the back casing. -
Page 5: Install Reolink App
Install Reolink App There are two ways to get the Reolink App: Search “Reolink” in App Store (for iOS), or Google Play (for Android), download and install the app. Scan the QR code below to download and install the app. - Page 6 If you did not hear the voice prompt, please page. Argus camera’ lens at a distance of about 20cm (8 inches) to let the camera scan the QR code. press “I did not hear the voice prompt” for Please make sure that you’ve ripped the protection film of the camera’s lens.
- Page 7 Wi-Fi connection succeeds! Welcome window will show as below. Create a new password for your camera, and click OK. check the Wi-Fi settings and try again. to Reolink! Note: If you hear the above voice prompt, please If you hear the above voice prompt, please For your account’s security, please create a strong password (at least 6 characters)
-
Page 8: Live Video
The default sensitivity of the PIR sensor is at “Mid” and the detecting distance is 6 meters (20ft). If you want to adjust the sensitivity, please launch your Reolink App, and then click “Device Settings” -> “PIR Settings” and click the “save” button to save the settings. - Page 9 Cover the Monitoring Area Important Notes for Reducing False Alarms When installing the camera, it’s not suggested to It’s not suggested to make make the PIR sensor vertically face the moving the PIR sensor vertically For reducing false alarms, please note that: face the moving object.
- Page 10 The Ideal Viewing Distance The ideal viewing distance is 2-10 meters (7-33ft), which enables you to recognize a human. Ideal Viewing Distance: 2-10 meters (7-33ft)
Need help?
Do you have a question about the Argus and is the answer not in the manual?
Questions and answers