Table of Contents
Advertisement
Quest
™
MANUAL XL
ATTENTION!
SAFETY INFORMATION, INSTALLATION AND USAGE INSTRUCTIONS.
READ PRIOR TO INSTALLING AND USAGE.
See VulyPlay.us/support for any updates to these instructions.
Visit
www.vulyplay.us/install
for step by step video instructions, or scan this QR code
If you have any feedback regarding our instructions, feel free to
email
instructions@vulyplay.com
so that we can continue to improve.
Advertisement
Table of Contents

Subscribe to Our Youtube Channel
Related Manuals for Vuly Quest XL


Summary of Contents for Vuly Quest XL
- Page 1 Quest ™ MANUAL XL ATTENTION! SAFETY INFORMATION, INSTALLATION AND USAGE INSTRUCTIONS. READ PRIOR TO INSTALLING AND USAGE. See VulyPlay.us/support for any updates to these instructions. Visit www.vulyplay.us/install for step by step video instructions, or scan this QR code If you have any feedback regarding our instructions, feel free to email instructions@vulyplay.com so that we can continue to improve.
-
Page 2: Table Of Contents
2.2. Due Care when Installing Product 2.3. Safe use instructions 3.0. Pre-assembly 3.1. Size Reference 3.2. Tips & Tricks 3.3. Parts and components 4.0. Assembly instructions – Vuly Quest 5.0. Product registration 6.0. Half-price replacement parts 7.0. Warranty 7.1. Warranty periods 7.2. Inclusions 7.3. - Page 3 Vuly. contract or breach of statutory duty on the part of Vuly, its office bearers, directors, employees or agents. WARNING: To reduce the risk of injury while using the system, enforce the following: •...
-
Page 4: Care And Maintenance
Ensure that moving steel components remain well lubricated. residual water with a dry cloth. Moisture left on the • Use only parts and accessories recommended by Vuly. 1.2. Rust and corrosion WIND: Disconnect any accessories, and cover the frame with a storm cover. -
Page 5: Usage And Behaviour
• Ensure you follow the steps in the manual at all times. 2.3. Safe use instructions ADULT SUPERVISION IS REQUIRED AT ALL TIMES WHILST EQUIPMENT IS IN USE. VULY CARES ABOUT SAFETY. WARNING: To reduce the risk of injury while using the system, enforce the following: •... -
Page 6: Pre-Assembly
3.0. Pre-assembly 3.1. Size Reference 3.2. Tips & Tricks 3.2.1. Joiner Fitting Difficulty in inserting joiners to frame tubes can be resolved by To align the joiner holes with the holes in the frame tube, take the inverting the tube and tapping the internal joiner against a scrap large 8mm Allen key and insert it into the top hole in the joiner tube piece of wood. - Page 7 3.2.2. Uneven Ground If assembling the Quest on uneven ground adjusting the flip rails will reduce rocking. If the Quest still seems unsteady, loosen the feet and move them down slightly. 3.2.3. Exploded View...
-
Page 8: Parts And Components
3.3. Parts and components DO NOT REMOVE PARTS FROM CARTONS UNTIL REQUIRED, OR MIX CARTON CONTENTS. BOX A... - Page 9 BOX B...
- Page 10 BOX C BOX E...
- Page 11 BOX F BOX H...
- Page 12 BOX SHADE COVER...
-
Page 13: Assembly Instructions - Vuly Quest
CLIMBING RAIL scan this QR code for video instruction: PRE-ASSEMBLY You will require the following: • Ladder • Rubber mallet • Tape measure or ruler ENSURE THAT AS YOU ASSEMBLE THE PRODUCT, YOU FIRMLY TIGHTEN ALL NUTS AND BOLTS, UNLESS DIRECTED. - Page 14 HAND TIGHT THE BOLTS AND MAKE SURE THEY ARE VERY LOOSE. You may need to rotate some Monkey Bars to fit into the remaining Climbing Rail. Make sure that the straight Climbing Bars are in the middle, and the angled Climbing Bars are in the either ends of the Climbing Rails, as indicated above.
- Page 15 ONLY HAND TIGHT THE BOLTS AND MAKE SURE THEY ARE VERY LOOSE. If having difficulties to get the Climbing Bars into the climbing Rails, double check to make sure all the bolts done in Step 3 remain very loose.
- Page 16 Once all of the climbing bars are loosely threaded into the climbing rails, tighten all of the bolts to make sure the climbing section is secure. FRAME 60MM...
- Page 17 WARNING: Ensure that you align these parts correctly. Once inserted, they will be very difficult to remove or adjust.
- Page 19 YOU HAVE A CARGO NET? SKIP TO STEP 19...
- Page 21 NO CARGO NET? SKIP TO STEP 25...
- Page 22 CARGO NET ASSEMBLY NO CARGO NET? SKIP TO STEP 25...
- Page 25 YOU HAVE A CARGO NET? SKIP TO STEP 34...
- Page 26 FRAME ASSEMBLY 60MM 60MM...
- Page 29 NO CARGO NET? SKIP TO STEP 42...
- Page 33 SKIP TO STEP 44...
- Page 35 WARNING: Ensure correct parts are installed and E2 is longer than E4.
- Page 39 NO FLYING FOX? SKIP TO STEP 56...
- Page 40 FLYING FOX FOR VERSION 1 FOR VERSION 2...
- Page 41 Adjust the length as required...
- Page 42 SHADE COVER TUBE...
- Page 46 If you will attach Standard Accessories: slide on the Accessory Joiners now, where you want to position your accessories. Ensure there is a minimum 450mm clearance between each swing element. Ring Swing Instruction WARNING: Refer to Ring Swing’s manual before continuing with the instructions if you have one.
- Page 47 WARNING: Best result with TWO people...
- Page 48 If you will attach Standard Accessories: slide on the Accessory Joiners now, where you want to position your accessories.
- Page 49 WARNING: Best result with TWO people If you will attach Standard Accessories: slide on the Accessory Joiners now, where you want to position your accessories.
- Page 50 SIDE LEGS...
- Page 51 WARNING: Do not force any part too far into the Angled Joiner. This will block the part on the other side from connecting completely.
- Page 52 45°...
- Page 53 SHADE COVER Tips: Loosen tension hook for easier installation...
- Page 54 Tighten all tension hooks to secure the shade cover...
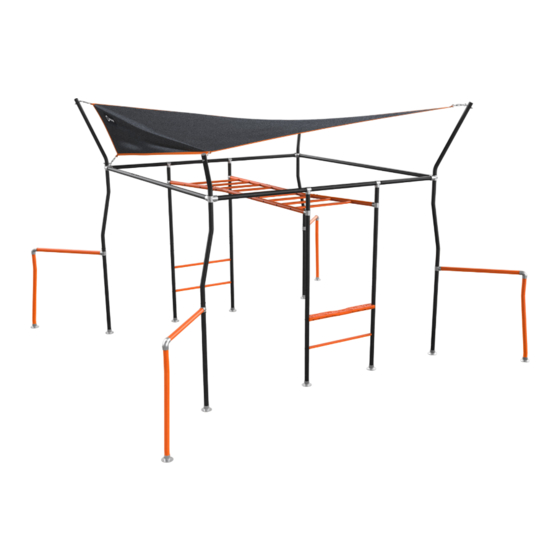
- Page 55 TIGHTEN ALL NUTS AND BOLTS AND ENSURE THE PARTS LOCK TOGETHER SECURELY. CONGRATULATIONS! You have assembled your Quest monkey bar.
-
Page 56: Product Registration
Damage to the product that results from weather events – such as 7.0. Warranty rain or wind – are not covered under the warranty. Vuly suggests that you contact your home and contents insurer if your product is All Vuly products are sold with a manufacturing warranty, damaged by such events. -
Page 57: Warranty Claims
This warranty (on steel components, specifically) will be reduced Vuly premises, they must first submit an online Warranty Claim at by 50% where the Vuly product is assembled within 1.6 km of a VulyPlay.us/Support – providing all required details. salt water environment or where it is subject to ocean spray. - Page 58 VulyPlay.us/Terms for the most recent Vuly warranty policies, terms and conditions.
Need help?
Do you have a question about the Quest XL and is the answer not in the manual?
Questions and answers