Advertisement
Quick Links
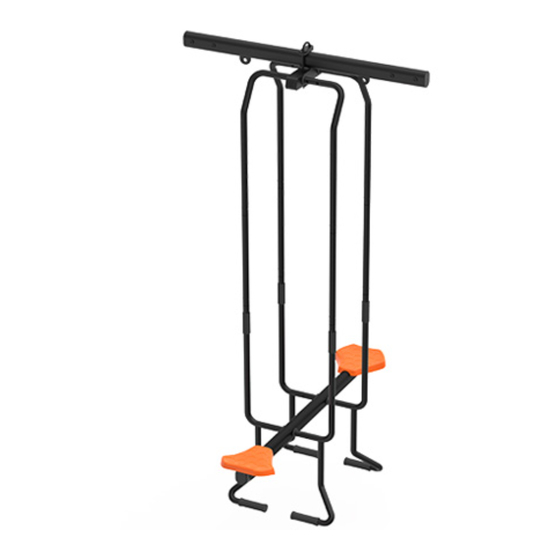
Seesaw Swing
ENSURE THAT AS YOU FOLLOW THESE INSTRUCTIONS, YOU FIRMLY SECURE ALL PARTS WITH NUTS AND BOLTS.
1
STEP
A.
Insert Bushings
into the four
holes in the Top
Connector.
Insert a Top Bar (Male) and Top Bar (Female) into the
B.
Bushings on one side of the Top Connector.
Repeat for the other side, but swap the positioning of
the Male and Female Top Bars.
2
STEP
Position a Top Bracket on top
of your Swing Rail, and the Top
Connector underneath.
Secure the parts together with
Hanging Bolts.
WARNING:
YOU MUST USE A 17 MM SPANNER
(NOT SUPPLIED) TO TIGHTEN THE HANGING BOLTS.
You must ensure that the Top Bracket is tightened
evenly, or the bolt threading may strip – causing the
swing to weaken and become unsafe.
3
STEP
A.
Insert Bushings into the four holes in the Base Rail.
Insert Bottom Bars
B.
(Male) onto one
side and Bottom
Bars (Female) into
the other.
4
STEP
VULY MINI:
Insert the ends of the Bottom Bars
into the Top Bars.
Secure the parts with Frame Bolts.
VULY MAX:
Insert the small end of the Max Tubes into
the ends of the Top Bars, and the Bottom
Bars into the large ends of the Max Tubes.
Secure the parts with Frame Bolts.
5
STEP
6
STEP
Insert a Foot into the end of each
Bottom Bar.
Ensure that those for the Left and
Right are on the appropriate side.
CONGRATULATIONS!
You have attached the Seesaw Swing
to your Swing Set.
MANUAL
Attach a Seat to each
end of the Base Rail.
Advertisement

Related Manuals for Vuly Seesaw Swing


Summary of Contents for Vuly Seesaw Swing
- Page 1 Insert Bushings into the four holes in the Base Rail. Right are on the appropriate side. Insert Bottom Bars (Male) onto one side and Bottom CONGRATULATIONS! Bars (Female) into the other. You have attached the Seesaw Swing to your Swing Set.
- Page 2 Read prior to installing and using the swings. See VulyPlay.com/support for any updates to these instructions. ADULT SUPERVISION IS REQUIRED AT ALL TIMES WHILST EQUIPMENT IS IN USE. VULY CARES ABOUT SAFETY. WARNING! • Minimum user age – 6 years. Only for domestic and outdoor use.
Need help?
Do you have a question about the Seesaw Swing and is the answer not in the manual?
Questions and answers