
Related Manuals for HOMCOM A90-290


Summary of Contents for HOMCOM A90-290
- Page 1 INapa008_IT_EN A90-290 IMPORTANT, RETAIN FOR FUTURE REFERENCE: READ CAREFULLY ASSEMBLY & INSTRUCTION MANUAL...
- Page 2 Prima di utilizzare il prodotto, leggere attentamente le seguenti istruzioni. Se si verificano le seguenti condizioni, prestare attenzione al tempo di allenamento e consultare un medico prima dell'uso. * Si hanno malattie cardiache * Si hanno disabilità sensoriali * Si soffre di osteoporosi o diabete * Si è...
- Page 3 LISTA PARTI Lista parti Quantità Lista parti Quantità Viti di fissaggio⑦ Telaio principale inferiore① Dadi di fissaggio⑧ Telaio principale centrale② Chiave multiuso⑨ Telaio di collegamento inclinato Chiave a brugola⑩ centrale③ Manopola⑪ Gruppo di rotazione pedale inferiore④ 1 Metro⑫ Montanti di collegamento superiore ⑤ Viti di fissaggio⑬...
- Page 4 STEP DI INSTALLAZIONE DEL PRODOTTO Step 1: Per prima cosa, estrarre tutti gli accessori dalla confezione e disporli Step 2: Appoggiare il telaio principale inferiore ① in piano e sovrapporre il foro del tubo sinistro ②, la vite ⑦ 8*50 e ⑧ utilizzare la chiave multiuso ⑨ ⑩per stringerli.
- Page 5 Step 3: sovrapporre il telaio principale inferiore ① con il foro del ③ tubo destro e stringere la vite 8*50 con una ⑧ chiave multiuso ⑨ ⑩. Step 4: Sovrapporre i fori del tubo di fissaggio ② e ③ e stringere le viti ⑦ 8*50 e ⑧ con la chiave multiuso ⑨...
- Page 6 Step 5: Connettere il gruppo di rotazione pedale inferiore ④ all’estremità superiore del telaio principale inferiore ③,e inserire la vite ⑦ 8*50 e ⑧ con la chiave multiuso ⑨ ⑩ per stringere nei fori doppi. Step 6: Inserire il telaio principale superiore nell'estremità superiore del telaio principale inferiore, quindi fissare il perno in posizione con la manopola, regolare i livelli superiore e inferiore in modo flessibile, quindi stringere la manopola.
- Page 7 Step 7: Connettere il gruppo delle impugnature superiori⑥ all'estremità superiore del telaio principale⑤ e inserire la vite con la chiave multiuso ⑨ ⑩ per stringere i fori doppi. Step 8: L'installazione è completa! Nota: il display elettronico può essere installato sul gruppo pedale superiore a scelta. (18*50 è...
- Page 8 Before using the product,please read the following instructions carefully. If you have the following conditions,please pay attention to your exercise time and consult a doctor before use. * Have heart disease * Have sensory impairment * Suffering from osteoporosis or diabetes * During pregnancy * Have a malignant tumor * Physical disability...
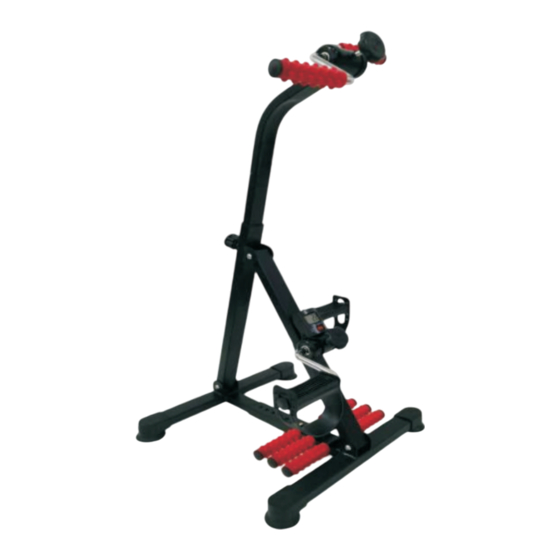
- Page 9 PRODUCT ALL PARTS LIST...
- Page 10 PRODUCT INSTALLATION STEPS Step 1: First take ou tall the accessories in the carton and lay it down Step 2: Lay the lower main frame ① flat and overlap the pipe hole on the left ②, ⑦ 8*50 screw and ⑧ use wrench ⑨ ⑩ to tighten together.
- Page 11 Step 3: Overlap the lower main frame ① with the right ③ pipe hole, and tighten the 8*50 screw and ⑧ with a wrench ⑨ ⑩. Step 4: Overlap the fixed pipe holes ② and ③, and tighten the screws ⑦ 8*50 and ⑧ with wrench ⑨...
- Page 12 Step 5: Splice the lower limb rotating foot assembly ④ on the upper end of the lower main frame ③, and insert the ⑦ 8*50 screw and ⑧ with the wrench ⑨ ⑩ to tighten the double holes. Step 6: Insert the upper main frame into the upper end of the lower main frame, and then use the knob to pull the pin to fix it, adjust the upper and lower levels adaptively and flexibly, and then tighten the knob.
- Page 13 Step 7: Join the upper body rotating armrest assembly ⑥at the upper end of the upper main frame , and insert the screw with the wrench ⑨⑩ to tighten the double holes. Step 8: The installation is complete! Note: The electronic watch can also be installed on the upper limb rotation pedal assembly ⑥...
Need help?
Do you have a question about the A90-290 and is the answer not in the manual?
Questions and answers