Table of Contents
Advertisement
Quick Links
Advertisement
Table of Contents

Related Manuals for NovaStar VX400s-N


Summary of Contents for NovaStar VX400s-N
- Page 1 VX400s-N All-in-One Controller User Manual...
- Page 2 Change History Document Version Release Date Description V1.0.0 2023-07-03 First release www.novastar.tech...
-
Page 3: Table Of Contents
VX400s-N All-in-One Controller User Manual Contents Introduction ..................................1 Appearance ..................................1 Applications ..................................3 Home Screen ................................... 3 Home Screen ................................3 Menu Operations ................................4 Screen Brightness..............................5 Screen Configuration ..............................5 5.2.1 Quick Configuration ............................5 5.2.2 Send Cabinet Configuration File ........................6 5.2.3 Save to RV Card .............................. -
Page 4: Introduction
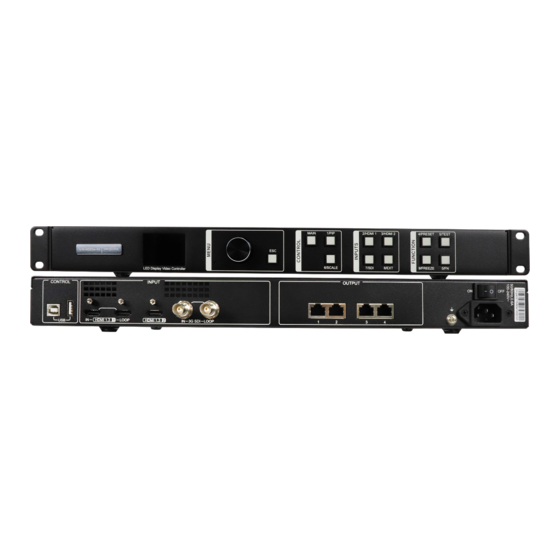
The VX400s-N is NovaStar's new all-in-one controller that integrates video processing and video control into one box. It features 4 Ethernet ports. A VX400s-N unit can drive up to 2.6 million pixels, with the maximum output width and height both up to 3840 pixels. - Page 5 VX400s-N All-in-One Controller User Manual Rear Panel Input Connectors Connector Description 3G-SDI ST-424 (3G), ST-292 (HD) and ST-259 (SD) standard video inputs supported Max. input resolution: 1920×1080@60Hz Deinterlacing processing supported 3G-SDI loop output supported Does Not support input resolution and bit depth settings.
-
Page 6: Applications
VX400s-N All-in-One Controller User Manual − Input connector for device cascading USB (Type-A): Output connector for device cascading Applications Home Screen Home Screen Figure 4-1 Home Screen Icon Description VX400s-N The device name 10.134.234.20 The device IP address www.novastar.tech... -
Page 7: Menu Operations
VX400s-N All-in-One Controller User Manual Icon Description Main The layer input source and resolution Screen The current screen resolution The screen brightness, 0% (black) to 100% (brightest) Port The Ethernet port number and port status : The Ethernet port is connected and serves as the primary output port. -
Page 8: Screen Brightness
VX400s-N All-in-One Controller User Manual After the settings, if you need to shut down the device, please wait at least 5 seconds; otherwise, the parameter settings may not be saved. Screen Brightness Screen brightness allows you to adjust the LED screen brightness in an eye-friendly way according to the current ambient illuminance. -
Page 9: Send Cabinet Configuration File
VX400s-N All-in-One Controller User Manual The following data flow settings are supported. During data flow settings, ensure that each port's physical connection is along the same direction and downward to the next one. During data flow settings, ensure that Ethernet Port 1 is at the beginning of the actual physical connection. -
Page 10: Save To Rv Card
VX400s-N All-in-One Controller User Manual Figure 5-5 Log in to NovaLCT Step 2 Go to Tools > Controller Cabinet Configuration File Import to enter the controller cabinet configuration file importing page. Figure 5-6 Import cabinet configuration file Step 3 Click Add Configuration File and select the desired file from the window that appears. -
Page 11: Output Frame Rate
The supported frame rates include 23.98Hz, 24Hz, 25Hz, 29.97Hz, 30Hz, 47Hz, 48Hz, 50Hz, 59.94Hz, 60Hz, 71.93Hz, 72Hz, 75Hz, 85Hz, 95Hz, 100Hz, 119.88Hz, 120Hz. Layer Settings The VX400s-N supports two layers. The layer properties and settings are shown in Table 5-1. -
Page 12: Add Layers
VX400s-N All-in-One Controller User Manual 5.3.1 Add Layers Button Operations Step 1 Press the MAIN, 1/PIP button in the CONTROL area on the device front panel to quickly open the layer and the device screen displays the corresponding layer settings screen. -
Page 13: Switch Layer Input Sources
VX400s-N All-in-One Controller User Manual 5.3.2 Switch Layer Input Sources Button Operations Step 1 Press the MAIN, 1/PIP button in the CONTROL area on the device front panel to quickly open the layer and the device screen displays the corresponding layer settings screen. -
Page 14: Input Settings
Figure 5-12 Select input source 5.4.1 Set Input Resolution The VX400s-N provides the HDMI and 3G-SDI (optional) input connectors. When an HDMI input source is output by a graphics card, the resolution settings are supported. The following two methods are provided to set the input resolution: ... - Page 15 VX400s-N All-in-One Controller User Manual Standard Resolution Step 1 On the input settings screen, select the desired input source and press the knob to enter the input resolution settings screen. Step 2 Select EDID and press the knob to enter the EDID settings screen.
-
Page 16: Set Input Source Color
Preset Settings A preset is a set of parameters that save the layer and layer-related information. The VX400s-N supports ten user-defined presets. After a preset is saved, you can load the preset simply by its name. The preset operations include Save, Load and Clear. -
Page 17: Save Presets
Rotate the knob to select Yes and press the knob to clear the preset. Image Mosaic When the pixel count of an LED screen is larger than the loading capacity of a single VX400s-N unit, the image mosaic function is required. You can use multiple device units together to load the LED screen. -
Page 18: Display Control
VX400s-N All-in-One Controller User Manual Figure 5-17 Connection method for image mosaic Notes After the image mosaic function is turned on, the full screen scaling and pixel to pixel display of the layer are unavailable. Operating Procedure Step 1 On the main menu screen, rotate the knob to select Image Mosaic and press the knob to enter the image mosaic settings screen. -
Page 19: Advanced Settings
The advanced settings allow you to set the device backup, synchronization, audio and input source HDCP. 5.8.1 Device Backup The VX400s-N supports both the backup between devices and Ethernet ports. Backup Between Devices Device backup allows you to set the backup relationship between two devices. You can set one of the devices as the primary device or the backup device. - Page 20 VX400s-N All-in-One Controller User Manual Figure 5-20 Device backup connection The setting procedure for the device backup: Step 1 On the main menu screen, go to Advanced Settings > Device Backup to enter the device backup screen. Figure 5-21 Device Backup Step 2 Rotate the knob to select Primary.
- Page 21 VX400s-N All-in-One Controller User Manual Figure 5-22 Ethernet port backup connection The setting procedure for the Ethernet port backup: Step 1 Run the NovaLCT software. On the menu bar, go to User > Advanced Synchronous System User Login. Enter the password and click Login.
-
Page 22: Synchronization
VX400s-N All-in-One Controller User Manual Figure 5-24 Ethernet port backup Step 7 Click Add to complete the backup settings of an Ethernet port, and the system will automatically list the primary ports and backup ports. Figure 5-25 Primary Ethernet ports... -
Page 23: Audio
Step 3 Rotate the knob to select Source and press the knob to confirm. Then rotate the knob again to select the desired sync source. Note: If two or more VX400s-N units load an LED screen, the sync sources used by each device must be the same. 5.8.3 Audio This function allows you to set the audio output and audio volume. -
Page 24: Volume
VX400s-N All-in-One Controller User Manual Figure 5-29 Audio output Off: Turn off the audio. Main Layer/PIP: Play the audio that comes with the main layer or PIP layer. Step 3 Press the knob to complete the selection. 5.8.3.2 Volume Adjust the audio volume. -
Page 25: Return To Home (S)
VX400s-N All-in-One Controller User Manual 5.9.2 Return to Home (s) You can set the period when the system stays at the current screen before returning to the homepage automatically when there is no operation performed. The value ranges from 60s to 3600s. -
Page 26: Communication Settings
You can set the communication information to enable the device to communicate with the control PC smoothly. 5.11.1 Set Communication Mode The VX400s-N can communicate with the control PC via the USB cable. You can select your preferred communication mode. -
Page 27: Video Source Features
VX400s-N All-in-One Controller User Manual Packing Information Accessories 1x Power cord 1x USB cable 1x HDMI cable 1x Certificate of Approval 1x Safety Manual Packing size 550.0mm × 175.0mm × 400.0mm Gross weight 5.3kg Noise Level (typical at 25° C/77° F) - Page 28 VX400s-N All-in-One Controller User Manual Elevated Operating Ambient - If installed in a closed or multi-unit rack assembly, the operating ambient temperature of the rack environment may be greater than room ambient. Therefore, consideration should be given to installing the equipment in an environment compatible with the maximum ambient temperature (Tma) specified by the manufacturer.
Need help?
Do you have a question about the VX400s-N and is the answer not in the manual?
Questions and answers