
Related Manuals for Body Solid FUSION 500


Summary of Contents for Body Solid FUSION 500
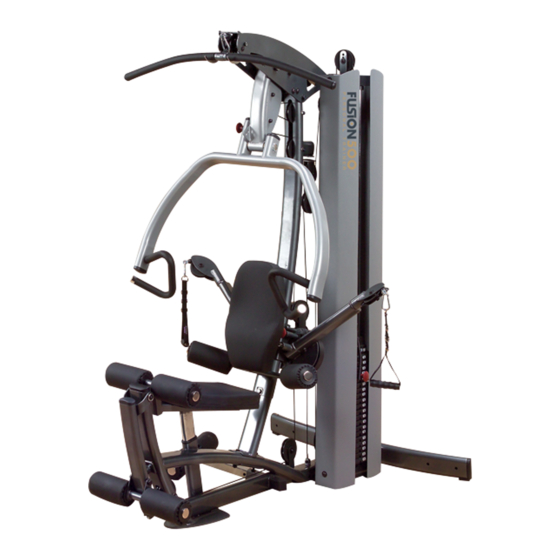
- Page 1 A s s e m b l y I n s t r u c t i o n s & & A s s e m b l y I n s t r u c t i o n s F 5 0 0 .2 O W N E R ` S M A N U A L O W N E R ’...
- Page 2 W a r n i n g , S a f e t y & M a i n t e n a n c e ...
- Page 3 T o t a l B o d y W o r k o u t D V D...
- Page 4 F u s i o n 5 0 0 R e f e r e n c e D r a w i n g s F u s i o n 5 0 0 F u s i o n 5 0 0 R e f e r e n c e D r a w i n g s R e f e r e n c e D r a w i n g s F u s i o n 5 0 0...
-
Page 5: Personal Safety During Assembly
I m p o r t a n t S a f e t y I n s t r u c t i o n s Before beginning any fitness program, you should obtain a complete physical examination from your physician. Il est conseille de subir un examen medical complet avant d’entreprendre tout programme d’exercise. Si vous avez des etourdissements ou des faiblesses, arretez les exercices immediatement. - Page 6 The dimension of the F500 are: width3'11" X length 6' 4". The usage space needed for the Fusion 500 could be more, depending if the user allows enough room for the The ceiling height requirement for the F500 is 6' 18".
- Page 7 S a f e t y G u i d e l i n e s Successful resistance training programs have one prominent feature in common...safety. Resistance training has some inherent dangers, as do all physical activities. The chance of injury can be greatly reduced or completely removed by using correct lifting techniques, proper breathing, maintaining equipment in good working condition, and by wearing the appropriate clothing.
-
Page 8: Assembly Tips
I n s t r u c t i o n s Assembly of the Fusion 500 takes professional installers about 3 hours to complete. If this is the first time you have assembled this type of equipment, plan on significantly more time. - Page 9 S T E P Be careful to assemble all components S T E P in the sequence they are presented. Be careful to assemble all components NOTE: in the sequence they are presented. Finger tighten all hardware in this step. Do Not wrench tighten until end of step 15. Some components may be pre-assembled.
- Page 10 S T E P S T E P S T E P Above shows STEP Above shows STEP assembled and completed assembled and completed 101X2 101X2 101X2 50X2 60X2 101X2 50X2 60X2 60X2 101X2 60X2 101X2 101X2 101X2 101X2 101X2 35X2 49X2 35X2...
- Page 11 S T E P Be careful to assemble all components in the sequence they are presented. NOTE: Finger tighten all hardware in this step. Do Not wrench tighten until end of Step 15. Some components may be pre-assembled. Connect Main Front Frame (N) and Rear Leg (H) to Main Base Frame (A) by using: Two 49 (M10x70 partial thread hex head bolt) Four 101 (M10 washer) Two 60 (M10 nylon lock nut)
- Page 12 S T E P 101x2 50x2 101x2 60x2 16x2 81x2 101x2 101x2 60x2 6X20 49x2 101x2 75x2 101x2 60x2...
- Page 13 S T E P Be careful to assemble all components S T E P in the sequence they are presented. Be careful to assemble all components NOTE: in the sequence they are presented. Finger tighten all hardware in this step. Do Not wrench tighten until end of step 15. Some components may be pre-assembled.
- Page 14 S T E P S T E P S T E P Above shows STEP Above shows STEP assembled and completed assembled and completed 101x2 101x2 60x2 60x2 101x2 50x2 101x2 50x2 101x2 25x2 101x2 25x2 50x2 50x2 26x2 26x2 101x2 60x2 101x2...
- Page 15 S T E P Be careful to assemble all components S T E P in the sequence they are presented. Be careful to assemble all components NOTE: in the sequence they are presented. Finger tighten all hardware in this step. Do Not wrench tighten until end of step 15. Some components may be pre-assembled.
- Page 16 S T E P S T E P S T E P DETAIL VIEW DETAIL VIEW Above shows STEP Above shows STEP assembled and completed assembled and completed ...
- Page 17 S T E P Be careful to assemble all components S T E P in the sequence they are presented. NOTE: Be careful to assemble all components Finger tighten all hardware in this step. Do Not wrench tighten until end of step 15. in the sequence they are presented.
- Page 18 S T E P S T E P S T E P Above shows STEP assembled and completed Above shows STEP assembled and completed 52X2 92X2 52X2 26X2 92X2 26X2 103X2 103X2 64X2 64X2 73X2 62X2 73X2 62X2 58X2 58X2 41X2 41X2 62X2...
- Page 19 S T E P Be careful to assemble all components in the sequence they are presented. NOTE: Finger tighten all hardware in this step. Do Not wrench tighten until end of step 15. Some components may be pre-assembled. Two 130 (Steel casing)
- Page 20 S T E P 45X2 101X2 100X2 101X2 60X2 103X2 92X2 53X2...
- Page 21 S T E P Be careful to assemble all components in the sequence they are presented. NOTE: Finger tighten all hardware in this step. Do Not wrench tighten until end of step 15. Some components may be pre-assembled. Connect Pulley (70) to Main Top Frame (C) by using: One 3 (M10x125 partial thread allen head bolt) Two 101 (M10 washer) One 60 (M10 nylon lock nut)
- Page 22 S T E P Above shows STEP assembled and completed 62X2 41X2 62X2 73X2...
- Page 23 S T E P Be careful to assemble all components in the sequence they are presented. NOTE: Finger tighten all hardware in this step. Do Not wrench tighten until end of step 15. Some components may be pre-assembled.
- Page 24 S T E P...
- Page 25 S T E P Be careful to assemble all components S T E P in the sequence they are presented. Be careful to assemble all components NOTE: in the sequence they are presented. Finger tighten all hardware in this step. Do Not wrench tighten until end of step 15. Some components may be pre-assembled.
- Page 26 S T E P Cable to constitute illustration Cable to constitute illustration S T E P LAT PULLDOWN CABLE (106) LAT PULLDOWN CABLE (106) Metal Ball End 5425mm Metal Ball End 5425mm Ball Stop End Ball Stop End 71-B 71-A 71-B 71-A 71-H...
- Page 27 S T E P Be careful to assemble all components in the sequence they are presented. NOTE: Finger tighten all hardware in this step. Do Not wrench tighten until end of step 15. Some components may be pre-assembled.
- Page 28 S T E P...
- Page 29 S T E P Be careful to assemble all components S T E P in the sequence they are presented. Be careful to assemble all components NOTE: in the sequence they are presented. Finger tighten all hardware in this step. Do Not wrench tighten until end of step 15. Some components may be pre-assembled.
- Page 30 S T E P S T E P Cable to constitute illustration S T E P Cable to constitute illustration LEG EXTENSION CABLE (107) LEG EXTENSION CABLE (107) Chain End 3540mm Stamped Eye End 3540mm Chain End LEFT ATTACHMENT CABLE (108) Stamped Eye End LEFT ATTACHMENT CABLE (108) Chain End...
- Page 31 S T E P Be careful to assemble all components S T E P in the sequence they are presented. Be careful to assemble all components NOTE: in the sequence they are presented. Finger tighten all hardware in this step. Do Not wrench tighten until end of step 15. Some components may be pre-assembled.
- Page 32 S T E P...
- Page 33 S T E P Be careful to assemble all components in the sequence they are presented. S T E P NOTE: Be careful to assemble all components Finger tighten all hardware in this step. Do Not wrench tighten until end of step 15. in the sequence they are presented.
- Page 34 S T E P Cable to constitute illustration Cable to constitute illustration S T E P FUNCTIONAL TRAINING ARM CABLE (105) FUNCTIONAL TRAINING ARM CABLE (105) 3028mm 3028mm Stamped Eye End Stamped Eye End Small Ball End Small Ball End RIGHT ATTACHMENT CABLE (120) RIGHT ATTACHMENT CABLE (120) 3475mm...
- Page 35 S T E P Be careful to assemble all components in the sequence they are presented. S T E P NOTE: Be careful to assemble all components Finger tighten all hardware in this step. Do Not wrench tighten until end of step 15. in the sequence they are presented.
- Page 36 S T E P S T E P Above shows STEP assembled and completed Above shows STEP assembled and completed S T E P ...
- Page 37 S T E P Be careful to assemble all components in the sequence they are presented. NOTE: Finger tighten all hardware in this step. Do Not wrench tighten until end of step 15. Some components may be pre-assembled. Insert Flat End Cap (34) into Side Leg Hold Down Frame (V). Insert Side Leg Hold Down Frame (V) into Main Base Frame (A).
- Page 38 S T E P S T E P S T E P Above shows STEP Above shows STEP assembled and completed assembled and completed ...
- Page 39 W a r n i n g s , S a f e t y & M a i n t e n a n c e Be sure that all users carefully read and understand all warning, safety and maintenance labels on the machine before each use.
- Page 40 Routine inspection and maintenance is of critical impor- tance to ensure the maximum safety and performance l Check slack in cables and re-adjust cable of the Fusion 500. Body-Solid uses the highest quality tension if needed. See pages 38-39. materials available, but wear is inevitable. Therefore, you must carefully inspect your equipment as outlined in the l Check that jam nut at Weight Stack is tight.
- Page 42 PHRASES, TERMS, TIPS & GUIDELINES B E G I N N E R ’ S G U I D E L I N E S • Work out at least two times a week. • Include six to eight exercises that train major muscle groups. •...
- Page 43 PHRASES, TERMS, TIPS & GUIDELINES S T A R T I N G R E S I S T A N C E L E V E L If you begin weight training at too high a level, you risk serious injury. You will also develop poor form, which will hinder your efforts and discourage you.
- Page 44 NUTRITION Good nutrition is a diet in which foods are eaten in canola, and soybean oil are sources of unsaturated condition is most common in the elderly but may also proper quantities and with the needed distribution of fats. It is recommended that no more than 30% of one’s exist in younger people who have diets inadequate in nutrients to maintain good health.
- Page 45 EXERCISE PRESCRIPTION Sets Rest Periods Between Workouts Sets are defined as a combination of any number of reps of one exercise. The number The amount of rest between training sessions depends on the recovery ability of the of sets used in a workout is directly related to training results. Typically, two to three sets individual.
-
Page 46: Training Tips
TRAINING TIPS FOR BEGINNER’S A R E Y O U “ B E G I N N E R ” ? A beginner can be classified as someone who has never touched a weight, may have lifted for a while, but has taken a substantial amount of time off, or has not consistently trained over the last six months. - Page 47 COMMON TRAINING MISTAKES 1. Lack of Adequate Warm-Up and Inadequate Flexibility A warmed muscle is a more flexible muscle that’s better able to lift heavier weights and work in a full range of motion. Those warmed muscles also greatly reduce your chance of training injuries. 2.
-
Page 48: Setting Up Your
SETTING UP YOUR PERSONAL PROGRAM It is important to first establish specific Once you have determined your personal goals, you will need to set up a schedule and realistic goals. You should determine that helps you attain them. Set up a schedule that includes the number of workouts your long term goal and then set a per week, the type of workout activity, the time of day for each workout, and the actual series of short term goals that will... - Page 49 DETERMINE YOUR TRAINING METHOD Which training method is right for you? There are three basic types of weight training methods: 1. Training for muscular FOR MUSCULAR FOR STRENGTH FOR POWER endurance and definition ENDURANCE & DEFINITION AND MUSCLE MASS 2. Training for strength This training method incorporates This type of training is the most This is the method most often used by...
- Page 50 EXERCISETIPS Listed below are Body-Solid’s picks of the best exercises you can do for each body part. These exercises can be done using free weights, machines and multi-station gyms. Learn to do each exercise in proper form. You can make substitutions in your training and try variations of each using different Body-Solid grips, cable attachments and accessories to slightly change the emphasis of a particular exercise.
-
Page 51: Front View
ANATOMY CHART FRONT VIEW Note: These illustrations depicting exaggerated musculature are Chest not in the textbook anatomical position. As such, they are inexact Neck Pectoralis Major for medical purposes but are useful for a general understanding. Omohyoid Pectoralis Minor Sternohyoid (beneath major) Sternocleidomastoid •... - Page 52 FITNESS GOALS SHORT-TERM GOALS Date Set Date Accomplished Goal Reward Date Set Date Accomplished Goal Reward Date Set Date Accomplished Goal Reward LONG-TERM GOALS Goal Reward! M a k e s e v e r a l c o p i e s o f t h i s p a g e t o k e e p t r a c k o f y o u r g o a l s a n d a c c o m p l i s h m e n t s . Y o u c a n p r i n t m o r e c o p i e s o f t h i s p a g e b y g o i n g t o h t t p : / / w w w .
-
Page 53: Weight Training
WEIGHT TRAINING EXERCISE LOG... - Page 54 WEIGHT TRAINING EXERCISE LOG...
- Page 55 WEIGHT TRAINING EXERCISE LOG...
- Page 56 STRETCHING & FLEXIBILITY Flexibility is an important component of physical fitness and needs to be addressed in a resistance training program. The two main purposes for stretching are injury prevention and a faster rate of recovery from exercise. Stretching should be performed in both the warm up and cool down phases of a training session.
- Page 57 STRETCHING STRETCHING STRETCHING STRETCHING STRETCHING STRETCHING STRETCHING STRETCHING STRETCHING WARM-UP/COOL-DOWN WARM-UP/COOL-DOWN WARM-UP/COOL-DOWN WARM-UP/COOL-DOWN WARM-UP/COOL-DOWN WARM-UP/COOL-DOWN WARM-UP/COOL-DOWN WARM-UP/COOL-DOWN WARM-UP/COOL-DOWN UPPER BACK Cross Arm in Front of Chest MUSCLE(S) AFFECTED: latissimus dorsi and teres major 1. Stand or sit with the right arm slightly flexed (15° to 30°) and adducted across the chest.
- Page 58 STRETCHING STRETCHING STRETCHING STRETCHING STRETCHING STRETCHING STRETCHING STRETCHING STRETCHING WARM-UP/COOL-DOWN WARM-UP/COOL-DOWN WARM-UP/COOL-DOWN WARM-UP/COOL-DOWN WARM-UP/COOL-DOWN WARM-UP/COOL-DOWN WARM-UP/COOL-DOWN WARM-UP/COOL-DOWN WARM-UP/COOL-DOWN LOWER BACK Semi-Leg Straddle Stretching the MUSCLE(S) AFFECTED: spinal erectors low back from seated position 1. Sitting, knees flexed 30 to 50 degrees, let the legs totally relax. 2.
- Page 59 STRETCHING STRETCHING STRETCHING STRETCHING STRETCHING STRETCHING STRETCHING STRETCHING STRETCHING WARM-UP/COOL-DOWN WARM-UP/COOL-DOWN WARM-UP/COOL-DOWN WARM-UP/COOL-DOWN WARM-UP/COOL-DOWN WARM-UP/COOL-DOWN WARM-UP/COOL-DOWN WARM-UP/COOL-DOWN WARM-UP/COOL-DOWN SHOULDER Seated Lean-Back Stretching shoulder MUSCLE(S) AFFECTED: deltoids and pectoralis major joints—sitting 1. Sitting with legs straight and arms extended, place palms on floor about 12 inches behind hips.
- Page 60 STRETCHING STRETCHING STRETCHING STRETCHING STRETCHING STRETCHING STRETCHING STRETCHING STRETCHING WARM-UP/COOL-DOWN WARM-UP/COOL-DOWN WARM-UP/COOL-DOWN WARM-UP/COOL-DOWN WARM-UP/COOL-DOWN WARM-UP/COOL-DOWN WARM-UP/COOL-DOWN WARM-UP/COOL-DOWN WARM-UP/COOL-DOWN NECK Look Right and Left Rotational flexion MUSCLE(S) AFFECTED: sternocleidomastoid of the neck 1. Stand or sit with head and neck upright. 2.
- Page 61 STRETCHING STRETCHING STRETCHING STRETCHING STRETCHING STRETCHING STRETCHING STRETCHING STRETCHING WARM-UP/COOL-DOWN WARM-UP/COOL-DOWN WARM-UP/COOL-DOWN WARM-UP/COOL-DOWN WARM-UP/COOL-DOWN WARM-UP/COOL-DOWN WARM-UP/COOL-DOWN WARM-UP/COOL-DOWN WARM-UP/COOL-DOWN SIDES Side Bend with Straight Arms Stretching MUSCLE(S) AFFECTED: external oblique, latissimus dorsi and serratus anterior the sides, upper back and shoulders 1.
- Page 62 STRETCHING STRETCHING STRETCHING STRETCHING STRETCHING STRETCHING STRETCHING STRETCHING STRETCHING WARM-UP/COOL-DOWN WARM-UP/COOL-DOWN WARM-UP/COOL-DOWN WARM-UP/COOL-DOWN WARM-UP/COOL-DOWN WARM-UP/COOL-DOWN WARM-UP/COOL-DOWN WARM-UP/COOL-DOWN WARM-UP/COOL-DOWN ANTERIOR OF THIGH AND HIP FLEXOR Kneeling Quadriceps Stretch Stretching the MUSCLE(S) AFFECTED: quadriceps quadriceps kneeling 1. Kneel with the balls of the feet on the ground. 2.
- Page 63 STRETCHING STRETCHING STRETCHING STRETCHING STRETCHING STRETCHING STRETCHING STRETCHING STRETCHING WARM-UP/COOL-DOWN WARM-UP/COOL-DOWN WARM-UP/COOL-DOWN WARM-UP/COOL-DOWN WARM-UP/COOL-DOWN WARM-UP/COOL-DOWN WARM-UP/COOL-DOWN WARM-UP/COOL-DOWN WARM-UP/COOL-DOWN Stretching the hamstrings with POSTERIOR OF THIGH emphasis on insertion of the hamstrings and calves Semistraddle (Figure Four) MUSCLE(S) AFFECTED: gastrocnemius, hamstrings and spinal erectors 1.
- Page 64 STRETCHING STRETCHING STRETCHING STRETCHING STRETCHING STRETCHING STRETCHING STRETCHING STRETCHING WARM-UP/COOL-DOWN WARM-UP/COOL-DOWN WARM-UP/COOL-DOWN WARM-UP/COOL-DOWN WARM-UP/COOL-DOWN WARM-UP/COOL-DOWN WARM-UP/COOL-DOWN WARM-UP/COOL-DOWN WARM-UP/COOL-DOWN GROIN Stretching the hamstrings and groin Straddle (Spread Eagle) with emphasis on insertion of the hamstrings and calves MUSCLE(S) AFFECTED: gastrocnemius, hamstrings, spinal erectors, adductors and sartorius 1.
- Page 65 STRETCHING STRETCHING STRETCHING STRETCHING STRETCHING STRETCHING STRETCHING STRETCHING STRETCHING WARM-UP/COOL-DOWN WARM-UP/COOL-DOWN WARM-UP/COOL-DOWN WARM-UP/COOL-DOWN WARM-UP/COOL-DOWN WARM-UP/COOL-DOWN WARM-UP/COOL-DOWN WARM-UP/COOL-DOWN WARM-UP/COOL-DOWN GROIN Butterfly Stretching the groin MUSCLE(S) AFFECTED: adductors and sartorius 1. Sitting with the upper body nearly vertical and legs straight, flex both knees as the soles of the feet come together.
- Page 66 STRETCHING STRETCHING STRETCHING STRETCHING STRETCHING STRETCHING STRETCHING STRETCHING STRETCHING WARM-UP/COOL-DOWN WARM-UP/COOL-DOWN WARM-UP/COOL-DOWN WARM-UP/COOL-DOWN WARM-UP/COOL-DOWN WARM-UP/COOL-DOWN WARM-UP/COOL-DOWN WARM-UP/COOL-DOWN WARM-UP/COOL-DOWN POSTERIOR OF LOWER LEG Step Stretch MUSCLE(S) AFFECTED: gastrocnemius and soleus; also, achilles tendon 1. Have ready a step or board 3 to 4 inches high. 2.
- Page 67 M a i n f r a m e P a r t s L i s t ESCRIPTION Part numbers are required when ordering parts.
- Page 68 H a r d w a r e L i s t ESCRIPTION Part numbers are required when ordering parts.
- Page 69 H a r d w a r e L i s t ( c o n t i n u e d ) ESCRIPTION Part numbers are required when ordering parts.
- Page 70 H a r d w a r e L i s t ( c o n t i n u e d ) ESCRIPTION RUBBER PAD 35X59 Ø15.9 ODX12L STEEL CASING Part numbers are required when ordering parts.
- Page 71 P a d s L i s t ESCRIPTION SEAT PAD BACK PAD C a b l e L i s t ESCRIPTION FUNCTIONAL TRAINING ARM CABLE 3028mm LAT PULLDOWN CABLE 5425mm LEG EXTENSION CABLE 3540mm LEFT ATTACHMENT CABLE 1765mm SHORT CABLE 775mm TURNPLATE CABLE 530mm RIGHT ATTACHMENT CABLE 3475mm...
- Page 72 H a r d w a r e...
- Page 73 H a r d w a r e...
- Page 74 H a r d w a r e...
- Page 75 H a r d w a r e PART # 87 ROUND ALLEN HEAD BOLT 3/8"X2"L FULL THREAD QTY.1 PART # 104 HEX HEAD BOLT M10X50L PARTIAL THREAD QTY.1 PART # 60 NYLON LOCK NUT M10 QTY.48 PART # 91 SPRING WASHER 3/8" QTY.1 PART # 92 SPRING WASHER M8 QTY.4 PART # 103 WASHER M8 QTY.4...
- Page 77 N o t e s...
- Page 79 ® www.bodysolid.com Copyright 2010. Body-Solid. All rights reserved. Body-Solid reserves the right to change design and specifi cations when we feel it will improve the product. Body-Solid machines maintain several patented and patent pending features and designs. All rights reserved on all design patents and utility patents.
Need help?
Do you have a question about the FUSION 500 and is the answer not in the manual?
Questions and answers