Advertisement
VODLF125-B2
INSTRUCTION MANUAL
Texto en español, página 16
Texte français page 18
WE'RE HERE TO HELP
Want to watch a video that
shows how easy this DIY
project will be?
Watch it now at:
SANUS.com/3124
Deutscher Text Seiten 20
Nederlandse tekst op pagina 22
Get it right the first time.
HeightFinder™ shows you
where to drill.
Check it out at:
SANUS.com/2567
Svensk text sida 24
Русский текст: стр. 26
中文文字说明请参见第 28 页
日本語は 30 ページ
Our install experts are
standing by to help.
Call us at:
US: +1 (800) 359-5520
EMEA: +31 (0) 495 580 852
UK: +44 (0) 800 056 2853
Advertisement
Table of Contents

Related Manuals for LEGRAND SANUS VODLF125-B2


Summary of Contents for LEGRAND SANUS VODLF125-B2
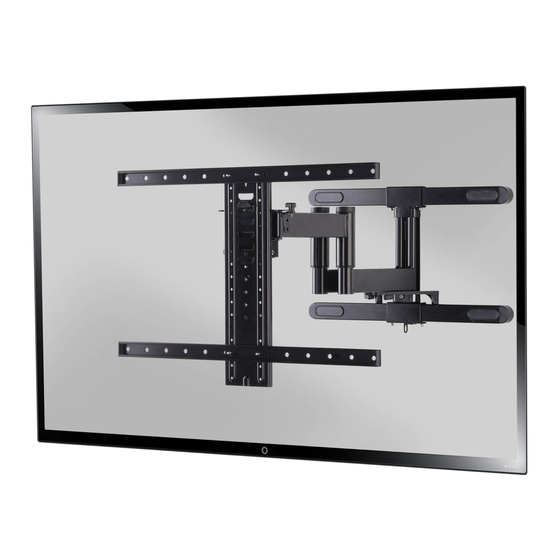
- Page 1 VODLF125-B2 INSTRUCTION MANUAL 中文文字说明请参见第 28 页 Texto en español, página 16 Deutscher Text Seiten 20 Svensk text sida 24 Texte français page 18 Nederlandse tekst op pagina 22 日本語は 30 ページ Русский текст: стр. 26 WE’RE HERE TO HELP Want to watch a video that Get it right the first time.
-
Page 2: Important Safety Instructions
IMPORTANT SAFETY INSTRUCTIONS – PLEASE READ MANUAL PRIOR TO USE – SAVE THESE INSTRUCTIONS Please read through these instructions completely to be sure you’re comfortable with this easy install process. Check your TV owner’s manual to see if there are any special requirements for mounting your TV. If you do not understand these instructions or have doubts about the safety of the installation, assembly or use of this product, contact Customer Service at +1-800-359-5520 (EMEA: +31 (0) 495 580 852;... - Page 3 Dimensions TV INTERFACE 15.75in 400mm 15.75in 3.94in 400mm 100mm 3.94in 100mm WALL PLATE TOP VIEW - EXTENDED SIDE VIEW - EXTENDED 13 deg 7 deg 16.00in DOWN 406.4mm 25.0in 1.77in 634mm 45mm 44 deg 44 deg 10.36in 263.1mm SIMULATED 65" FLAT SCREEN TV FULLY ASSEMBLED MOUNT TOP VIEW - RETRACTED...
-
Page 4: Supplied Parts And Hardware
Supplied Parts and Hardware WARNING: This product contains small items that could be a choking hazard if swallowed. Before starting assembly, verify all parts are included and undamaged. If any parts are missing or damaged, do not return the damaged item to your retailer; contact Customer Service. Never use damaged parts! NOTE: Not all hardware included will be used. - Page 5 STEP 1 Attach TV Bracket to TV 1.1 Select TV Screw Diameter Only one screw size fits your TV. NOTE: If your TV included inset spacers or adapters, use them UNDER the mount hardware. 1.2 Select TV Screw Length and Spacers NO SPACER SPACER NEEDED •...
- Page 6 VESA TV Hole Pattern 1.3 Attach Horizontal TV Brackets to Your TV 100 mm / 200 mm LONG SHORT VESA TV Hole Pattern VESA TV Hole Pattern 100 mm / 200 mm 300 mm / 400 mm NO SPACER VESA TV Hole Pattern 300 mm / 400 mm 04 05 SPACER NEEDED...
- Page 7 1.4 Attach Vertical TV Bracket 04 05...
- Page 8 1.5 Secure the TV Brackets 04 05 CAUTION: Avoid potential personal injuries and property damage! DO NOT use power tools for this step. Tighten the four TV screws and four vertical TV bracket screws only enough to secure the TV brackets to the TV.
- Page 9 1.6 Attach Padlock Assembly (optional) IMPORTANT: Install Padlock Assembly in the slot that corresponds to your intended TV height (height slot Example: is the LOWEST your TV will hang on the arm assembly. is the HIGHEST your TV will hang on the arm assembly. TV LOWER ON ARM TV Height...
-
Page 10: Wood Stud Installation
STEP 2A Attach Wall Plate Wood Stud Installation CAUTION: Avoid potential personal injury or property damage! ● Drywall covering the wall must not exceed 5/8 in. (16 mm) ● Minimum wood stud size: nominal 2 x 4 in. (51 x 102 mm) actual 1½ x 3½ in. (38 x 89 mm) ●... - Page 11 STEP 2B Attach Wall Plate Solid Concrete or Concrete Block Installation CAUTION: Avoid potential personal injury or property damage! ● Mount arm assembly directly onto concrete surface (no wall covering) ● Minimum solid concrete thickness: 8 in. (203 mm) ● Minimum concrete block size: 8 x 8 x 16 in.
- Page 12 STEP 3 Attach TV to Arm Assembly 3.1 Height Adjust Selection Example: IMPORTANT: For the best fit, select the height slot that corresponds with the position where you installed the Padlock Assembly See example...
- Page 13 3.2 Hang Your TV HEAVY! You may need assistance with this step. Height slot Use two people to hang the TV, to visually ensure TV bracket To adjust the leveling of your TV, loosen the roll screw , level your TV, then tighten the roll screw hung onto arm assembly at your desired height slot...
-
Page 14: Manage Cables
Manage Cables Fully extend the arms before attaching cables. Use cable ties to secure cables. NOTE: Tension knobs be tightened or loosened to increase or decrease arm mobility. Secure TV with Padlock (Optional) Fully retract your TV / arm assembly 2 ½... - Page 15 TV Adjustments TILT ADJUSTMENT Your TV should adjust easily when moved, then stay in place. If your TV is too loose or too tight, adjust the side tension knob NOTE: Once your TV is in place, tighten the tension knob prevent unwanted movement.
- Page 16 INSTRUCCIONES IMPORTANTES DE SEGURIDAD: ESPAÑOL GUARDE ESTAS INSTRUCCIONES Y LEA TODO EL MANUAL ANTES DE UTILIZAR ESTE PRODUCTO. Antes de empezar, asegúrese de que este es el soporte adecuado para usted. No — ¡Perfecto! ¿Su televisor pesa 54,4 kg (accesorios incluidos) Sí...
- Page 17 PASO 2A Cómo fijar la placa a la pared Colocación sobre montantes de madera PÁGINA 10 PRECAUCIÓN: Evite posibles lesiones personales o daños materiales. Los paneles de yeso que cubren la pared no deben superar los 1,5 cm (5/8 pulg.) Tamaño mínimo de los montantes de madera: nominal 5,1 x 10,2 cm (2 x 4 pulg.), real 3,8 x 8,9 cm (1½...
-
Page 18: Avant De Commencer
INFORMATIONS IMPORTANTES CONCERNANT LA SÉCURITÉ FRANÇAIS – CONSERVEZ CES INSTRUCTIONS – VEUILLEZ LIRE ATTENTIVEMENT LE MANUEL AVANT D'UTILISER CE PRODUIT Avant de commencer, assurons-nous que ce support vous convient parfaitement ! Non — Parfait ! Votre téléviseur Oui — Ce support n'est PAS compatible. Visitez le site MountFinder.SANUS.com ou appelez le 54,4 kg (accessoires compris) [US]: +1 (800)-359-5520 [EMEA]: +31 (0) 495 580 852 [RU]:+44 (0) 800 056 2853pour trouver un support compatible. - Page 19 ÉTAPE 2A Fixation de la plaque murale au mur Installation sur des montants en bois PAGE 10 ATTENTION : Évitez les risques de blessures corporelles ou de dommages matériels ! L'épaisseur du revêtement de cloison sèche ne doit pas excéder 1,5 cm (5/8 po). Taille minimum des montants en ●...
- Page 20 WICHTIGE SICHERHEITSHINWEISE DEUTSCH – BEWAHREN SIE DIESE HINWEISE SORGFÄLTIG AUF – LESEN SIE VOR DEM GEBRAUCH DES PRODUKTS BITTE DAS GESAMTE HANDBUCH Stellen Sie vor Montagebeginn sicher, dass diese Halterung für Sie geeignet ist! Nein – Perfekt! Wiegt Ihr Fernseher MEHR Ja –...
- Page 21 Montage an Holzbalken SCHRITT 2A Anbringen der Wandplatte an der Wand SEITE 10 VORSICHT: Vermeiden Sie Verletzungen und Sachschäden! Die Gipsschicht der Wand darf 1,5 cm (5/8") nicht überschreiten. Mindestmaße der Holzbalken: Nenngröße 5,1 x 10,2 cm (2 x 4"), tatsächlich 3,8 x 8,9 cm (1½ x 3½"). ●...
- Page 22 BELANGRIJKE VEILIGHEIDSINSTRUCTIES NEDERLANDS – BEWAAR DEZE INSTRUCTIES – LEES DE VOLLEDIGE HANDLEIDING VOORAFGAAND AAN HET GEBRUIK Controleer voor u begint of deze wandbevestiging ook voor u geschikt is! Weegt uw tv Nee: Prima! Ja: Deze wandbevestiging is NIET geschikt. Raadpleeg MountFinder.SANUS.com of bel (inclusief accessoires) 54,4 kg MEER dan...
- Page 23 STAP 2A Installatie met houten dragers Wandplaat aan de wand bevestigen PAGINA 10 LET OP: Voorkom lichamelijk letsel of materiële schade! Gipsplaten die de muur bedekken, mogen niet dikker zijn dan 1,5 cm (5/8 in.). Minimale grootte houten drager: nominaal 5,1 x 10,2 cm (2 x 4 in.), werkelijk 3,8 x 8,9 cm (1½ x 3½ in.). ●...
- Page 24 VIKTIGA SÄKERHETSANVISNINGAR SVENSKA – SPARA DESSA ANVISNINGAR – LÄS HELA BRUKSANVIS NINGEN INNAN DU ANVÄNDER DENNA PRODUKT Innan du börjar bör du se till att det här monteringsfästet är perfekt för dig! Nej – Perfekt! Väger TV:n (inklusive tillbehör) MER än 54,4 kg Ja –...
- Page 25 STEG 2A Montera väggplatta på vägg Installation på träregel SIDAN 10 FÖRSIKTIGHET: Undvik eventuella personskador och materiella skador! Gipsskiva som täcker väggen får inte överstiga 1,5 cm (5/8 tum). Minsta storlek på träregel: nominell 5,1 x 10,2 cm (2 x 4 tum) e ektiv 3,8 x 8,9 cm (1½ x 3½ tum). ●...
-
Page 26: Перед Началом Работы
ВАЖНЫЕ ИНСТРУКЦИИ ПО ТЕХНИКЕ БЕЗОПАСНОСТИ РУССКИЙ – СОХРАНИТЕ ЭТИ ИНСТРУКЦИИ – ПЕРЕД ЭКСПЛУАТАЦИЕЙ ИЗДЕЛИЯ ПОЛНОСТЬЮ ПРОЧТИТЕ ДАННОЕ РУКОВОДСТВО Перед началом установки необходимо убедиться, что это крепление подходит для вашего телевизора! Ваш телевизор Нет — Прекрасно! (включая 54,4 кг принадлежности) Да — Это крепление НЕ подходит. Посетите веб-сайт MountFinder.SANUS.com или позвоните по телефону [US]: +1 (800)-359-5520 весит... - Page 27 ШАГ 2A Присоединение настенной пластины к стене Установка на деревянные стойки СТР. 10 ВНИМАНИЕ! Соблюдайте осторожность во избежание получения травм или повреждения имущества! ● ● Толщина гипсокартона, покрывающего стену, не должна превышать 1,5 см (5/8 дюйма). Минимальный размер деревянной стойки: общий 5,1 х 10,2 см (2 х 4 дюйма); номинальный 3,8 х 8,9 см (1 ½ x 3 ½ дюйма). ●...
- Page 28 中文 重要安全说明 – 保存这些说明 – 使用本产品之前,请阅读完本说明书 在开始安装之前,我们首先来确认此支架是否适合您! 您的电视机 否 — 适合! 54.4 kg (包括配件) — 此支架不兼容。访问 MountFinder.SANUS.com 或致电 [US]: +1 (800)-359-5520 是 的重量是否 超过 (120 磅) [EMEA]: +31 (0) 495 580 852 [イギリス]:+44 (0) 800 056 2853 查找兼容的支架。 54.4 kg(120 磅)? 混凝土/ 有木墙柱的...
- Page 29 步骤 2A 木墙柱安装 将壁板安装到墙壁上 第 10 页 注意: 墙上覆盖的干式墙不能超过 1.5 cm (5/8 in.)。 最小木墙柱尺寸:标称 5.1 x 10.2 cm (2 x 4 in.) 实际 3.8 x 8.9 cm (1½ x 3½ in.) 避免潜在人身伤害或财产损毁! ● ● 扣件之间的最小水平间隔:40.6 cm (16 in.) 。 。 ●...
- Page 30 安全のための重要な説明 日本語 – この説明書を保管しておいてください – 本製品を使用する前に、 説明書全体をよくお読みください 作業を始める前に、 このマウントがお使いのテレビに適しているかどうかを確認します。 設置するテレビ いいえ — 最適です ! (アク の重量 セサリを含む) はい — このマウントは、 適合しません。 MountFinder.SANUS.comをご覧になるか、 54.4 kg が、 54.4 kg (120 ポン [US]: +1 (800)-359-5520 [EMEA]: +31 (0) 495 580 852 [英国]:+44 (0) 800 056 2853 (120 ポンド)...
- Page 31 木製スタ ッ ド壁への取り付け 手順2A ウォールプレートを壁に取り付ける 10 ページ 注意: 負傷したり壁面を傷付けたり しないように注意してください。 • 壁面を覆う石膏ボードは1.5 cm (5/8 インチ) を超えてはいけない 。 • 木製スタッ ドの最小寸法 : 名目 5.1 x 10.2 cm (2 x 4 インチ) 、 実寸 3.8 x 8.9 cm (1½ x 3½ インチ) 。 •...
- Page 32 Reading RG2 0RP UK Legrand AV Inc. and its a iliated corporations and subsidiaries (collectively, “Legrand”), intend to make this manual accurate and complete. However, Legrand makes no claim that the information contained herein covers all details, conditions, or variations. Nor does it provide for every possible contingency in connection with the installation or use of this product. The information contained in this document is subject to change without notice or obligation of any kind.
Need help?
Do you have a question about the SANUS VODLF125-B2 and is the answer not in the manual?
Questions and answers