Table of Contents
Advertisement
Quick Links
VXF730-B2
INSTRUCTION MANUAL
WE'RE HERE TO HELP
Want to watch a video that
shows how easy this DIY
project will be?
Watch it now at:
SANUS.com/2816
Texto en español, página 12
Texte français page 14
Get it right the first time.
HeightFinder™ shows you
where to drill.
Check it out at:
SANUS.com/2567
Deutscher Text Seiten 16
Nederlandse tekst op pagina 18
GET IT
RIGHT
THE FIRST TIME
Follow this step-by-step
instruction manual to
speed up your installation.
Our install experts are
standing by to help.
Svensk text sida 20
Русский текст: стр. 22
Call us at:
US:
800-359-5520
EMEA:
+31 (0) 495 580 852
UK:
0800 056 2853
中文文字说明请参见第 24 页
日本語は 26 ページ
Advertisement
Table of Contents

Related Manuals for LEGRAND SANUS VXF730-B2


Summary of Contents for LEGRAND SANUS VXF730-B2
- Page 1 GET IT RIGHT THE FIRST TIME Follow this step-by-step VXF730-B2 instruction manual to speed up your installation. INSTRUCTION MANUAL WE’RE HERE TO HELP Want to watch a video that Get it right the first time. Our install experts are shows how easy this DIY HeightFinder™...
-
Page 2: Wall Construction
IMPORTANT SAFETY INSTRUCTIONS PLEASE READ ENTIRE MANUAL PRIOR TO USE – SAVE THESE INSTRUCTIONS Please read through these instructions completely to be sure you’re comfortable with this easy install process. Check your TV owner’s manual to see if there are any special requirements for mounting your TV. If you do not understand these instructions or have doubts about the safety of the installation, assembly or use of this product, contact Customer Service. -
Page 3: Before You Begin
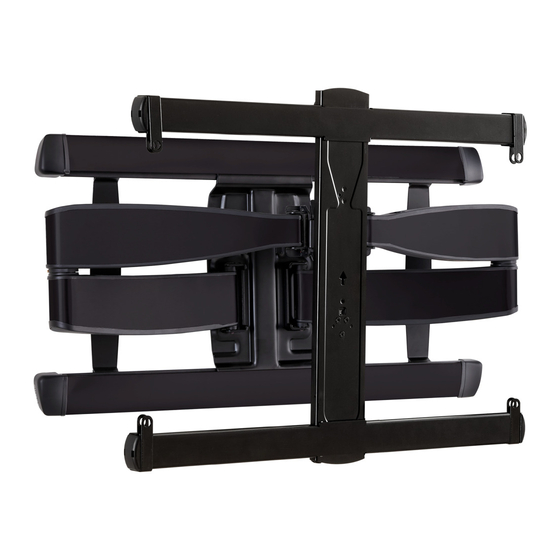
Soft clean surface Legrand AV Inc. and its a liated corporations and subsidiaries (collectively, “Legrand ”), intend to make this manual accurate and complete. However, Legrand makes no claim that the information contained herein covers all details, conditions, or variations. Nor does it provide for every possible contingency in connection with the installation or use of this product. The information contained in this document is subject to change without notice or obligation of any kind. - Page 4 STEP 1 ATTACH TV BRACKET TO TV Parts and Hardware for STEP 1 WARNING: This product contains small items that could be a choking hazard if swallowed. Before starting assembly, verify all parts are included and undamaged. If any parts are missing or damaged, do not return the damaged item to your dealer; contact Customer Service. Never use damaged parts! NOTE: Not all hardware included will be used.
- Page 5 Attach TV Bracket Assembly to TV PREP TV BRACKET ALIGN WITH TV HOLES NOTE: 400 x 400 hole patterns can skip to 3 below. REMOVE LOOSEN NOTE: The horizontal arms (and tabs can be reversed top/bottom, if neeeded to fit non-standard hole patterns. CENTER ON TV LOOSELY ASSEMBLE NO SPACER...
- Page 6 STEP 2 ATTACH WALL PLATE TO WALL Parts and Hardware for STEP 2 Before starting assembly, verify all parts are included and undamaged. If any parts are missing or damaged, do not return the damaged item to your dealer; contact Customer Service. Never use damaged parts! Lag Bolt Wall Plate Template...
-
Page 7: Wood Stud Installation
Wood Stud Installation CAUTION: Avoid potential Min. 1 ½ in. (3.8 cm) personal injury or property damage! ● Drywall covering the wall Min. 16 in. (40.6 cm) Min. 3 ½ in. (8.9 cm) must not exceed 5/8 in. (1.5 cm) ●... - Page 8 Solid Concrete or Concrete Block Installation CAUTION: Avoid potential personal injury or property damage! POSITION TEMPLATE Visit HeightFinder™ ● Mount the wall plate directly onto the concrete surface sanus.com /2567 ● Minimum solid concrete thickness: 8 in. (20.3 cm) ● Minimum concrete block size: 8 x 8 x 16 in.
-
Page 9: Attach Tv To Wall Plate
STEP 3 ATTACH TV TO WALL PLATE Parts and Hardware for STEP 3 WARNING: This product contains small items that could be a choking hazard if swallowed. Before starting assembly, verify all parts are included and undamaged. If any parts are missing or damaged, do not return the damaged item to your dealer; contact Customer Service. Never use damaged parts! CABLE COVERS (ATTACHED) 5/32 in. -
Page 10: Manage Cables
3.2 Hang TV onto Arm Assembly ATTACH HANG YOUR TV HEAVY! You may need assistance with this step. SECURELY TIGHTEN CAUTION: Avoid potential personal injury or property damage! Always make sure your securement screw is tightened, so the TV is securely fastened to the arm assembly MANAGE CABLES ROUTE CABLES ATTACH COVERS... - Page 11 ADJUSTMENTS LEVEL CAUTION: CAUTION: Avoid potential personal injury or property damage! Always make sure your securement screw is tightened, so the Screw MUST be loosened TV is securely fastened to the arm assembly before turning screw TILT Your TV should adjust easily when moved, then stay in place. Your TV should adjust easily when moved, then stay in place.
-
Page 12: Antes De Comenzar
¡ESTAMOS AQUÍ PARA AYUDARLE! Español ¿Desea ver un video para comprobar lo fácil que es hacerlo usted mismo? Visualícelo ahora en: SANUS.com/2816 Acierte a la primera. HeightFinder™ le indica el lugar donde debe taladrar. Descúbralo en: SANUS.com/2567 US]: 800-359-5520 [EMEA]: +31 (0) 495 580 852 Nuestros expertos en instalación de EE. - Page 13 Instalación en pared con montantes de madera PÁGINA 7 Español • • PRECAUCIÓN: Evite posibles lesiones físicas y daños materiales. El yeso que recubre la pared no debe exceder los 1,5 cm (5/8 pulg.). Tamaño mínimo del montante de madera: nominal 5,1 x 10,2 cm (2 x 4 pulg.) actual 3,8 x •...
-
Page 14: Avant De Commencer
NOUS SOMMES LÀ POUR VOUS AIDER Souhaitez-vous voir une vidéo démontrant à quel point cette procédure est facile à effectuer ? Rendez-vous maintenant sur : SANUS.com/2816 FRANÇAIS Réussissez du premier coup ! HeightFinder™ vous indique à quel endroit percer. Renseignez-vous à l'adresse : SANUS.com/2567 Nos experts de l'installation basés aux États-Unis sont là... - Page 15 Pour les INSTALLATIONS SUR BÉTON, Pour les INSTALLATIONS SUR MONTANTS FRANÇAIS EN BOIS, suivez L’ÉTAPE 2A à la PAGE 7 suivez l’ÉTAPE 2B à la PAGE 8 ÉTAPE 2A Installation sur des montants en bois PAGE 7 • • ATTENTION : Évitez les risques de blessures corporelles ou de dommages matériels ! L'épaisseur du revêtement de cloison sèche ne doit pas excéder 1,5 cm (5/8 po).
- Page 16 WIR SIND FÜR SIE DA Möchten Sie sich ein Video ansehen, das zeigt, wie einfach dieses Heimwerkerprojekt ist? Schauen Sie rein auf: SANUS.com/2816 DEUTSCH Machen Sie es gleich richtig. HeightFinder™ zeigt Ihnen, wo Sie bohren müssen. Sehen Sie es sich an auf: SANUS.com/2567 [US]: 800-359-5520...
- Page 17 Bei einer MONTAGE AN BETONWÄNDEN Bei einer MONTAGE AM HOLZSTÄNDERWERK DEUTSCH folgen Sie den Anweisungen in SCHRITT 2B auf SEITE 8 folgen Sie den Anweisungen in SCHRITT 2A auf SEITE 7 Montage an Holzbalken SCHRITT 2A SEITE 7 • • VORSICHT: Vermeiden Sie Verletzungen und Sachschäden! Die Gipsschicht der Wand darf 1,5 cm (5/8") nicht überschreiten.
-
Page 18: Voordat U Begint
WIJ STAAN VOOR U KLAAR Wilt u een video bekijken die u toont hoe gemakkelijk dit doe-het-zelf-project is? Bekijk het nu op: SANUS.com/2816 NEDERLANDS Doe het in een keer goed. HeightFinder™ laat u zien waar u moet boren. Bekijk het op: SANUS.com/2567 Onze installatie-experts in de VS staan klaar om u te helpen. - Page 19 Voor GEBRUIK BIJ INSTALLATIES IN BETON, Voor GEBRUIK BIJ INSTALLATIES MET HOUTEN DRAGERS, volgt u STAP 2B op PAGINA 8 volg STAP 2A op PAGINA 7 NEDERLANDS Installatie met houten dragers STAP 2A PAGINA 7 LET OP: • • Voorkom lichamelijk letsel of materiële schade! Gipsplaten die de muur bedekken, mogen niet dikker zijn dan 1,5 cm (5/8 in.).
-
Page 20: Innan Du Börjar
VI ÄR HÄR FÖR ATT HJÄLPA DIG Vill du titta på ett videoklipp som visar hur enkelt det här Gör-det-själv-projektet kommer att bli? Titta på klippet nu på: SANUS.com/2816 SVENSKA Gör rätt från början. HeightFinder™ visar var du borrar. Kolla in den på: SANUS.com/2567 [US]: 800-359-5520... - Page 21 För MONTERING PÅ TRÄREGLAR, För MONTERING PÅ BETONG, följ STEG 2A på SIDAN 7 följ STEG 2B på SIDAN 8 SVENSKA STEG 2A Installation på träregel SIDAN 7 FÖRSIKTIGHET: • • Undvik eventuella personskador och materiella skador! Gipsskiva som täcker väggen får inte överstiga 1,5 cm (5/8 tum). Minsta storlek på...
-
Page 22: Перед Началом Работы
МЫ ЗДЕСЬ, ЧТОБЫ ПОМОЧЬ ВАМ! Хотите посмотреть видео, демонстрирующее, как просто это сделать самому? Посмотрите его прямо сейчас: SANUS.com/2816 РУССКИЙ Сделайте все правильно с первого раза. HeightFinder™ покажет вам, где сверлить. См. SANUS.com/2567 [US]: 800-359-5520 [EMEA]: +31 (0) 495 580 852 Наши... - Page 23 При УСТАНОВКЕ НА ДЕРЕВЯННЫЙ КАРКАС При УСТАНОВКЕ НА СТЕНУ ИЗ БЕТОНА РУССКИЙ выполните ШАГ 2A на СТР. 7 выполните ШАГ 2B на СТР. 8 Установка на деревянные стойки ШАГ 2A СТР. 7 • • ВНИМАНИЕ! Соблюдайте осторожность во избежание получения травм или повреждения имущества! Толщина...
- Page 24 随时随地的帮助 想要通过视频了解如何轻松完成此 DIY 项目? 2816 立即观看:SANUS.com/ 中文 确保安装一举成功。HeightFinder™ 可提供具体的钻孔位置。 访问以下网址了解详细信息:SANUS.com/2567 [US]: 800-359-5520 [EMEA]: +31 (0) 495 580 852 我们在美国的安装专家可随时提供帮助。 若需帮助请致电: [UK]: 0800 056 2853 重要安全说明 – 保存这些说明 – 使用本产品之前,请阅读完本说明书 在开始安装之前,我们首先来确认此支架是否适合您! 您的电视机 否 — 适合! 79.3 kg (包括配件) 此支架不兼容。访问 MountFinder.Sanus.com 或致电 [US]: 800-359-5520 [EMEA]: +31 (0) 495 580 852 —...
- Page 25 对于木墙柱安装, 对于混凝土安装, 中文 请执行第 7 页的步骤 2A 请执行第 8 页的步骤 2B 步骤 2A 木墙柱安装 第 7 页 • • 注意: 墙上覆盖的干式墙不能超过 1.5 cm (5/8 in.)。 最小木墙柱尺寸:标称 5.1 x 10.2 cm (2 x 4 in.) 实际 3.8 x 8.9 cm (1½ x 3½ in.)。 避免潜在人身伤害或财产损毁!...
- Page 26 便利な情報サイ トとお問い合わせ先 取り付け手順をわかりやすく説明したビデオをご覧いただけます。 次のサイ トにアクセスしてください : SANUS.com/2816 日本語 一度で正しく取り付けられるように、 HeightFinder™で穴を開ける場所を確認できます。 次のサイ トをご覧ください : SANUS.com/2567 [US]: 800-359-5520 [EMEA]: +31 (0) 495 580 852 弊社の米国の専門技術者が、 取り付けのご相談に応じます。 電話 : [UK]: 0800 056 2853 安全のための重要な説明 – この説明書を保管しておいてください – 本製品を使用する前に、 説明書全体をよくお読みください 作業を始める前に、 このマウントがお使いのテレビに適しているかどうかを確認します。 設置するテレビ いいえ — 最適です ! (アク...
- Page 27 木製スタッドに取り付ける場合は、 コンクリートに取り付ける場合は、 日本語 7 ページの手順 2A に従ってください 8 ページの手順 2B に従ってください 木製スタ ッ ド壁への取り付け 手順2A 7 ページ • • 注意: 負傷したり壁面を傷付けたり しないように注意してください。 壁面を覆う石膏ボー ドは1.5 cm (5/8 イ ンチ) を超えてはいけない 。 木製スタ ッ ドの最小寸法 : 名 • • 目 5.1 x 10.2 cm (2 x 4 イ ンチ) 、 実寸 3.8 x 8.9 cm (1½ x 3½ イ ンチ) 。...
- Page 28 SANUS.com ©2021 Legrand AV Inc. All rights reserved. SANUS is a brand of Legrand. SANUS and the SANUS logo are registered trademarks. All other brand names or marks are used for identification purposes and are trademarks of their respective owners.
Need help?
Do you have a question about the SANUS VXF730-B2 and is the answer not in the manual?
Questions and answers