
Subscribe to Our Youtube Channel
Related Manuals for Reolink E1 Outdoor S


Summary of Contents for Reolink E1 Outdoor S
- Page 1 Q S G 1 _ A _ E N Quick Start Guide Apply to: E1 Outdoor S @ R e o l i n kTe c h h t t p s ://re o l i n k . c o m...
-
Page 2: Table Of Contents
Contents What's in the Box What's in the Box · · · · · · · · · · · · · · · · · · · · · · · · · · · · · · · · · · · · · · · · · · · · · · · · · · · 2 NVR Introduction ·... -
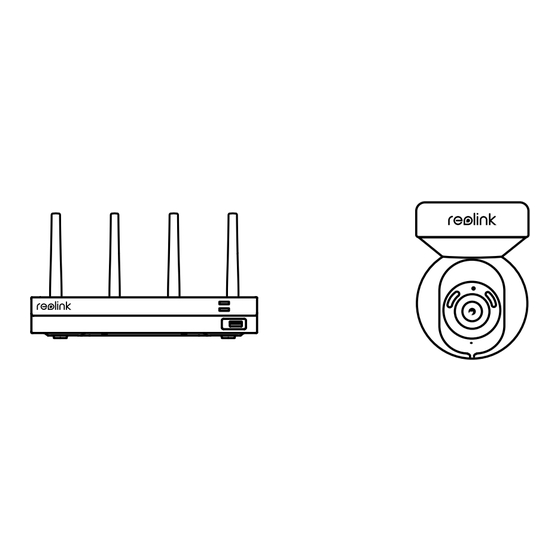
Page 3: Nvr Introduction
NVR Introduction Camera Introduction Power LED HDD LED Daylight Sensor Spotlight USB Port Lens Reset IR LEDs Power Input Built-in Mic USB Port Speaker HDMI Port Network Port VGA Port Power Port Audio Out Reset Button LAN Port(For Internet) * Press for more than five seconds to restore the LAN Port (For IPC) device to default settings. -
Page 4: Network Topology Diagram
Network Topology Diagram Connection Diagram Router 1. Power on the NVR with the provided 12V power adapter. 2. Connect the NVR to your router with an Ethernet cable if you want to remotely access your NVR via your smartphone or computer. HDMI NOTE: 1. -
Page 5: Access The Nvr Via Smartphone Or Pc
Settings > System > Info on the monitor. Connect the NVR to a router using the included Ethernet cable. 3. Download and launch the Reolink App or Client and follow the instructions to access the NVR. • On Smartphone Scan to download the Reolink App. -
Page 6: Mount Tips For The Camera
Mount Tips for the Camera Troubleshooting Installation Tips Camera Not Displaying lmages on the Monitor • Do not face the camera towards any light sources. Cause 1:Camera is not Powering on • Do not point the camera towards a glass window. Or, it may result in poor image quality because of the window glare by infrared LEDs, Solutions: ambient lights or status lights. - Page 7 • Install antennas on the camera and the NVR. interference, and (2) this device must accept any interference received, including interference that may cause undesired operation. If these won‘t work, please contact Reolink Support https://support.reolink.com Note: This equipment has been tested and found to comply with the limits for a Class B digital device, pursuant to Part 15 of the FCC Rules.
- Page 8 Caution: Changes or modifications not expressly approved by the party responsible for compliance could void the user’s authority to operate the equipment. FCC Radiation Exposure statement This equipment complies with FCC radiation exposure limits set forth for an uncontrolled environment. This equipment should be installed and operated with minimum distance 20cm between the radiator and your body.
Need help?
Do you have a question about the E1 Outdoor S and is the answer not in the manual?
Questions and answers