Table of Contents
Advertisement
Quick Links
Advertisement
Table of Contents

Related Manuals for BRIO CLPOU520UVRO4


Summary of Contents for BRIO CLPOU520UVRO4
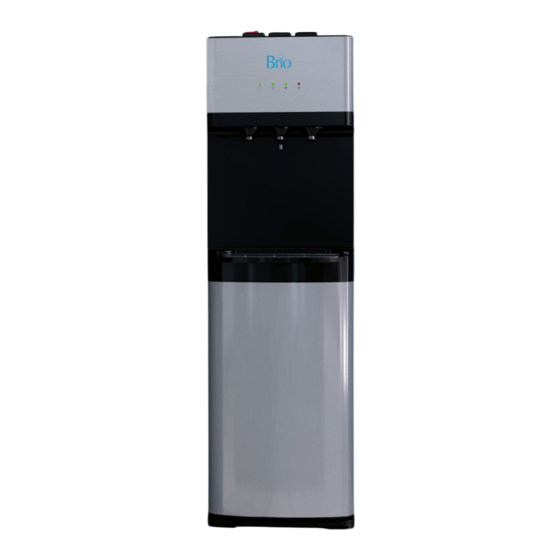
- Page 1 Water Dispenser Installation and Operation Manual Model No.: CLPOU520UVRO4...
-
Page 2: Table Of Contents
Table of Contents Safety Information � � � � � � � � � � � � � � � � � � � � � � � � � � � � � � � � � � � � � � � � � � � � � � � � � � � � � � � � � � � � � � � � � � � 3 Intended Use �... -
Page 3: Safety Information
Safety Information WARNING: To reduce risk of injury and property damage, you must read this entire manual before assembling, installing, and operating the dispenser. WARNING: This product dispenses water at very high temperatures. Failure to use properly can cause personal injury. When operating this dispenser, always exercise basic safety precautions, including the following: Prior to use, this dispenser must be properly assembled and installed in accordance with this •... -
Page 4: Intended Use
Intended Use This dispenser is intended to be used in household and similar applications such as: • Staff kitchen areas in shops, offices, and other working environments • Farm houses • Hotels, motels, and other types of residential environments • Bed-and-breakfast type environments •... -
Page 5: Indicator Panel Description
Indicator Panel Description 1� Power/Self cleaning indicator – When illuminated, indicates that the dispenser is on. When blinking, indicates that the self-cleaning feature is operating. 2� Hot water indicator light – When illuminated, indicates that the dispenser is heating water. 3�... -
Page 6: Package Contents
Package Contents Part Description Quantity Part Description Quantity Filter flushing tube Post carbon filter Feed water adapter Shut-off valve tube (7 ft) (with extra nut) Filter housing Plumber’s tape (for filter flushing) Sediment filter Drain saddle with foam gasket Carbon filter RO water-outlet tube RO (reverse osmosis) filter Materials Needed... -
Page 7: Connect To The Cold Water Supply
2� Connect to the Cold Water Supply CAUTION: DO NOT CONNECT THIS WATER LINE TO A HOT WATER SUPPLY LINE. The water supply to the unit MUST be from the COLD WATER LINE. Using HOT WATER will severely damage your filters. A�... -
Page 8: Make The Reverse Osmosis (Ro) Waste Connections
3� Make the Reverse Osmosis (RO) Waste Connections A� The RO filter assembly requires a drain line connection to be installed, which removes rejected water to the sewer. The drain saddle connects the drain line from the dispenser to your drain pipe. -
Page 9: Flush The Filters
4� Flush the Filters IMPORTANT: Follow this procedure for every filter during installation and every time you replace your filters. IMPORTANT: Ensure the water supply is off before you begin. A� Connect a filter (D) to the filter housing (C) by twisting the filter (D) clockwise. -
Page 10: Install The Filters And Complete The Installation
5� Install the Filters and Complete the Installation A� After flushing, twist each filter clockwise into the filter housings located inside the dispenser cabinet. The sediment filter (D) goes on the left, followed by the carbon block filter (E), the RO filter (F), and the post carbon filter (G). -
Page 11: Operation
Operation IMPORTANT: This unit has been tested and sanitized prior to packing and shipping. During transit, dust and odors can accumulate in the tank and lines. Dispense and dispose of at least 1 quart of water prior to drinking any water. Turn the Dispenser On/Off IMPORTANT: Before you activate the red hot-water and green cold-water switches, ensure water has filled... -
Page 12: Troubleshooting Guide
Troubleshooting Guide Refer to the table below for possible problems and their solutions. Problem Solution • It takes approximately 1 hour after setup to dispense cold water. • Make sure the power cord is properly connected to a working outlet. •... -
Page 13: Cleaning And Maintenance
Cleaning and Maintenance This dispenser runs on a continuous UV cleaning cycle. It works for 40 minutes (UV indicator light is on), turns off for 140 minutes, and then cycles back on again as long as the dispenser is plugged in and turned on. CAUTION: Before manual cleaning, always turn off hot- and cold-water switches, and unplug dispenser. -
Page 14: Filter Replacement Schedule
Filter Type Replacement Schedule Function Performs a coarse filtration of original water. Removes Sediment 3-6 months or 950 gallons (3596 liters) mud, sand, iron, rust, suspensions, and impurities. Carbon Block Reduces chlorine taste and odor, lead, and cysts. 3-6 months or 950 gallons (3596 liters) Reverse Removes up to 99% of contaminants including 6-12 months or 1,900 gallons (7200 liters) -
Page 15: Care And Maintenance
If the water supply is cut off, shut off the water supply and unplug the dispenser. When the water supply is back on, plug in the dispenser, and allow the dispenser to run in order to discharge sediment. Warranty Brio (“Vendor”) warrants to the original purchaser of the Brio Water Coolers (the “Product”), and to no other... - Page 16 person, that if the Product is assembled and operated in accordance with the printed instructions accompanying it, then for a period of one (1) year from the date of purchase, all parts in the Product shall be free from defects in material and workmanship.
- Page 17 Contact Us Call: +1 844-257-4103 ©2021 DTWUSA...
Need help?
Do you have a question about the CLPOU520UVRO4 and is the answer not in the manual?
Questions and answers