
Related Manuals for Ferno KED Pro


Summary of Contents for Ferno KED Pro
- Page 1 Ferno KED® Pro Extrication Device Users’ Instructions Doc. ID. 234-3396R01 / January 2024...
-
Page 2: Ferno Customer Relations
Limited Warranty Statement The products sold by Ferno are covered by a limited warranty. The Ferno S.r.l complete terms and conditions of the limited warranty, and the limitations via B. -
Page 3: Table Of Contents
Pro Behind the Patient _________ 17 ® Applying the Leg Straps ______________________ 18 Wrapping and Positioning the KED Pro _________ 19 ® Fastening the Torso Straps ____________________ 20 Securing the Patient’s Head ___________________ 21 © Ferno Australia / 234-3396R01 / January 2024... -
Page 4: Safety Information
Batch Number Serial Number Date of Manufacture Improper maintenance can cause injury. Maintain the KED® Pro only as described in this manual. Improper parts can cause injury. Use only Ferno parts on the KED® Pro. Authorised Authorised Product meets Representative... -
Page 5: Operator Skills And Training
A sample training record ● sheet is provided on page 35. receive professional instruction and training in Technical ● Rescue procedures before using the KED Pro in a Technical ® Rescue situation. © Ferno Australia / 234-3396R01 / January 2024... -
Page 6: About The Ked
Integrated carrying handles measurements. For more information, contact Ferno Customer ● Relations (page 2) or your Ferno distributor. Carrying case with integrated backpack ● Ferno reserves the right to change specifications without notice. X-ray translucent (except metal buckles) ● Rated vertical confined-space rescue ●... -
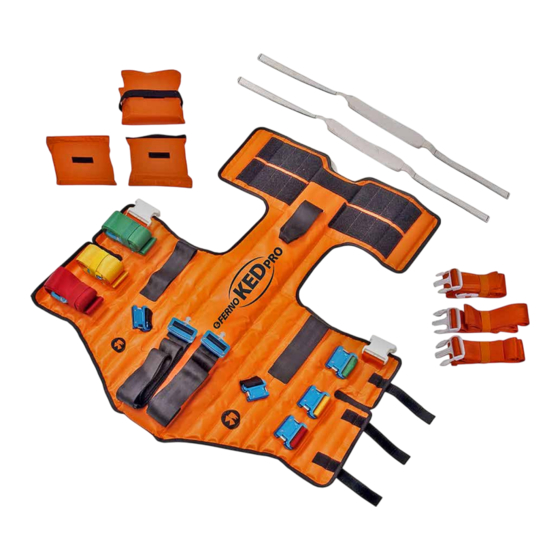
Page 7: Components
Head/Chin Strap (2) Modular Filler Pad (3) Lifting Handle (3) Colour-Coded Securing Strap (3) Wraparound Head Flaps Shoulder Strap Buckle (2) Storage Strap (3) Leg Strap (2) Take-Down Strap (2) Shoulder Strap (1) © Ferno Australia / 234-3396R01 / January 2024... -
Page 8: Using The Features
(Figure 4). 2. Repeat until the strap is snug tight. Feed Pull © Ferno Australia / 234-3396R01 / January 2024... -
Page 9: Lengthening Torso And Leg Straps
If you are not going to use the leg straps, leave them attached in the storage configuration, where they will not interfere with applying the KED Pro. ® © Ferno Australia / 234-3396R01 / January 2024... -
Page 10: Torso Straps
Within the time permitted by the patient’s and rescue conditions, fasten as many straps as possible, in this order: Middle strap ● Bottom strap ● Leg straps ● Head/chin straps ● Top strap ● © Ferno Australia / 234-3396R01 / January 2024... -
Page 11: Leg Straps
In Technical Rescue situations such as a vertical lift or confined- space rescue, place the leg pads on the leg straps. This will help set the groin area and will minimize pressure against the patient’s groin. Body Midline © Ferno Australia / 234-3396R01 / January 2024... -
Page 12: Modular Pads
Always take care to pad without hyperextending or flexing the patient’s neck. Secure the patient’s head with the head straps (see Head Straps, page 14). Note: The pads can also be used as splint padding. © Ferno Australia / 234-3396R01 / January 2024... -
Page 13: Lifting Handles
® ● kg (330 lb) Use a suitable lifting bridle with a load capacity ● of at least 1,500 kg (3,300 lb. or 15Kn). The Ferno ® Pro Lifting Bridle is recommended for this ® application (See Accessories, page 34). -
Page 14: Head Straps
® Pro with the head flaps shortened, fold the head flaps toward the outside of the KED Pro (away from the patient’s ® head as shown in Figure 16 and Figure 17). © Ferno Australia / 234-3396R01 / January 2024... -
Page 15: Using The Ked
Stay with the patient at all times. ● Operators performing Technical Rescue (using the KED ● ® for a one-person lift or confined-space rescue) must receive professional instruction and training in Technical Rescue procedures. © Ferno Australia / 234-3396R01 / January 2024... -
Page 16: Applying The Cervical Collar
Apply the cervical collar according to local protocols and the cervical-collar manufacturer’s instructions. In Figure 18, one operator holds the patient’s head and neck in neutral alignment while the other operator applies the Ferno ® WizLoc cervical collar before the KED Pro is applied. -
Page 17: Placing The Ked
KED Pro, taking care not to move the ® patient’s head. 7. Use the lifting handles to center the KED Pro behind the patient. ® © Ferno Australia / 234-3396R01 / January 2024... -
Page 18: Applying The Leg Straps
Snugging/Tightening, page 8). Leave space for two or three fingers laid flat between the strap and the patient’s leg. You will tighten the leg straps just before transferring the patient to the long spine board. Leg-Strap Anchoring Points Body Midline © Ferno Australia / 234-3396R01 / January 2024... -
Page 19: Wrapping And Positioning The Ked
NOTICE It is important to pull the KED Pro up firmly under the armpits to make sure the patient’s weight is suspended. This will reduce the possibility of the patient slipping downward while being lifted. -
Page 20: Fastening The Torso Straps
“Money Buys Lots of Hot Toys” Money = Middle Strap Buys = Bottom Strap Lots of = Leg Straps Hot = Head/Chin Straps Toys = Top Strap © Ferno Australia / 234-3396R01 / January 2024... -
Page 21: Securing The Patient's Head
Do not apply the strap so snugly that the patient cannot open their mouth. See Head Straps, page 14. 4. After the head and chin straps have been applied, the operator holding the head may release their grasp on the patient’s head. © Ferno Australia / 234-3396R01 / January 2024... -
Page 22: Buckling The Top Strap And Making Final Strap Adjustments
2. Check and tighten the middle (yellow) strap. 3. Check and tighten the bottom (red) strap. 4. Check and tighten the leg straps. The properly applied KED Pro is shown in Figure 37. ® © Ferno Australia / 234-3396R01 / January 2024... -
Page 23: Using The Shoulder Strap (Optional)
3. Tighten the shoulder strap to a snug fit (Figure 40). Do not overtighten. WARNING Crossing the shoulder strap over the patient’s neck can choke the patient. Fasten the shoulder strap only as described in this manual. © Ferno Australia / 234-3396R01 / January 2024... -
Page 24: Extricating The Patient To A Long Spine Board
12. Tighten the shoulder strap. WARNING An unrestrained patient can fall off the spine board or cot and be injured. Use restraints to secure the patient on the spine board and cot. © Ferno Australia / 234-3396R01 / January 2024... -
Page 25: Straps For A Standing Take-Down (Optional)
Lift only the weight you can safely handle. Be mindful of your back and be aware that you will be holding the full weight of the patient as the spine board tilts. © Ferno Australia / 234-3396R01 / January 2024... -
Page 26: Adapting The Ked
Fasten the top strap in the bottom buckle (Figure 50). Note: While the images on pages 26 - 28 show a Ferno Model 125 KED, the principles for use are the same as for the KED Pro. © Ferno Australia / 234-3396R01 / January 2024... -
Page 27: Adapting The Ked
6.5 Adapting the KED® Pro for Use With Monitoring Systems Folding two slats of each torso flap inward provides more chest exposure when needed. Loosening two of the three chest straps allows defibrillation without losing immobility (Figure 53). © Ferno Australia / 234-3396R01 / January 2024... -
Page 28: Adapting The Ked
(Figure 55). 6.7 Using the KED® Pro With an Anti-Shock Garment The KED® Pro will not interfere with, or limit the use of, a pneumatic anti-shock garment (Figure 56). © Ferno Australia / 234-3396R01 / January 2024... -
Page 29: Storing The Ked Pro
5. Make sure to position the folded strap so the keeper wraps around the center of the male buckle half. This will enable you to pull the strap free without tangles, and have the buckle in your hand, in a single motion. © Ferno Australia / 234-3396R01 / January 2024... - Page 30 Elastic Keepers case (Figure 65). The head straps may also be stored on the KED Pro, attached to the ® head flaps. See Head Straps, page 31. © Ferno Australia / 234-3396R01 / January 2024...
- Page 31 6. Close the carrying case by pressing the hook-and-loop fastening strips together (Figure 72). 7. The carrying case has adjustable shoulder straps to allow the KED Pro to be carried as a backpack (Figure 73). ® © Ferno Australia / 234-3396R01 / January 2024...
-
Page 32: Maintenance
Pro and modular pads with a mild ® Storing a damp or wet KED Pro in its carrying case will encourage soap solution and a medium-bristle brush. Wash the head the growth of mould. Do not store the KED Pro in its carrying straps with the soap solution and a clean sponge. -
Page 33: Parts
9.1 U.S.A. and Canada WARNING In the United States and Canada, to order parts, contact EMSAR ® the only agent authorized by Ferno to manage, service, and repair Improper parts can cause injury. Use only Ferno parts on Ferno products. the KED® Pro. -
Page 34: Training Record
Training and Maintenance Record Samples TRAINING RECORD Date Name Training Method MAINTENANCE RECORD Date Maintenance © Ferno Australia / 234-3396R01 / January 2024... - Page 35 Storing the KED Pro...
- Page 36 Ferno Australia 11 Johnstone Road Brendale, Queensland 4500 AUSTRALIA Emergency Rescue Safety Mortuary Ferno KED Pro / 234-3396R01 / January 2024...
Need help?
Do you have a question about the KED Pro and is the answer not in the manual?
Questions and answers