Wine Guardian CS025 Quick Start Installation Manual
Ceiling system wine cellar cooling units
Hide thumbs
Also See for CS025:
- Quick start installation manual (32 pages) ,
- Quick start manual (16 pages) ,
- Quick start installation manual (12 pages)
Advertisement
Available languages
Available languages
Quick Links
Advertisement

Related Manuals for Wine Guardian CS025


Summary of Contents for Wine Guardian CS025
- Page 1 Wine Guardian® Ceiling System Wine Cellar Cooling Units Models: CS025, CS050 (60Hz) WGC60 (50 Hz) Quick Start Installation Guide wineguardian.com USA + 1 315-452-7400 | Europe + 41 52 224 0490 info@wineguardian.com 15H0270-00 Rev A 04/2021 Part #...
-
Page 2: Table Of Contents
Wine Guardian Ceiling System This document is a pictorial guide for installing the Wine Guardian Ceiling system. It is not intended to replace the detailed instructions found in the Installation, Operation and Maintenance (IOM) manual, which includes important safety messages all installers and owners should follow for safe and optimal performance of the system. -
Page 3: English
Humidification — Stand-alone Ideal for adding humidity to your wine cellar. Temperature / Humidity Remote Sensors Sense and control multiple locations (maximum of three) within your room. Ideal for odd shaped rooms or multi-room applications. Unpackage Remove unit from box. Check for any signs of concealed damage, and that all optional equipment has been provided. - Page 4 2. Installing the Fan-Coil Decide where the unit will be mounted, consider the supply/return orientation, to ensure the utilities can be connected to the correct side of the unit. The Ceiling System consists of a Fan-coil Chassis, a Mounting Flange, and a Diffuser (Fig. 1). The fan coil unit can be located either above, or below the condensing unit in height.
- Page 5 H. Connect RJ-9 cable to the back of the remote user interface and attach to the wall at the screw locations Reconnect cable to side of Wine Guardian unit at either COM1 or COM2. Note: For wireless installations or multiple...
- Page 6 (See chart on below) See the full Wine Guardian Operations and installation manual for comprehensive charging procedure. At www.wineguardian.com. Includes charts for system Pressures, Superheat, and Sub-cooling.
- Page 7 System Charging Note: Each DS & WGS Model condensing unit is shipped with 16oz/.453kg of refrigerant charge already, to be taken into account for below total amounts based on 25’/7.62 meters interconnect length. Here are the recommended factory total system refrigerant charges by model based on the 25’/7.62meter interconnect baseline: DS025= 62oz / 1.75kg (includes added charge required if an XLA system) DS050=70oz / 1.98kg (includes added charge required if an XLA system)
-
Page 8: Deutsch
Deutsch Deckensystems von Wine Guardian Dieses Dokument ist eine bildliche Anleitung für die Montage des Deckensystems von Wine Guardian. Diese Anleitung soll nicht die detaillierten Anweisungen des Installations-, Be- dienungs- und Wartungshandbuchs (IBW) ersetzen, das wichtige Sicherheitsinformationen enthält, die alle Installateure und Besitzer für einen sicheren und optimalen Betrieb des Sys-... - Page 9 Befeuchtung — Stand-Alone Ideal, um Ihrem Weinkeller Feuchtigkeit hinzuzufügen. Temperatur-/Feuchtigkeitsaußensensoren Erfassen und steuern Sie mehrere Standorte (maximal drei) in Ihren Räumlichkeiten. Ideal für ungewöhnlich geformte Räume oder Multi-Raum-Anwendungen. Feuchtigkeit hinzuzufügen. 1. Auspacken Einheit aus der Verpackung entnehmen. Über- prüfen Sie alle Anzeichen von verdeckten Schäden, und ob alle optionalen Geräte zur Verfügung gestellt wurden.
- Page 10 2. Montage des Gebläsekonvektors Legen Sie fest, wo das Gerät montiert werden soll, und achten Sie auf die Ausrichtung von Vor- und Rücklauf, um sicherzustellen, dass die Versorgungsleitungen an der richti- gen Seite des Geräts angeschlossen werden können. Das Deckensystem besteht aus einem Gebläsekonvektor, einem Montageflansch und einem Vor- / Rücklaufgitter (Abb.
- Page 11 Rückseite der Remote-Schnittstelle an und befestigen Sie es an den Verschraubungen an der Wand. Verbinden Sie erneut das RJ-9-Kabel mit der Seite der Wine Guardian-Einheit entweder mit COM1 oder COM2 . 4. Kondensatablauf Wine Guardian-Deckensysteme sind mit einem Kondensatpumpensystem ausgestattet.
- Page 12 5. Montage der Kondensatoreinheit Die Wine Guardian Kondensatoreinheit muss horizontal wie abgebildet auf ihren Sockel montiert werden und muss vorne und hinten +/- 0,635 cm und 0,1375 cm an den Seiten haben. Ein Mindestabstand von 30 cm um dieKondensatoreinheit ist für eine ordnungsgemäße Luftzirkulation im Gerät und den Servicezugang,...
- Page 13 Systemaufladung Hinweis: Jede Kondensationseinheit des DS & WGS-Modells wird bereits mit einer Kältemittelfüllung von 0,453 kg (16 oz) geliefert, die bei den unten angegebenen Gesamtmengen, basierend auf der Verbindungslänge von 7,62 m (25 Zoll), zu berücksichtigen ist. Hier sind die empfohlenen werkseitigen Gesamtkältemittelfüllmengen des Systems für das jeweilige Modell, basierend auf der Verbindungslänge von 7,62 m (25 Zoll): DS025 = 1,75 kg (einschließlich zusätzlicher Füllung, die für ein XLA-System erforder- lich ist)
-
Page 14: Español
Wine Guardian para techos, por favor, póngase en contacto con nuestro distribuidor autorizado de Wine Guardian o con la oficina local de Wine Guardian. Complete la lista de verificación de inicio del sistema WG Split que se puede encontrar descargando el manual completo de instalación, operación y mantenimiento de... - Page 15 Humidificación —Unidad independiente Ideal para aportar humedad a su bodega. Sensores remotos de temperatura/humedad Detecte y controle múltiples ubicaciones (máximo tres) dentro de la habitación. Ideal para espacios con formas irregulares o instalaciones en múltiples lugares. 1. Extracción del embalaje Extraiga la unidad de la caja.
- Page 16 2. Instalación del ventiloconvector Decida dónde se instalará la unidad, tenga en cuenta la orientación del suministro/retorno para asegurar que los módulos se puedan conectar del lado correcto de la unidad. El sistema para techos consta de un ventiloconvector, una brida de fijación y una rejilla de suministro/retorno (Fig.
- Page 17 Vuelva a conectar el cable RJ-9 en el lateral de la unidad Wine Guardian ya sea a COM1 o COM2. Nota: Para instalaciones inalámbricas o múltiples interfaces remotas, consulte la versión completa del manual que se encuentra en wineguardian.com/...
- Page 18 5. Instalación de la unidad de condensación La unidad de condensación de Wine Guardian debe montarse horizontalmente en su base, tal y como se muestra, y estar nivelada a +/- ¼" de extremo a ex- tremo y 1/8" de lado a lado.
- Page 19 Carga del sistema Nota: Cada unidad condensadora de los modelos DS y WGS ya se envía con 16 oz/0,453 kg de carga de refrigerante, que debe tenerse en cuenta para las cantidades totales inferiores basadas en una longitud de interconexión de 25 pies/7,62 metros. Estas son las cargas totales de refrigerante del sistema recomendadas de fábrica por modelo, según la línea de base de interconexión de 25 pies/7,62 metros: DS025 = 62 oz/1,75 kg (incluye la carga adicional necesaria si es un sistema XLA)
-
Page 20: Français
Français Système Wine Guardian Ceiling Ce document est un guide illustré pour l’installation de votre climatiseur Wine Guardian Ceiling. Il n’est pas destiné à remplacer les instructions détaillées du manuel d’installation, d’utilisation d’entretien, lequel comprend d’importants messages de sécurité que toute personne installant ou possédant... - Page 21 Humidificateur autonome Idéal pour humidifier votre cave à vin Capteurs à distance de temperature/humidité Mesure et contrôle plusieurs endroits (trois au maximum) dans votre salle. Idéal pour les salles de forme irrégulière ou les caves à plusieurs salles. Déballage A. Retirez l'appareil de la boîte. Recherchez tout signe de dommages cachés vérifiez...
- Page 22 2. Installer le ventilo-convecteur Choisissez l’emplacement où l'unité sera montée, tenez compte de l'orientation d'alimentation/retour pour vous assurer que les installations soient connectées du bon côté de l'unité. Le système de plafond se compose d'un ventilo-convecteur, d'une bride de montage et d'une grille d'alimentation/retour (Fig.1).
- Page 23 4. Évacuation du condensat Les systèmes de plafond Wine Guardian sont équipés d'un système de pompe à condensats. Connectez-vous à la conduite de vidange de l'unité et dirigez-la vers l'emplacement de vidange le plus...
- Page 24 (Voir tableau ci- dessous) Voir le manuel d'installation et d'utilisation complet de Wine Guardian pour plus de détails sur la procédure de chargement. MODÈLE...
- Page 25 Chargement du système Remarque : chaque unité de condensation des modèles DS & WGS est déjà expédiée avec 16 oz / 0,453 kg de charge de réfrigérant, à prendre en compte pour les quantités totales ci- dessous basées sur une longueur d'interconnexion de 25 pi / 7,62 mètres. Voici les charges de réfrigérant totales recommandées en usine du système par modèle en fonction de la ligne de base d'interconnexion de 25 pi / 7,62 mètres : DS025 = 62 oz / 1,75 kg (comprend la charge supplémentaire requise s’il s’agit d’un système...
- Page 26 Chinese Wine Guardian 吊顶式系统 本文件是Wine Guardian吊顶式系统的图解安装指南。该指南不能 取代安装、操作和维护 (IOM)手册中的详细说明,其中附带安装 人员和所有者为确保安全并实现系统最优性能而应遵守的所有重要 的安全信息。 完整的IOM手册请浏览wineguardian.com资源与手册页面。如有 Wine Guardian 吊顶式系统相关的其它问题,请联系您的授权 Wine Guardian 分销商或当地 Wine Guardian 办事处。 请填写WG拆分系统启动清单,该清单可通过从我们的网站下载适 用于您的模型拆分系统的完整安装,操作和维护手册来找到。...
- Page 27 加湿—单机式 酒窖加湿的理想选择 温度/湿度远程传感器 感知和控制您房间内的多个地点(最多三个) 适合不规则房间或多房间应用 拆包 将设备从箱内移出。检查是否有暗藏的损坏迹象,是否所 有可选的设备都已经提供。如果部件丢失或设备在运输中 受到损坏,立即联系Air Innovation。 装运设备包括: - (1)台风机盘管单元 - (1)件安装法兰 - (1)套供气/回风格栅组件 - (1)台冷凝单元 - (1)台远程接口控制器(带50’控制电缆) - (1)件文件夹,内含备用数据铭牌...
- Page 28 2. 安装风机盘管制冷剂 确定装置的安装位置,需考虑供气/回风的方向,以确保 将设施连接到该装置的正确侧面。吊顶式系统包括一台 风机盘管单元、一台安装法兰和一套供气/回风格栅组件 (见图1)。风机盘管单元可以安装于冷凝设备的上方或 下方。高度间隙最大为15’ (4.57米)。 图 1 安装风机盘管 A. 在天花板上切开一个切口,中央托梁间距为16” 时,切口尺寸为41”(长)x 14.5” (宽),中央 托梁间距为12” 时,尺寸为41” (长)x 10.5” 图 2 (宽)(见图2)。 B. 将安装法兰安装到天花板上,并使用2 1/2”的平头 木结构螺钉(未提供)将其固定到托梁上。确保安 装法兰的铰链部分与设施和该装置的连接侧保持相 对(见图3)。 图 3 C. 将风机盘管与安装法兰的铰链相连接(见图4),向 上旋转装置,然后使用四(4)个垫圈、紧固垫圈和 螺母(已提供),将风机盘管固定在安装法兰上 (见图5)。 D. 将所有设施连接到风机盘管上。有关如何安装世伟 图 4 (见第35页)。...
- Page 29 3. 恒温器接线 设备随附 50 英尺(15 米)长的电缆,带有可连接至远程接 口控制器 RJ-9 型连接器。 将远程用户终端放在室内通风良好、远离窗户或热源的墙体 中间点上。 将控制器背面的电线拆下,重新将电缆布线到室内所需的安 装位置。 在墙壁或机架结构上钻一个直径为 3/4” (19毫米)的孔,以 便为控制器背面的RJ-9连接器留出空间。 卸下控制器的背板,并在所需位置标记安装点。 钻两个1/8” (3毫米)的孔,将锚钉插入安装表面。如果固定 在墙柱或墙架上,可能不需要锚钉。将螺钉插入锚钉中,并 测试背面安装板的匹配情况。紧固/松开螺钉以调整匹配度。 将前盖板拧入背板上的适当位置,重新安装前盖板。 将RJ-9电缆连接到远程用户界面的背面,并使用螺钉固定在 墙上。 将RJ-9电缆插入COM1或COM2,重新连接到Wine Guardian 设备的侧面。 注意:对于无线安装或多个远程接口,请参阅 wineguardian.com/manuals 上的完整版手册 冷凝排水 Wine Guardian吊顶式系统配备冷凝水泵。连接设备 的排水管线,将其引至周边最低点。...
- Page 30 安装冷凝设备 Wine Guardian 冷凝设备必须水平安装在底座上,如 图所示。保持端到端 +/- ¼”和侧对侧1/8” 对齐。 冷凝设备周边应至少留有12英寸的间距,以保证整个 设备的良好通风和维修作业。 C. 在朝向蒸发器的 进气管道和液体管道上,每10英尺提供一英寸的落差,以防止进气管路中冷 凝剂流入压缩机中或者设备关闭。 D. 将系统安装在室外混凝土板上,高度要在平均降雪高度以上。设备也可以安 装在房屋的侧面或室内窄小空间、阁楼或机房(面积至少是酒窖面积的三 (3)倍)。 防止倾斜、凹陷或其他会导致冷却油泄漏的低点。 如有需要,打开液体管线关闭阀,或移除液体管线出口配件或塞子,使用干 燥空气吹扫设备,清空室内设备进气管道和液体管道,并进行泄漏测试。 G. 增压和泄漏测试系统(冷凝设备预充)。建议采用与设备铭牌上标明的低侧 试验压力相等的压力,进行泄漏测试。 H. 抽空系统并保持500微米托耳真空度,充入制冷剂。向系统中填充适宜剂量 的制冷剂,并使用永久性记号笔在设备铭牌的空白部位标明其剂量。(见下 表) 有关详细的填充流程,请参考完整版Wine Guardian操作与安装手册。 MODEL LIQUID LINE (OD) SUCTION LINE (OD) CS025 1/4 inch...
- Page 31 系统充注量 注意:每个DS&WGS型号冷凝器发货时已充注16盎司/453千克的制冷剂, 根据25英尺/7.62米的互连长度,以下总量应将这考虑在内。 以下是根据25英尺/7.62米互连基准按型号列出的推荐工厂系统总制冷剂充 注量: DS025 = 62盎司/1.75千克(包括XLA系统所需的额外费用) DS050 = 70盎司/1.98千克(包括XLA系统所需的额外费用) WGS75 = 1.92千克(包括XLA系统所需的额外费用) **对于每1英尺或每1米25英尺/7.62米以上或以下的管道,将总系统制冷剂 R134A充注量从基线以上调整0.50盎司/0.0465千克。” 6. 将设备连接到电源上 将电源与图示冷凝设备中的触点相连接。 采用24伏低压信号接线,连接风机盘管上的Y和C端口 与冷凝器外壳上的Y和C端口(如左图所示)。 系统启动前24小时,开启冷凝单元电源,让曲轴箱加 热器加热压缩机。 *完整接线图,请查看手册第20页。冷凝设备内部也有接线 图。 启动装置 打开风机盘管的电源,按下远程用户终端上的“开/关”按钮。远程用户终 端预置为室温55°F (13°C)。 按一下“向上”箭头。显示器会显示现有的目标温度。按“向上或向下”箭头 按钮,将温度调整到想要的设定值。 系统会在5分钟后启动,冷风段开始送冷风。如果系统无法启动,请联系Air Innovations。...
-
Page 32: Pусский
обслуживанию можно найти на странице ресурсов и руководств wineguardian.com. Если у вас есть дополнительные вопросы, касающиеся вашей потолочной системы Wine Guardian, пожалуйста, свяжитесь с вашим официальным дистрибьютором Wine Guardian или обратитесь в местный офис Wine Guardian. Заполните контрольный список запуска WG Split System, который... - Page 33 Увлажнение-(Отдельный модуль) Идеально подходит для повышения влажности в винном погребе. Удаленные датчики температуры / влажности Контроль нескольких мест (максимум трех) в вашем помещении. Идеально подходит для помещений сложной конфигурации или при наличии нескольких помещений. 1. Распаковка Достаньте установку из коробки. Проверьте наличие каких- либо...
- Page 34 2. Установка фанкойла Выберите место установки и направление распределительной решетки на входе /выходе воздуха таким образом, чтобы гарантировать, что коммуникации будут подключены к правильной стороне блока. Потолочная система состоит из фанкойла, монтажного фланца и распределительной решетки на входе /выходе воздуха (рис. 1). Фанкойл может быть расположен либо фигура...
- Page 35 пользовательскому интерфейсу в задней панели и прикрепите к стене в местах расположения винтов. Подсоедините кабель RJ-9 к боковой стороне устройства Wine Guardian в порт COM1 или COM2. Примечание. Для беспроводных установок или нескольких удаленных интерфейсов см. Полное руководство по версии, расположенное по...
- Page 36 . Установка конденсационного блока Конденсационный блок Wine Guardian должен быть установлен горизонтально на собственном основании, как показано на рисунке, на уровне / - ¼ ”от конца к концу и 1/8” из стороны в сторону. По периметру конденсационного блока для обеспечения правильного воздушного потока...
- Page 37 Системная зарядка Примечание: Каждый конденсатный блок модели DS и WGS поставляется с 16oz/.453kg хладагента заряда уже, которые должны быть приняты во внимание общее количество (показано ниже) на основе 25'/7.62 метров интерконнектной длины. Вот рекомендуемый заводом общий объем заправки системы хладагента по модели на основе 25'/7.62 метр интерконнекта базовый: DS025 = 62 унции...
-
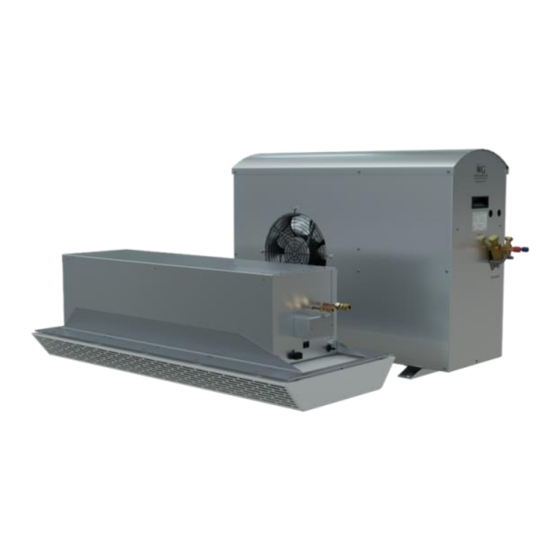
Page 38: Product Overview & Options
Fan Coil A. Suction Line B. Liquid Line C. Optional Humidifier H. Supply Air Section D. Drain Line I. Controls Section G. Junction Box for Connection Primary Power E. RJ9 Control Cable J. Return Air Section F. 24-volt Connection to K. - Page 39 Deustch J. Rückluftbereich A. Saugleitung K. Kondensatwanne B. Flüssigkeits-leitung L. Kältemittelleitung-Anschlüsse C. Optionaler Luftbefeuchter M. Kältemittel-Sichtglas D. Ablaufleitungs-Anschluss N. Kompressor E. RJ9-Steuerkabel O. Hochdruck-schalter F. 24-Volt-Anschluss an Kondensatoreneinheit P. Kondensator-Spule G. Verteilerkasten für Primärenergie Q. Außenhülle H. Zuluftbereich R. Hebegriffe I.
- Page 40 Preserving it is Ours U. S. Headquarters 7000 Performance Drive North Syracuse, New York USA 13212 +1 315-452-7400 wineguardian.com info@wineguardian.com European Office Wine Guardian GmbH Pestalozzistrasse 2 CH 8201 Schaffhausen Switzerland +41 52 224 0490 15H0270-00 Part No. Rev. 04-2021...
Need help?
Do you have a question about the CS025 and is the answer not in the manual?
Questions and answers