
Related Manuals for DVDO DVDO-C7-1-S


Summary of Contents for DVDO DVDO-C7-1-S
- Page 1 DVDO-C7-1-S 4K PTZ Camera with HDMI/IP/USB 3.0 & AI Voice Tracking User Manual Version v1.4 │ │ │ DVDO +1.408.213.6680 support@dvdo.com www.dvdo.com...
- Page 2 Preface This manual is to ensure that the user can use the product properly and avoid danger while operating. Before using this product, please read the user manual carefully and keep it properly for future reference. Overview This manual is about 4K PTZ camera operation. Graphic Symbols Description of graphic symbols used in this manual.
- Page 3 Attention This manual introduces functions, installations and operations for this product in details. Please read this manual carefully before installation and use. Precautions This product can only be used in the specified conditions in order to avoid any damage to the camera: 1) Do not expose the product to rain or moisture.
- Page 4 4) Do not power on before completely installation. Improper operations may damage the product structure and result in mechanical failure. Please note the following tips. Do not move the camera by grabbing the head. Move the camera by holding the bottom with one or both hands.
-
Page 5: Table Of Contents
Content Quick Start............................3 1.1 Interface ..........................3 1.2 Power-on Self-Test ......................3 1.2.1 Power on ........................3 1.2.2 Self-Test ........................4 1.3 Video Output ........................4 1.3.1 Network Output ......................4 1.3.2 HDMI Output ......................4 1.3.3 USB3.0 Output ......................4 1.4 Bracket .......................... - Page 6 3.3 Menu Setting ........................23 3.3.1 Main Menu ......................23 3.3.2 Trace Setting ......................24 3.3.3 System Setting ......................24 3.3.4 Camera Parameter Setting ..................25 3.3.5 P/T/Z ........................29 3.3.6 Video Format ......................29 3.3.7 Version ........................30 3.3.8 Restore Default ......................30 Network Connection ........................
-
Page 7: Quick Start
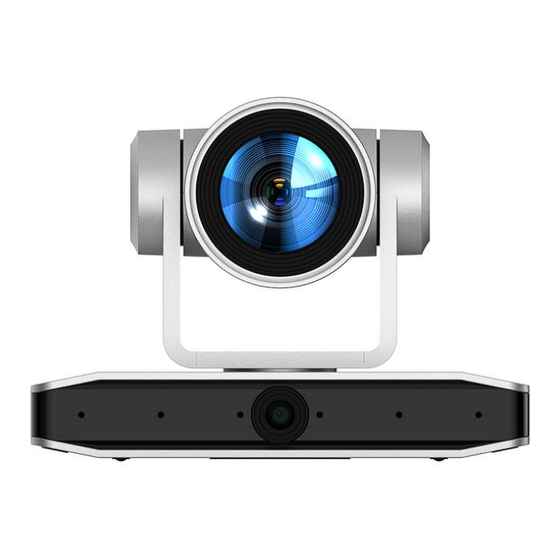
Quick Start Interface Figure1-1 Interface Interface 1. Close-up Lens 6. Fixation Hole 11. RS232 Input 7. Audio in 12. DC12V Power Socket 2. Base 3. Panoramic Lens 8. USB3.0 13. Power Switch 9. HDMI Jack 4. Receiving Light 5. Tripod Screw Hole 10. -
Page 8: Self-Test
1.2.2 Self-Test After power on, the receiver light will start flashing and camera will do a brief pan-tilt tour and return to the home position. When light stop flashing, the self-test is finished. ⚫ Default address of the remote control is 1#. When menu restore default setting, the address of IP remote control will restore 1#. -
Page 9: Bracket
Bracket ⚫ Bracket can only be wall mounted or upside down mounted on template and concrete wall, but can not be installed on plasterboard. 1.4.1 Steps of Wall Mount... - Page 10 Figure1-2 Steps of Wall Mount...
-
Page 11: Steps Of Ceiling Mount
1.4.2 Steps of Ceiling Mount Figure1-3 Steps of Ceiling Mount... -
Page 12: Product Overview
Product Overview Product Overview 2.1.1 Product model UV490D2 2.1.2 Product Dimension Figure2-1 Product Dimension... -
Page 13: Accessory
2.1.3 Accessory When you unpack your package, check that all the supplied accessories are included: Table2-1 Supplied Accessory Power adapter USB3.0 Cable Supplied User manual RS232 cable Plastic pad IR Remote Control Brackets for wall mounting Optional Brackets for ceiling mount Product Feature This is a brand new UHD 4K camera. -
Page 14: Technical Specification
⚫ Audio Input Interface: support AAC, MP3, G.711A audio compression, AAC and MP3 support 16000, 32000, 44100, 48000 sampling frequency. ⚫ Built-in Gravity Sensor: Support PTZ auto-flip function and easy installation. ⚫ Multiple Network Protocol: Support ONVIF, GB/T28181, RTSP, RTMP,VISCA OVER IP,IP VISCA,RTMPS,SRT protocols;... - Page 15 USB3.0: Main stream:YUY2/NV12: 1920×1080/1280×720/1024×576/800×600/800×448/640×480/64 0×360/480×270/320×180@30/25/20/15/10/5fps;; MJPG/H264: 1920×1080/1600×896/1280×720/1024×576/960×540/800× 600/800×448/720×576/720×480/640×360/640×480/480× 270/352×288/320×240@30/25/20/15/10/5fps; Secondary stream:YUY2/NV12: 1920×1080/1280×720/1024×576/800×600/800×448/640×360/64 0×480/480×270/320×180@30/25/20/15/10/5fps; MJPG/H264: 1920×1080/1600×896/1280×720/1024×576/960×540/800× 600/800×448/720×576/720×480/640×360/640×480/480× 270/352×288/320×240@30/25/20/15/10/5fps; Close-up Parameters Horizontal:7.6°(N)~80.5°(W) Viewing Angle F1.8 ~ F3.6 Iris Value Digital Zoom Minimum 0.5Lux(F1.8, AGC ON) Illumination 2D&3D DNR White Balance Auto / Manual/ One Push/ Specified Temperature Focus Auto/Manual/One Push Focus Exposure Mode Auto/Manual/Shutter priority/Aperture priority/brightness priority...
- Page 16 ON/OFF OFF/ 1~8 Video Brightness, Color, Saturation, Contrast, Sharpness, B/W mode, Adjustment Gamma curve >50dB Panoramic lens Fixed 110.2°\101.8°\69.5°(D\H\V) Viewing Angle Aperture F2.0±5% Focal Length F=1.89mm Table2-2 Interface Parameter Interface Parameter HDMI, LAN(Support POE), USB3.0, LINE-IN, RS232-IN, DC12V Video Interfaces Power Supply, Power Switch Video Output HDMI, LAN, USB3.0...
- Page 17 Serial Port VISCA/Pelco-D/Pelco-P; Communication Support Baudrate: 115200/38400/9600/4800/2400 Protocols UVC ( Video Communication Protocol ) , UAC ( Audio Communication Communication Protocol) Protocol Power Supply HEC3800 Outlet (DC12V) Power Adapter AC110V~AC220V to DC12V/2.5A Input Voltage DC12V±10% Input <1A Consumption <12W Table2-3 PTZ Parameter PTZ Parameter -110°~+110°...
-
Page 18: Interface Introduction
Humidity Dimension 220(L)mm*136mm(W)*159mm(H) Weight 1.7kg Environment Indoors Table2-5 Accessory Parameter Accessory Supplied Power Supply, RS232 Control Cable, USB3.0 Cable, IR Remote Accessory Control, User Manual Optional Ceiling / Wall Mount (Extra Cost) Accessory Table2-6 AI Function AI Function Built-in high speed processor and face detection algorithm, Auto Framing automatically detect participants and provide ideal framing. -
Page 19: Rs-232
Figure2-2 Interface Diagram 2.3.3 RS-232 RS-232 Diagram 1) Connecting method to PC or controller Device WindowsDB-9 1.DTR 1.DCD 2.DSR 2.RXD 3.TXD 3.TXD 4.GND 4.DTR 5.RXD 5.GND 6.GND 6.DSR 7.IR OUT 7.RTS 8.NC 8.CTS 9.RI... - Page 20 Figure2-3 RS-232 Diagram RS-232 Mini-DIN 8-pin Terminal Port Definition 2) Table2-7 RS-232 Mini-DIN 8-pinTerminal Port Definition Terminal Definition Port Data Terminal Ready Data Set Ready Transmit Data System Ground Receive Data System Ground IR OUT IR Commander Signal IR No Connection RS232(DB9) Terminal Port Definition 3)...
- Page 21 Data Set Ready Request to Send Clear to Send Ring Indicator ISCA Networking Method 4) Device Cascading Connection Method Device 1 Device 2 1.DTR 2.DSR 3.TXD 4.GND 5.RXD 6.GND IR OUT 7.OPEN 8.OPEN Figure2-4 VISCA Networking Diagram ⚫ This camera has RS232 Input/Output interface, you can cascade as above method...
-
Page 22: How To Use
How to Use Video Output 3.1.1 Power-on Self-test After powering on, camera will have initial configuration and receiver light will be flashing. Camera will do a brief pan-tilt tour and return to the home position, or if preset 0 is set, the camera will return to the preset 0 position). 3.1.2 Video Output Network output: connect this product and your computer through network cable, 1)... -
Page 23: Remote Control
Remote Control 3.2.1 IR Remote Control 1. Standby Key After 3S long press, the camera will step into standby mode. Long press 3S again, the camera will self-test again and back to HOME position. (Note: If power-on mode is turned on and Preset 0 is set, and there is no operation within 12s, it will automatically point to the specified preset position. -
Page 24: Remote Control Usage
9. BLC Control Key Back Light ON / OFF: Turn on or off the back light 10. Menu Setting Open or close the OSD menu Enter / exit the OSD menu or return to the previous menu. 11. Camera IR Remote Control Address Setting 【*】+【#】+【F1】:Camera Address No.1 【*】+【#】+【F2】:Camera Address No. - Page 25 1. In this instruction, “press the key” means a click rather than a long-press, and a special note will be given if a long-press for more than one second is required. 2. When a key-combination is required, do it in sequence. For example,“ 【 *】+ 【#】+【F1】”means press“【*】”first and then press“【#】”...
- Page 26 key first and then press the number key 0-9 to clear the relative preset; Note : press the“【#】” key three times continually to cancel all the presets. Zoom Control 4) ZOOM IN: press “ZOOM “ key ZOOM OUT: press “ZOOM ”...
-
Page 27: Menu Setting
Menu Setting 3.3.1 Main Menu In normal working mode, press 【MENU】key to display the menu, using scroll arrow to point at or highlight the selected items. MENU =============== Language English Trace Setting (Setup) (Camera) (P/T/Z) (Video Format) (Version) (Restore Default) [←... -
Page 28: Trace Setting
return confirm 3.3.2 Trace Setting Trace Setting =============== Auto Framing Voice Location Track Mode Pan Movies Detecting Speaking Time Close-up hold time Cut Panorama Time Voice Active Time Middle Track Mode [↑↓]Select[← →]Change Value [Menu]Back [Home]OK Auto Framing: On/Off Voice Location: On/Off Detecting Speaking Time: For example, if the speech detection time is set to one second, it means that as long as A speaks continuously for one second, the camera will determine this position and it will be valid. -
Page 29: Camera Parameter Setting
SETUP =============== Protocol Auto Visca Address Visca Address Fix PELCO-P Address PELCO-D Address Baudrate 9600 USB tranmissiong mode Auto Flip Auto Sleep [↑↓]Select[← →]Change Value PROTOCOL: VISCA/Pelco-/Pelco- Address:VISCA=1~7 Pelco-P = 1~255 D/Auto Pelco-D =1~255 Baudrate Visca Address Fix:On/Off 2400/4800/9600/38400/115200 :On/Off USB dual stream:On/Off Auto Flip Auto Sleep: On/Off... - Page 30 Exposure: Enter into Exposure setting Color: Enter into color setting Image: Enter into image setting Focus: Enter into focus setting Noise Reduction: Enter into noise reduction Style: Default, Zoom Certified , Teams Certified standard, Clarity,Brightness Exposure 1) Move the pointer to the (EXPOSURE) in the Main Menu, click the【HOME】and enter the (EXPOSURE SET) as follow EXPOSURE ===============...
- Page 31 Gain: Set the size of the gain, 0 ~ 15 (Only available in manual mode and shutter priority mode) Color 2) Move the pointer to the (COLOR) in the Main Menu, click the【HOME】and enter the (COLOR SET) as follow COLOR ==============...
- Page 32 IMAGE =============== Brightness Contrast Sharpness B&W-Mode Color Gamma Default DZoom Low-Light Mode [← →]Change [↑↓]Select Value [Menu]Back Brightness: 0~100 Contrast: 0~100 Sharpness: 0~15 B&W Mode: Color, black/white Gamma: Default, 0.45, 0.50, 0.55, 0.63 Digital Zoom: On/Off Low-Light Mode: Close/Open Focus 4)...
-
Page 33: P/T/Z
Noise Reduction 5) Move the pointer to the (NOISE REDUCTION) in the Menu, click the【HOME】and enter the (NOISE REDUCTION) as follow NOISE REDUCTION ================ NR-2D NR-3D [↑↓]Select [← →]Change Value [Menu]Back Noise Reduction: Close, 1~8 3.3.5 P/T/Z Move the pointer to the (P/T/Z) in the Main Menu, click the【HOME】and enter the (P/T/Z) as follow P/T/Z ================... -
Page 34: Version
VIDEO FORMAT =============== 4KP30 4KP25 1080P30 1080P25 1080P29.97 [↑↓]Select [Menu]Back [Home]OK ⚫ Exit menu after modifying parameter to save it 3.3.7 Version Move the pointer to the (VERSION) in the Main Menu, click the【HOME】and enter the (VERSION) as follow VERSION ================... - Page 35 RESTORE DEFAULT ================ Restore Default? [← →]Change Value [↑↓]Select [Menu]Back [Home]OK Restore default: Yes/No ( after restoring default, the language, color, and video format won’t be restored) ⚫ If the address of former remoter is not 1 but another one from 2,3,4, the corresponding camera address will restore to 1 when all parameters or system parameters are restored.
-
Page 36: Network Connection
Network Connection Connection Method Direct Connection:Direct connections via “cross-over” network cable Connection to LAN:Connections to LAN via patch cable to LAN wall jack or LAN switch ⚫ Please do not put the power and network cable in places where can be easily touched to prevent video quality lowered by unstable signal transmission due to poor contact of cables. - Page 37 Figure4-1 Network segment successfully added User can also to verify network connection as steps above mentioned after the finish of camera self-check. If IP is default, open DOS command window and input 192.168.5.163, then press Enter key. It will show message as below, which means network connection is normal.
-
Page 38: Camera Web Interface
Camera Web Interface 4.2.1 Web Login Web Login 1) After assigning an IP address to the camera, you can reach the Web Interface by typing in the camera’s IP address into a web browser. You can log in this interface as administrator or user. -
Page 39: Configuration
User name and default password: “user1” or “user2” You can control PTZ, zoom, focus, sound, zoom in, full screen and set run, and delete the preset position. Can preview and logout. ⚫ No configuration permission for normal user login. 4.2.3 Configuration Click Configuration to enter into the device parameters setting page There are the following options: video configuration, network configuration, system configuration, detailed description see the following table. - Page 40 Image Quality: Set the image quality, image quality can be changed only when rate control is variable bit rate,(main stream defaulted is best, secondary stream default is better, there are best, better, good, bad, worse, worst for options). Rate (Kb/s): Set the video bit rate (main stream default 4096Kb / s, 64-40960Kb/s optional;...
- Page 41 4) Video Parameters A)Focus: Focus mode, focus tactic, focus sensitivity can be set. Focus Mode: set the focus mode (Default automatic, manual optional, one-push) Focus Area: Set the focus area (Default All, up,middle, Down are optional) Focus Sensitivity: Set the focus sensitivity (Default is low, high, medium optional) B)Exposure: Exposure mode, exposure compensation, backlight compensation, anti-flicker, gain limit, shutter, aperture, brightness, gain can be set.
- Page 42 Red Fine Tuning: Set red fine tuning, valid in auto white balance mode. (default 0, - 10-10 optional). Blue Fine Tuning: Set Blue fine tuning, valid in auto white balance mode. (default 0, -10-10 optional). Saturation: Set the saturation (default 38,0-127 optional). Chroma: Set the chrome (default 4, 0-8 optional).
-
Page 43: Network Configuration
⚫ Refresh the page after changing above parameters in a, b, c, d, e, f to take effect. Character Overlapping 5) Display Time & Date: Yes/No Display Title: Yes/No Time, Font and Color: Default white, black, yellow, red and blue optional) Title Font Color: Default white, black, yellow, red, and blue optional) Move Character: Set the location where the time and title to display. - Page 44 Onvif Port: Set Onvif port, the device will restart automatically after changed (default 2000, 0-65535 optional). Soap Port: Set Soap port (default 1936, 0-65535 optional). RTMP Port: Set RTMP port (default 1935, 0-65535 optional). RTSP Port: Set RTSP port, the device will restart automatically after changed (default 554,0-65535 optional).
-
Page 45: System Configuration
Time Synchronization: Enable/Disable time synchronization Stream Type: Set stream type (default main stream, secondary stream optional) Signing Time (in seconds): 3600, range 5-65535 Heartbeat Time (seconds): 60, range 1-65535 Register ID: 34020000001320000001 Register User Name: IPC Register Password: 12345678 Equipment Ownership: Users can add their own Administrative Regions: Users can add their own Alarm Zone: Users can add their own Equipment Installation Address: Users can add their own... - Page 46 System Language: Set the system language (default Simplified Chinese, English optional).Need to re-login after modify and save the setting. Click on the "Save" button, it will be valid when display "Save successful". 2) System Time Date Format: Set the date format (YYYY-MM-DD default Year - Month - Day, MM- DD-YYYY namely Month - Day - Year, DD-MM-YYYY namely Date- Month - Year Optional).
-
Page 47: Logout
⚫ If you log in to the webpage with the user name and password of an ordinary user, you have no configuration rights and can only perform preview, playback, and logout operations. Version Update 4) The version information displayed on the page is read-only version and cannot be modified by the user. -
Page 48: Tracking Function Web
4.2.8 Tracking Function Web Page Configuration 1. After successfully logging in, enter into the management interface, select to enter the tracking interface, and you can set to open/close related tracking functions. 2. On the right top is PTZ control area, in which you can set the preset region of Regional Tracking. - Page 49 10 shielded areas, set attention, first select the enable check box, select the setting area (yellow background), and then select the area on the left to take effect.
-
Page 50: Serial Port Communication Control
Serial Port Communication Control In normal working state, you can control the camera through RS232 (VISCA IN) cable. The parameter of RS232 is as below: Baud rate: 2400/4800/9600/115200/second Start Bit:1 bit; Data Bit:8 bit; Stop Bit:1 bit; Verification Bit:None. After power on, the camera will first turns to the bottom left and then back to the center position. -
Page 51: Camera Control Command
Indicates that two sockets are already Command being used(executing two commands) and z0 60 03 FF Buffer Full the command could not be accepted when received. Returned when a command which is being executed in a socket specified by the Command z0 6y 04 FF(y: cancel command is canceled. - Page 52 Command Function Command Packet Remark Stop 8x 01 04 08 00 FF Far(Standard) 8x 01 04 08 02 FF Near(Standard) 8x 01 04 08 03 FF Far(Variable) 8x 01 04 08 2p FF p = 0(low) - 7(high) Near (Variable) 8x 01 04 08 3p FF 8x 01 04 48 0p 0q CAM _Focus...
- Page 53 Command Function Command Packet Remark 2700K 8x 01 04 35 0F FF 2800K 8x 01 04 35 10 FF 2900K 8x 01 04 35 11 FF 3000K 8x 01 04 35 01 FF 3100K 8x 01 04 35 12 FF 3200K 8x 01 04 35 13 FF 3300K...
- Page 54 Command Function Command Packet Remark 5100K 8x 01 04 35 23 FF 5200K 8x 01 04 35 24 FF 5300K 8x 01 04 35 25 FF 5400K 8x 01 04 35 26 FF 5500K 8x 01 04 35 09 FF 5600K 8x 01 04 35 27 FF 5700K...
- Page 55 Command Function Command Packet Remark One Push WB One Push Trigger 8x 01 04 10 05 FF Trigger(Enabled during One Push WB mode) Manual 8x 01 04 35 05 FF 8x 01 04 A9 00 FF CAM_AWB Normal 8x 01 04 A9 01 FF WB Sensitivity Setting Sensitivity High...
- Page 56 Command Function Command Packet Remark Down 8x 01 04 0A 03 FF 8x 01 04 4A 00 00 Direct pq: Shutter Position 0p 0q FF Reset 8x 01 04 0B 00 FF 8x 01 04 0B 02 FF Iris Setting CAM_Iris Down 8x 01 04 0B 03 FF...
- Page 57 Command Function Command Packet Remark 8x 01 04 21 02 FF CAM_WDRS Down 8x 01 04 21 03 FF trength 8x 01 04 51 00 00 Direct p: WDR Level Positon 00 0p FF 8x 01 04 53 0p FF P=0-8 0:OFF CAM_NR 8x 01 04 54 0p FF...
- Page 58 Command Function Command Packet Remark 8x 01 04 3F 00 pq Reset pq: Memory Number(=0 CAM_Memor 8x 01 04 3F 01 pq to 254) Corresponds to 0 to 9 on the Remote Commander 8x 01 04 3F 02 pq Recall 8x 01 04 61 02 FF CAM_LR_Re Image Flip Horizontal...
- Page 59 Command Function Command Packet Remark pq: Video format 0x19 : 4KP30 0x1A: 4KP25 CAM_Video 8x 01 06 35 00 pq Camera System 0x06 : 1080P30 video system 0x07 : 1080P25 0x0D: 1080P29.97 8x 01 06 01 VV WW 03 01 FF 8x 01 06 01 VV WW Down 03 02 FF...
-
Page 60: Inquiry Command
Command Function Command Packet Remark 8x 01 06 03 VV WW RelativePosition 0Y 0Y 0Y 0Y 0Z 0Z 0Z 0Z FF Home 8x 01 06 04 FF Reset 8x 01 06 05 FF 8x 01 06 07 00 0W W:1 Up Right 0Y 0Y 0Y 0Y 0Z 0Z 0:DownLeft 0Z 0Z FF... - Page 61 Command Command Return Packet Remark Packet y0 50 03 FF y0 50 00 FF y0 50 01 FF Center CAM_AFZone 8x 09 04 AA FF y0 50 02 FF Bottom y0 50 03 FF CAM_WBMod 8x 09 04 35 FF y0 50 pq FF Pq=WBMode eInq...
- Page 62 Command Command Return Packet Remark Packet y0 50 02 FF CAM_ExpCo 8x 09 04 3E FF mpModeInq y0 50 03 FF CAM_ExpCo y0 50 00 00 0p 0q 8x 09 04 4E FF pq: ExpComp Position mpPosInq y0 50 02 FF CAM_Backligh 8x 09 04 33 FF tModeInq...
- Page 63 Command Command Return Packet Remark Packet turationInq (0) to 7E (127) y0 50 00 00 00 0p CAM_IDInq 8x 09 04 22 FF p: Camera ID y0 50 02 FF IR_ReceiveInq 8x 09 06 08 FF y0 50 03 FF CAM_Brightne y0 50 00 00 0p 0q 8x 09 04 A1 FF...
-
Page 64: Pelco-D Protocol Command List
Command Command Return Packet Remark Packet 0x0D: 1080P29.97 Pan- ww: Pan Max Speed tiltMaxSpeedI 8x 09 06 11 FF y0 50 ww zz FF zz: Tilt Max Speed y0 50 0w 0w 0w 0w wwww: Pan Position Pan-tiltPosInq 8x 09 06 12 FF zzzz: Tilt Position 0z 0z 0z 0z FF Note: [x] in the above table represents the address of the device to be operated, [y]=[x + 8]. - Page 65 Function Byte1 Byte2 Byte3 Byte4 Byte5 Byte6 Byte7 Focus Near 0xFF Address 0x01 0x00 0x00 0x00 Stop 0xFF Address 0x00 0x00 0x00 0x00 Preset Set Preset 0xFF Address 0x00 0x03 0x00 Preset Clear Preset 0xFF Address 0x00 0x05 0x00 Preset Call Preset 0xFF Address...
-
Page 66: Pelco-P Protcol Command List
Pelco-P Protcol Command List Function Byte1 Byte2 Byte3 Byte4 Byte5 Byte6 Byte7 Byte8 Tilt 0xA0 Address 0x00 0x08 0xAF Speed Speed Tilt Down 0xA0 Address 0x00 0x10 0xAF Speed Speed Tilt Left 0xA0 Address 0x00 0x04 0xAF Speed Speed Tilt Right 0xA0 Address... - Page 67 Function Byte1 Byte2 Byte3 Byte4 Byte5 Byte6 Byte7 Byte8 Query 0xA0 Address 0x00 0x51 0x00 0x00 0xAF Position Query Value Value 0xA0 Address 0x00 0x59 0xAF Position High Byte Byte Response Query Tilt 0xA0 Address 0x00 0x53 0x00 0x00 0xAF Position Query Tilt Value...
-
Page 68: Maintenance And Troubleshooting
Maintenance and Troubleshooting Camera Maintenance 1)If the camera will not be used for a long time, please turn off the power switch. 2)Use a soft cloth or lotion-free tissue to clean the camera body. 3)Use a soft dry lint-free cloth to clean the lens. If the camera is very dirty, clean it with a diluted neutral detergent. - Page 69 ⚫ Serial port can not work 1. Check whether the camera serial device protocol, baud rate, address is consistent 2. Check whether the control cable is connected properly 3. Check whether the camera working mode is the normal operating mode (see Table 2.9) ⚫...
- Page 70 Follow us │ │ │ DVDO +1.408.213.6680 support@dvdo.com www.dvdo.com...
Need help?
Do you have a question about the DVDO-C7-1-S and is the answer not in the manual?
Questions and answers