Table of Contents
Advertisement
Advertisement
Table of Contents

Subscribe to Our Youtube Channel
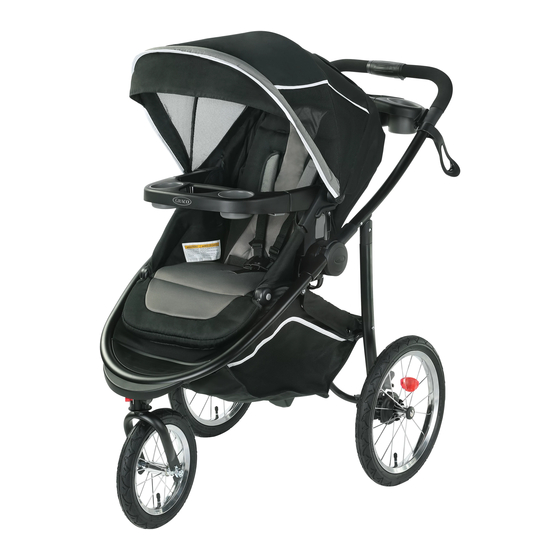
Related Manuals for Graco MODES JOGGER


Summary of Contents for Graco MODES JOGGER
- Page 1 MODES™ JOGGER • featuring • • Owner’s Manual...
- Page 2 4 Use To Use Tether To Attach Graco® Infant Car Seat to Toddler Seat 4-M To Attach Graco® Infant Car Seat to Stroller Frame 4-N To Fold Stroller Frame without Toddler seat 4-O To Fold Stroller with Toddler seat attached 5 Cleaning Care &...
- Page 3 AVOID SERIOUS INJURY from parcels or accessory items on the falling or sliding out. Always use handle (other than approved Graco seat belt or infant car seat stroller bags). Never place harness. After fastening buckles, anything on the canopy.
- Page 4 IF YOU ARE JOGGING WITH READ THE MANUAL provided THIS STROLLER: with your Graco car seat before DO NOT INFLATE above the using it with your stroller. maximum recommended inflation FALL HAZARD: Always check that...
- Page 5 MODES JOGGER™ Use Positions...
- Page 6 2-B Parts List This model may not include some features shown below. Check that you have all the parts for this model BEFORE assembling your product. If any parts are missing, call Customer Service. Tools required: Phillips Screwdriver All models...
- Page 7 To Open Stroller Be sure to place stroller on top of a piece of cardboard or some other protective cover to prevent any damage to floor. 1. Open storage latch. 2. Lift handle of stroller up.
- Page 8 3. CHECK that the stroller is completely latched open every SNAP! time you open the stroller and before continuing with the rest of the assembly steps.
- Page 9 Front Wheel CHECK the tire pressure before using the stroller. DO NOT INFLATE above the maximum recommended inflation pressure that is written on the side of the tire. Over-inflation may cause wheel and/or tire to blowout and could result in serious injury. DO NOT use air compressor to inflate tire.
- Page 10 1. Attach front wheel to stroller as shown. SNAP! 2. CHECK that wheel is securely attached by pulling on wheel assembly.
- Page 11 Rear Wheels WARNING Choking Hazard: Remove and immediately discard protective end cap from each wheel. DO NOT remove rear wheels unless replacing them. Child could fall on exposed rear axle and be injured. 1. Remove and immediately discard protective end cap from each wheel.
- Page 12 2. Attach rear wheels to stroller as shown. SNAP! 3. CHECK that wheels are securely attached by pulling on wheel assemblies.
- Page 13 Kickstand 1. Disconnect 4 snaps on back of basket. 2. Snap kickstand onto basket tube SNAP! as shown. 3. Reattach 4 snaps over assembled kickstand and tube on back of SNAP! basket.
- Page 14 Parent’s Tray 1. Insert tray into slots. 2. Make sure parent’s tray is snapped securely into slots on each side of the frame.
- Page 15 To Attach/Remove Toddler Seat To Attach Toddler Seat 1. To attach seat, place seat on mounts as shown until they lock into place on both sides of the stroller. Seat may be placed on stroller either rear-facing or forward-facing. See warnings for additional information.
- Page 16 2. MAKE SURE seat mounts are securely attached to the stroller on both sides as shown. SNAP! To Remove Toddler Seat 1. Squeeze buttons on both sides of the seat and pull up as shown.
- Page 17 Canopy 1. Insert canopy wire into the canopy mounts on each side of the stroller as shown. 2. Using Philips screwdriver, insert screw into canopy mount as shown. Repeat on other canopy mount.
- Page 18 3. Fasten hook and loop tape on the rear of canopy as shown. MAKE SURE canopy is always fastened with the hook and loop tape when used with infant car seat or when toddler seat is in use. 4. Pull forward to open canopy.
- Page 19 5. Push backwards to close canopy. 5. Pull flap backward to open and forward to close canopy window. 6. Pull canopy visor out for use, push back under rim of canopy when not in use.
- Page 20 Footrest 1. To raise footrest, lift up as shown. 2. To lower, push buttons as shown. 3. To allow more room for child’s feet, push footrest down.
- Page 21 Child’s Tray WARNING Always secure your child with the seat belt. The tray is not a restraint device. DO NOT lift the stroller by the child’s tray. Use care when snapping the tray on the stroller with a child in the stroller. 1.
- Page 22 2. Attach child tray to armrests. SNAP! 3. To remove child’s tray press buttons on bottom of tray. 4. To remove armrest, push button as shown and remove.
- Page 23 To Secure Child WARNING Falling Hazard: Always use the seat belt. 5 Point Harness 1. To open, press button on buckle to release the waist straps. 2. To close, slide shoulder strap connectors onto waist straps and insert into buckle.
- Page 24 3. Use slide adjuster at shoulder and waist for tighter adjustment. To Use slide adjuster at sho change shoulder harness slots, waist for further adjustm see page 34-35. Repeat on other side. Utilisez le régulateur cou à l'épaule et à la taille po ajustement plus précis.
- Page 25 3 Point Buckle 1. To open, press button on buckle to release the waist straps. 2. Slide shoulder strap connectors off of waist straps. 3. Remove shoulder straps from stroller.
- Page 26 4. Attach waist straps to harness buckle as shown. 5. Use slide adjuster at waist for tighter adjustment. 6. To open, press button on buckle to release the waist straps.
- Page 27 Adjusting Shoulder Harness position Shoulder harness anchor—larger child Shoulder harness anchor—smaller child Slide adjuster...
- Page 28 1. Push harness anchor through the front of the seat then re-insert through desired slots at the same height level. Use either shoulder harness anchor in the slots that are closest to child’s shoulder height. Use slide adjuster for further adjustment.
- Page 29 To Recline WARNING When making adjustments to the stroller seat, make sure child’s head, arms, and legs are clear of moving seat parts and stroller frame. 1. To recline, push button down and pull seat towards the rear. 2. To raise, pull both straps up.
- Page 30 Brakes WARNING Always apply both brakes. CHECK that brakes are on by trying to push stroller. 1. Push down on brake to lock brakes. SNAP! 2. Push up on brake to unlock brakes. SNAP!
- Page 31 Swivel Wheel WARNING FALL HAZARD from tip over. Before running, jogging or walking fast, LOCK the front wheel from swiveling. 1. Front swivel wheel locks for use on uneven surfaces such as grass, stones or gravel. SNAP!
- Page 32 Parent’s Tray with Smart Device Holder 1. To attach your smart device (not included), slide the hook on the tray and insert your smart device in either direction as shown. Hook...
- Page 33 Removing Wheels Front Wheel 1. For easy transport or storage, remove front wheel by pushing button as shown.
- Page 34 Rear Wheels WARNING DO NOT remove rear wheels unless replacing them. Child could fall on exposed rear axle and be injured. 1. To remove wheel, push button and pull wheel off. Repeat with the other wheel.
- Page 35 To Use Tether The tether strap is intended to maintain control of the stroller in the case of a fall while running. DO NOT allow tether strap to lie over top of the handle. DO NOT hang items on the tether strap. 1.
- Page 36 Use only a Graco® SnugRide® Click Connect™ car seat with this stroller. This stroller is only compatible with Graco® SnugRide® infant car seats with Click Connect™. Only use with Graco® infant car seats that have the Click Connect™ logo. Improper use of this product with a car seat may result in serious injury or death.
- Page 37 1. NOTE: Infant car seat can ONLY be attached rear-facing to toddler seat when toddler seat is in forward-facing position.
- Page 38 2. Recline the toddler seat back to lowest position. 3. Find mounts in toddler seat. 4. Insert car seat into stroller and push down on car seat until the latches snap into the Click Connect™ mounts. SNAP!
- Page 39 5. Check that infant car seat is securely attached by pulling up on it. 6. To remove car seat, squeeze release handle at back of car seat and lift car seat out of the stroller.
- Page 40 To Attach Graco Infant Car Seat to Stroller ® Frame 1. Infant car seat can be inserted in stroller frame rear-facing or forward-facing. 2. Insert car seat into stroller and push down on car seat until the latches snap into the Click Connect™...
- Page 41 3. Check that infant car seat is securely attached by pulling up on it. 4. To remove car seat, squeeze release handle at back of car seat and lift car seat out of the stroller.
- Page 42 To Fold Stroller Frame without Toddler seat 1. Before folding stroller: (a) remove infant car seat if in use (b) lock brakes SNAP! 2. To fold: (a) slide button then (b) rotate handle forward.
- Page 43 3. Rotate handle down. 4. CHECK that the storage latch is secure.
- Page 44 To Fold Stroller with Toddler seat attached 1. Before folding stroller: (a) remove infant car seat if in use (b) lock brakes SNAP! 2. To fold: (a) slide button then (b) rotate handle forward.
- Page 45 3. Rotate handle down. 4. CHECK that the storage latch is secure.
- Page 46 FROM TIME TO TIME CHECK YOUR STROLLER for loose screws, worn parts, torn material or stitching. Replace or repair the parts as needed. Use only Graco replacement parts. EXCESSIVE EXPOSURE TO SUN OR HEAT could cause fading or warping of parts.
- Page 47 SnugRide® Click Connect™35...
-
Page 48: Table Of Contents
1.0 Warning to Parents and Other Users .........4-5 2.0 Registration Information ..............6-7 2.1 Register Your Infant Restraint ...........6 2.2 For Recall Information ...............6 2.3 If You Need Help ...............7 2.4 Child Restraint/Base Useful Life ..........7 3.0 Important Information ..............8-12 3.1 Warnings for Use as an Infant Restraint ......8-10 3.2 Warnings for Use With a Stroller ..........10 3.3 Additional Warnings for Use as a Carrier ........11 3.4 Height and Weight Limits ............12... - Page 49 5.0 Features and Components ............20-25 5.1 Adjusting Handle ..............23 5.2 Removing and Attaching Infant Restraint ........23 5.3 Cold Weather Boot (on certain models, styles vary) ....24 5.4 Canopy Attachment ..............24 5.5 Head Support, Body Support and Harness Covers (on certain models) ..............25 6.0 How to Install the Infant Restraint/Base ........26-34 6.1 Installing the Infant Restraint Without Base Using Vehicle Belt ..............26-27...
-
Page 50: Warning To Parents And Other Users
1.0 Warnings to Parents and Other Users DO NOT PLACE THIS INFANT RESTRAINT IN A VEHICLE SEATING LOCATION THAT HAS A FRONT AIR BAG. If the air bag inflates, it can hit the infant restraint with great force and cause serious injury or death of your child. - Page 51 Failure to properly use this infant restraint increases the risk of serious injury or death in a sharp turn, sudden stop or crash. Your child’s safety depends on you installing and using this infant restraint correctly on every ride. Even if using this infant restraint seems easy to figure out on your own, it is very important to FOLLOW THE OWNER’S MANUAL.
-
Page 52: Registration Information
2.0 Registration Information 2.1 Register Your Infant Restraint Please fill in the above information. The model number and date of manufacture can be found on a label on the bottom of your infant restraint. Fill out the prepaid registration postcard attached to the seat pad and mail it today. -
Page 53: If You Need Help
2.3 If You Need Help In the U.S.A, please contact our Customer Service Department with any questions you may have concerning parts, use, or maintenance. When you contact us, please have your product’s model number and date of manufacture ready so that we may help you quickly. These numbers can be found on a sticker on the underside of your infant restraint. -
Page 54: Important Information
3.0 Important Information 3.1 Warnings for Use as an Infant Restraint DO NOT INSTALL OR USE THIS INFANT RESTRAINT AND • BASE UNTIL YOU READ AND UNDERSTAND THE INSTRUCTIONS IN THIS MANUAL AND IN YOUR VEHICLE OWNER’S MANUAL. DO NOT let others install or use the infant restraint unless they understand how to use it. - Page 55 According to crash statistics, CHILDREN ARE SAFER • WHEN PROPERLY RESTRAINED IN REAR VEHICLE SEATING POSITIONS, RATHER THAN FRONT SEATING POSITIONS. For a vehicle with a front passenger air bag, refer to your vehicle owner’s manual as well as these instructions for infant restraint installation. NEVER LEAVE YOUR CHILD UNATTENDED.
-
Page 56: Warnings For Use With A Stroller
PART OF THE GRACO CLICK CONNECT TRAVEL SYSTEM. Refer to stroller owner’s manual for details about how to attach the infant restraint to your stroller. • Never use a Graco infant restraint with other manufacturer’s strollers, as this may result in serious injury or death. -
Page 57: Additional Warnings For Use As A Carrier
3.3 Additional Warnings for Use as a Carrier FALL HAZARD: Child’s movements also can move carrier. • NEVER place carrier on edges of countertops, tables or other high surfaces. Always stay within arms reach whenever carrier is not on floor/ground. BE SURE handle locks into position before lifting carrier. -
Page 58: Height And Weight Limits
3.4 Height and Weight Limits TO AVOID SERIOUS INJURY OR DEATH, DO NOT USE THE INFANT RESTRAINT WITH A CHILD LARGER OR SMALLER THAN THE WEIGHT AND HEIGHT RANGE LISTED BELOW. Your child MUST meet the following requirements: WEIGHT: 4-35 lbs. (1.8 kg-15.87 kg) •... -
Page 59: Choosing An Appropriate Vehicle Seat Location
4.0 Choosing an Appropriate Vehicle Seat Location 4.1 Vehicle Seat Requirements IMPROPER PLACEMENT OF THE INFANT RESTRAINT INCREASES THE RISK OF SERIOUS INJURY OR DEATH. Some seating positions in your vehicle may not be safe for this infant restraint. Some vehicles do not have any seating positions that can be used safely with the infant restraint. -
Page 60: Vehicle Seat Belt Requirements
The VEHICLE seat must face forward. • DO NOT use infant restraint on vehicle seats with seat backs that • will not lock in an upright position. DO NOT use seats that can fold down without having to release a lock or latch of some kind. These seats can fly forward and strike the child in a sudden stop or crash. -
Page 61: Unsafe Vehicle Belt Systems
4.2.1 UNSAFE Vehicle Belt Systems LATCH can be used IN PLACE OF the vehicle belt system. Please refer to vehicle owner’s manual for LATCH locations. DO NOT use any of the following systems to secure the infant restraint. Lap Belts with Emergency Locking Retractor (ELR) •... -
Page 62: Safe Vehicle Belt Systems
4.2.2 SAFE Vehicle Belt Systems THE FOLLOWING BELT SYSTEMS CAN BE USED WITH YOUR INFANT RESTRAINT, IF the seat location meets all other requirements of these instructions and those in your vehicle owner’s manual. LATCH can be used in place of the vehicle belt system in designated locations. Please refer to vehicle owner’s manual for LATCH locations. - Page 63 The automatic locking Lap Belts with Automatic • retractor will not permit the Locking Retractor (ALR) lap belt to lengthen once it is buckled. Tighten the belt by feeding the belt back into the retractor while pushing down hard on the infant restraint. Once it is buckled, this type of Combination Lap/Shoulder Belt •...
- Page 64 This belt has a latch plate that slides Combination Lap/Shoulder • freely along the belt. Belt with Sliding Latch Plate This belt MUST be converted to prevent movement of the lap portion of the belt. You must use a locking clip (provided with the infant restraint) when using the infant restraint without the base unless Locking clip...
-
Page 65: Latch Locations
4.3 LATCH Locations Newer vehicles may have one or more seating positions with LATCH anchorage systems. If vehicle is equipped with LATCH, the vehicle lower anchor points may be visible at the vehicle seat crease. If not visible, they may be marked with the symbol See your vehicle owner’s manual for exact locations, anchor identification, and requirements for use with an infant restraint. -
Page 66: Features And Components
5.0 Features and Components FRONT VIEW Handle Harness slots Chest Harness clip straps Handle adjustment button Handle slots adjustment button Vehicle Crotch belt strap slots hook Harness buckle tongues Harness Harness adjustment Harness buckle strap adjustment button... - Page 67 REAR VIEW Canopy Release handle Harness slots Attachment hook Click Connect™ attachment Harness straps Hip strap pins Locking clip storage* Crotch strap clip Metal Harness adjustment junction plate strap The locking clip is stored on the bottom of *Locking the infant restraint. You will need to use it Clip with certain types of vehicle lap/shoulder seat belts.
- Page 68 BASE LATCH Connector LATCH Adjustment Instruction Level indicator Belt manual storage Knob for Adjustable Foot LATCH Adjustable Foot Storage United States Federal Motor Vehicle Safety Standards have defined a system for installing car seats in vehicles. The system is called LATCH. * LATCH may be used IN PLACE of vehicle belt ONLY if vehicle is equipped with LATCH anchor points.
-
Page 69: Adjusting Handle
5.1 Adjusting Handle 1. Press handle adjustment buttons on both sides of handle Ê . Ê 2. Rotate handle until it clicks into any of the 4 positions: Position A: MUST be used when carrying by handle, Position A,B,C,D: may be used in vehicle. BOTH handle adjustment buttons must pop out to lock Carrying... -
Page 70: Cold Weather Boot (On Certain Models, Styles Vary)
5.3 Cold Weather Boot (on certain models, styles vary) Some models come with a cold weather boot. To use, slide boot on end of seat and attach plastic flaps as shown. 5.4 Canopy Attachment Ê Attach canopy by inserting canopy bow into slots in canopy mounts on both sides of infant restraint as shown Ê. -
Page 71: Head Support, Body Support And Harness Covers (On Certain Models)
5.5 Head Support, Body Support and Harness Covers (on certain models, styles vary) To prevent ejection in sudden stop or crash: • Always make sure shoulder straps are threaded through slots and properly Ê positioned on shoulders. • Never allow body support to bunch or fold behind child. -
Page 72: How To Install The Infant Restraint/Base
6.0 How to Install the Infant Restraint/Base 6.1 Installing the Infant Restraint Without Base Using Vehicle Belt You must carefully follow the instructions provided by your vehicle manufacturer, in addition to the information in this manual. Before proceeding be sure you have read and understood section 4, “Choosing an Appropriate Ê... - Page 73 1. Place the infant restraint without base in a rear-facing position in a vehicle seat. 2. Thread the lap belt or lap portion of a lap/shoulder belt under both vehicle belt hooks: Lap/Shoulder Lap Belt Belt Ì 3. Buckle the vehicle belt. 4.
-
Page 74: Installing The Infant Restraint And Base Using Vehicle Belt
6.2 Installing the Infant Restraint and Base Using Vehicle Belt Ê 1. Make sure vehicle is on level ground in order to get the correct recline position. Ë Lap/Shoulder 2. Place the base Lap Belt in a rear-facing Belt position on a forward-facing vehicle seat. - Page 75 4. To create a secure installation, while pushing down on the base, pull the free end of the lap belt or the shoulder portion of the lap/shoulder belt to tighten 5. Check that belt does not move by pulling and pushing hard on base with hands near the vehicle belt path.
-
Page 76: Using Latch To Install Base
6.3 Using LATCH to Install Base 1. MAKE SURE vehicle is on level ground. Make sure to check your vehicle owner's manual for LATCH seating positions. Ê 2. For ease of installation, press button to extend LATCH to its MAXIMUM LENGTH Ê . Ë... - Page 77 7. NEVER put two LATCH connectors on one vehicle LATCH anchor . 8. Test infant restraint for secure installation as described in infant restraint “Final Safety Check” page 42. 9. Check that the LATCH stays tight and does not slip from the tightened position.
-
Page 78: Reclining Infant Restraint/Base
6.4 Reclining Infant Restraint/Base For your child’s safety, it is important that your infant restraint/base be properly reclined. Attached to the side of your infant restraint is a level indicator to help properly recline the infant restraint/base on the vehicle seat. Failure to properly recline the infant restraint on the vehicle seat increases the risk of serious injury or death. - Page 79 USING INFANT RESTRAINT AND BASE TOGETHER: 1) Vehicle MUST be level with ground to get correct recline position. 2) Use level indicator on base. When reading the level indicator on base, view it directly from side of the indicator. Check the level indicator. You must look straight on at the indicator.
- Page 80 Ê To Adjust Recline on Base: Turn the knob counter clockwise to the desired setting to lower the foot Ê. Turn the knob clockwise to raise the foot Ë. If there is still red in the level indicator when the foot is completely extended then raise the foot Ë...
-
Page 81: Using Infant Restraint
7.0 Using Infant Restraint 7.1 Positioning Harness Straps FAILURE TO PROPERLY ADJUST THE HARNESS STRAPS FOR YOUR CHILD INCREASES THE RISK OF SERIOUS INJURY OR DEATH IN THE EVENT OF A SHARP TURN, SUDDEN STOP, OR CRASH. The harness straps must be properly adjusted to fit your child according to the following instructions. - Page 82 A. Push the harness adjustment button Ì under the seat flap. Pull the shoulder straps out to loosen the harness Ì . B. From behind seat, remove the ends of the two shoulder straps from the metal junction plate . C.
- Page 83 Shoulder Straps for a SMALLER Baby: Use the lower 2 sets of harness slots Ê (if they are even with or just below your child’s shoulders) and the upper strap loops Ë. The ends of the straps must hang in front of the metal junction plate as shown in Ë, not as shown in Ì.
-
Page 84: Changing The Crotch Strap Position
7.2 Changing the Crotch Strap Position FOR SMALLER BABIES: Ê Turn infant restraint over and push crotch strap clip through Rear slot the front crotch slot Ê and seat pad. Re-insert clip through the front of seat pad into the rear crotch slot and seat as shown. -
Page 85: Securing Child In The Infant Restraint
7.3 Securing Child in the Infant Restraint Failure to properly secure your child in the infant restraint/carrier increases the risk of serious injury or death from suffocation or falls, or in the event of a sudden stop or crash. Even when used only as a carrier, make sure the harness straps are properly secured. - Page 86 4. Place your child in the infant restraint as Ì shown in Ì, not . Place the harness straps around your child. 5. Insert the two buckle tongues into the harness buckle on the crotch strap. Make sure that you hear each tongue click into the buckle ...
- Page 87 6. Snap chest clip pieces together . 7. Pull on harness adjustment strap to tighten straps as shown . CHECK that both straps are flat and snug on shoulders and thighs. 8. Position chest clip in middle of chest, ...
- Page 88 Final Safety Check: Every time you drive with your child, Ê PUSH DOWN on the top of the infant restraint slowly but firmly to make sure the vehicle belt does not lengthen at all and that the vehicle belt or LATCH is fastened securely around the infant restraint/base Ê...
-
Page 89: Additional Information
8.0 Additional Information 8.1 Airplane Use When installing in an airplane using the base, install the same way as in an automobile with a lap only belt. If using the infant restraint only, install following the same instructions as in an automobile. -
Page 90: Cleaning And Maintenance
8.3 Cleaning and Maintenance TO CLEAN SEAT PAD: Ê 1. Unfasten hook and loop patches and plastic flaps from infant restraint. 2. Pull out plastic flaps from under infant restraint lip Ê and Ë. 3. Unfasten hook and loop tape in seat area of pad and pull out from around harness hip straps. - Page 91 INFANT RESTRAINT METAL AND PLASTIC PARTS may be cleaned by wiping with a mild soap and water solution. DO NOT USE BLEACH OR DETERGENT which may weaken plastic parts. HARNESS STRAPS may be spot cleaned or replaced. DO NOT IMMERSE THE HARNESS STRAPS IN WATER.
-
Page 92: Buckle Cleaning Process
8.4 Buckle Cleaning Process Prevent serious injury or death: • Buckle must be properly latched. • Periodically inspect and clean buckle to remove objects or debris that could prevent latching. 1. Turn restraint over, push clip through Ê crotch strap slot Ê . 2. To clean buckle - place in a cup of warm water and gently agitate the buckle, press the red button several times while in the water Ë...
Need help?
Do you have a question about the MODES JOGGER and is the answer not in the manual?
Questions and answers