Table of Contents
Advertisement
Advertisement
Table of Contents

Related Manuals for Graco Modes DUO


Summary of Contents for Graco Modes DUO
- Page 1 MODES™ DUO • featuring • • Owner’s Manua ©2015 Graco PD348896B 12/15...
-
Page 2: Table Of Contents
1 WARNING Pages 2 Features 10-12 Pages MODES™ DUO Use Positions Parts List • Liste des pièces 3 Assembly 13-23 Pages To Open Stroller Rear Wheels Front Wheels 3-D Bench Seat Parent’s Cupholder Toddler Seats... - Page 3 To Use Toddler Seats To Secure Child 4-D To Recline Brakes Swivel Wheels 4-G To Attach Graco® Infant Car Seat to Rear Position 4-H To Attach Graco® Infant Car Seat to Front Position To Fold Stroller Frame Harness Covers 5 Cleaning...
-
Page 4: Warning
Failure to follow these warnings and the assembly instructions could result in serious injury or death. Only use product as instructed. PLEASE SAVE OWNER’S STROLLER TO BE USED only MANUAL FOR FUTURE USE. at walking speed. Product not intended for use while jogging, ADULT ASSEMBLY REQUIRED. - Page 5 DISCONTINUE USING YOUR Refer to the sections “To Attach STROLLER should it become Graco® Infant Car Seat to Rear damaged or broken. Position” and “To Attach Graco® Infant Car Seat to Front Position” ONLY USE THE TODDLER pages 41-48.
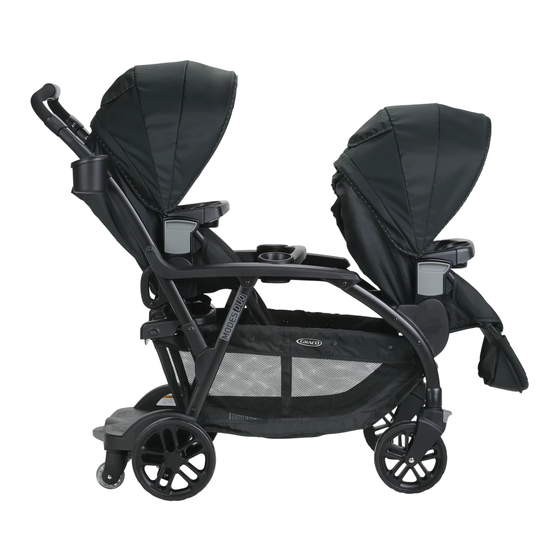
- Page 6 MODES™ DUO Use Positions WARNING DO NOT allow child to stand on platform facing backwards. To avoid falling, child must hold onto handles.
-
Page 8: Features
2-B Parts List This model may not include some features shown below. Check that you have all the parts for this model BEFORE assembling your product. No tools required. All models... - Page 9 To Open Stroller Be sure to place stroller on top of a piece of cardboard or some other protective cover to prevent any damage to floor. 1. Open stroller lock. 2. Lift handle of stroller up.
-
Page 10: Assembly
3. CHECK that the stroller is completely latched open every time you open the stroller and SNAP! before continuing with the rest of the assembly steps. Rear Wheels Rear Axle 1. Insert axle rod through axle opening. - Page 11 Rear Wheelss 2. Firmly attach hub adapter onto wheel. 3. Place wheel on axle. 4. Place washer on axle.
- Page 12 5. Push straight side of pin through axle hole. Pin will separate around the axle. Curved end of pin MUST face up as shown. Repeat steps 2-5 on other side. 6. Snap hubcap over pin as shown. Repeat with other hubcap. SNAP!
- Page 13 Front Wheels 1. Attach front wheels to front leg tubes as shown. SNAP! 2. CHECK that wheels are securely attached by pulling on wheel assembly.
- Page 14 Bench Seat WARNING Do not allow child to stand on bench seat. Never use bench seat in motor vehicle or on any other product. 1. Slide bench seat over tube with hooks on the bottom of the bench seat fastening under tube. 2.
- Page 15 Parent’s Cupholder 1. Line up opening in cupholder with Opening mount on stroller and press onto stroller tube. 2. Make sure cupholder is snapped securely into mount.
- Page 16 Toddler Seats 1. Insert seat wire into openings on sides of toddler seat. 2. Secure flaps around wire with 3 snaps. Repeat on other toddler seat.
- Page 17 Canopy • 1. Insert canopy wire into the canopy pivots on each side of the toddler seat as shown. SNAP! 2. Fasten hook and loop tape on the rear of canopy as shown. MAKE SURE canopy is always fastened with the hook and loop tape when toddler seat is in use.
- Page 18 Child’s Armbar WARNING Always secure your child with the seat belt. The armbar is not a restraint device. DO NOT lift the stroller by the child’s armbar. Use care when snapping the armbar on the stroller with a child in the stroller.
- Page 19 2. To open, press button on bottom and rotate child’s armbar up. 3. To remove child’s armbar, press buttons on bottom on both ends and lift off. Press release buttons under seat pad and pull armbar mounts off.
- Page 20 Car Seat/Toddler Seat Attachment Mounts WARNING DO NOT adjust mounts with child in the bench seat or allow child to play with mounts. Rear Position Mounts 1. To attach a car seat or toddler seat, place attachment mounts in upright position by: a.
- Page 21 2. Rotate the rear seat attachment mounts forward to provide handles for child on bench seat or stand platform. a. Pull attachment mounts inward and, b. rotate forward, c. snap into place. SNAP!
- Page 22 Front Position Mounts 1. To attach car seat or toddler seat in front position, rotate car seat/ toddler seat attachment mounts into upright position. SNAP! 2. When car seat or toddler seats are not in use, or for more compact folding, rotate attachment mounts inward as shown.
- Page 23 To Use Toddler Seats To Attach Toddler Seat WARNING DO NOT adjust mounts with child in the bench seat or allow child to play with mounts. 1. REAR POSITION: If they are not already, place car seat/toddler seat attachment mounts in upright position by: a.
- Page 24 2. FRONT POSITION: If they are not already, rotate car seat/toddler seat attachment mounts into upright position. SNAP!
- Page 25 3. To attach seat, be sure front (a) and rear (b) attachment mounts are in the vertical position as shown. Place seat on mounts as shown until they lock into place on both sides of the stroller. Seat may be placed on stroller in either direction and either seating position.
- Page 26 4. MAKE SURE seat mounts are securely attached to the stroller on both sides as shown. SNAP! 5. CHECK that toddler seat is securely attached to the stroller by pulling up on toddler seat.
- Page 27 To Remove Toddler Seat 1. Squeeze buttons on both sides of the seat and pull up as shown.
- Page 28 Canopy 1. Pull forward to open canopy. 2. Push backwards to close canopy. 3. Pull flap forward to open and backwards to close canopy window. 4. To open or close canopy visor.(On certain models)
-
Page 29: Point Harness
To Secure Child WARNING Falling Hazard: Always use the seat belt. 5 Point Harness 1. To open, press button on buckle to release the waist straps. 2. To close, slide shoulder strap connectors onto waist straps and insert into buckle. - Page 30 3. Use slide adjuster at shoulder and waist for tighter adjustment. To Use slide adjuster at shoulder and change shoulder harness slots, waist for further adjustment. see page 36. Repeat on other side. Utilisez le régulateur coulissant à l'épaule et à la taille pour un ajustement plus précis.
- Page 31 3. Remove shoulder straps from stroller. 4. Attach waist straps to harness buckle as shown. 5. Use slide adjuster at waist for tighter adjustment. 6. To open, press button on buckle to release the waist straps.
- Page 32 Adjusting Shoulder Harness position Shoulder harness anchor—larger child Shoulder harness anchor—smaller child Slide adjuster...
- Page 33 1. Push harness anchor through the front of the seat then re-insert through desired slots at the same height level. Use either shoulder harness anchor in the slots that are closest to child’s shoulder height. Use slide adjuster for further adjustment.
- Page 34 To Recline WARNING When making adjustments to the stroller seat, make sure child’s head, arms, and legs are clear of moving seat parts and stroller frame. 1. To recline, adjust webbing (a) for partial recline. Release buckle (b) for full recline. 2.
-
Page 35: Mise En Garde
Brakes WARNING CHECK that brakes are on by trying to push stroller. MISE EN GARDE 1. Push down on brake to lock brakes. SNAP! 2. Push up on brake to unlock brakes. SNAP! - Page 36 Swivel Wheels Front swivel wheels lock for use on uneven surfaces such as grass, stones or gravel. 1. To lock, press up. SNAP! 2. To unlock, press down. SNAP!
- Page 37 Use only a Graco® SnugRide® Click Connect™ car seat with this stroller. This stroller is only compatible with Graco® SnugRide® infant car seats with Click Connect™. Only use with Graco® infant car seats that have the Click Connect™ logo. Improper use of this product with a car seat may result in serious injury or death.
- Page 38 WARNING DO NOT adjust mounts with child in the bench seat or allow child to play with mounts. 2. If they are not already, place car seat/toddler seat attachment mounts in upright position by: a. Pulling attachment mounts inward and, b.
- Page 39 3. Insert car seat into stroller and push down on car seat until the latches snap into the seat attachment mounts. Mount 4. Check that infant car seat is securely attached by pulling up on it. 5. To remove car seat: squeeze release handle at back of car seat, and lift car seat out of the stroller.
- Page 40 To Attach Graco Infant Car Seat to Front ® Position 1. Infant car seat can be inserted in stroller frame rear and forward facing. 2. If they are not already, rotate car seat/toddler seat attachment mounts into upright position. DO NOT allow child to play with mounts.
- Page 41 3. Insert car seat into stroller and push down on car seat until the latches snap into the seat attachment mounts. Mount 4.Check that infant car seat is securely attached by pulling up on it. 5. To remove car seat: squeeze release handle at back of car seat, and lift car seat out of the stroller.
- Page 42 To Fold Stroller Frame NOTE: Stroller can be folded with toddler seats installed forward-facing. DO NOT fold stroller with a toddler seat rear-facing in the rear position or with a car seat in front or rear position.
- Page 43 1. Before folding stroller: a. remove infant car seats and rear-facing toddler seat in rear position if in use b. lock brakes SNAP! 2. Slide handle release button in (a) and rotate handle forward (b).
- Page 44 3. Rotate handle down. 4. CHECK that the storage latch is secured. Harness Covers To attach harness covers, slide onto harness straps.
- Page 45 FROM TIME TO TIME, CHECK YOUR STROLLER for loose screws, worn parts, torn material or stitching. Replace or repair the parts as need- ed. Use only Graco replacement parts. EXCESSIVE EXPOSURE TO SUN OR HEAT could cause fading or warping of parts.
Need help?
Do you have a question about the Modes DUO and is the answer not in the manual?
Questions and answers