
Related Manuals for Graco MODES 3 LITE


Summary of Contents for Graco MODES 3 LITE
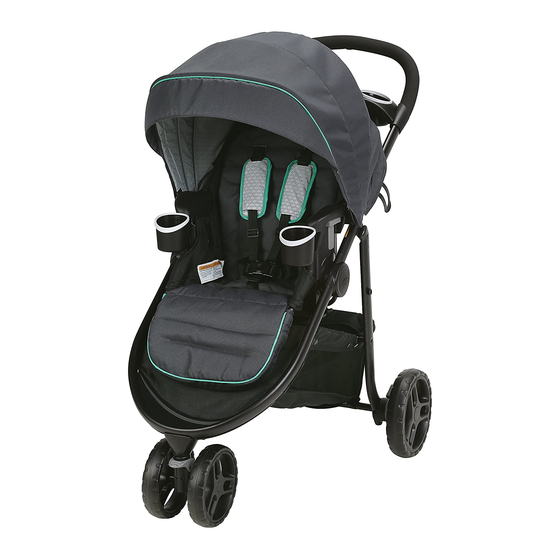
- Page 1 MODES™ 3 LITE • featuring • avec • que incluye • Owner’s Manual • Mode d’emploi • Manual del propietario ©2015 Graco PD320992A 5/15...
- Page 2 Brakes • Les freins • Los frenos Swivel Wheels • Les roues pivotantes • Las ruedas giratorias 4-H To Attach Graco® Infant Car Seat to Toddler Seat • Pour fixer le siège d’auto pour bébé Graco® au siège pour bambin • Cómo sujetar el asiento de automóvil para bebé...
- Page 3 5 Cleaning • Nettoyage 46-52 Pages • Páginas • Limpiezac Care & Maintenance • Soins et entretien • Cuidado y mantenimiento Replacement Parts • Warranty Information Pièces détachées • Renseignements sur la garantie Piezas de repuesto • Información sobre la garantía Product Registration •...
- Page 4 Always use the handle (other than approved seat belt or infant carseat Graco stroller bags). Never harness. After fastening buckles, place anything on the canopy. adjust belts to get a snug fit TO PREVENT A HAZARDOUS, around your child.
- Page 5 CAREGIVER MUST always carseat may result in serious ensure the brakes are engaged injury or death. when placing child into stroller. See Graco infant carseat owners USING GRACO® INFANT manual for maximum size of CARSEAT WITH STROLLER: child. TO AVOID INJURY TO YOUR...
- Page 6 S’assurer que d’accessoires (autres que les la poussette est entièrement sacs à poussette Graco déployée et verrouillée avant de approuvés) sur la poignée ou le permettre à l’enfant de s’en baldaquin. Ne jamais placer quoi approcher.
- Page 7 CETTE POUSSETTE doit être utilisée seulement à des vitesses LIRE LE MANUEL fourni avec de marche. Ce produit n’est pas votre siège d’auto Graco avant conçu pour utiliser en faisant du de l’utiliser avec cette poussette. jogging, du patin, etc.
- Page 8 Consulter le manuel du siège TOUJOURS ATTACHER l’enfant d’auto pour bébé GRACO pour avec le harnais du siège d’auto connaître la taille maximum pour bébé lorsqu’il est utilisé permise.
- Page 9 (si no armado y trabado antes de son las bolsas para cochecito permitir que el niño se acerque aprobadas por Graco). No ponga al mismo. nunca nada sobre la capota. NUNCA USE EL COCHECITO EN PARA PREVENIR UNA ESCALERAS o escaleras SITUACIÓN INESTABLE Y...
- Page 10 GRACO® SNUGRIDE® CON desarmarse y causar lesiones. CLICK CONNECT™. Úselo solamente con los asientos de NUNCA PONGA al niño en el automóvil para bebé de Graco® asiento para niño pequeño con que tienen el la cabeza hacia el apoyapiés. logotipo Click NO use el armazón del cochecito...
- Page 11 Vea el manual del propietario del con el arnés del asiento de asiento de automóvil para bebé automóvil cuando usa el asiento Graco para determinar el de automóvil en el cochecito. Si tamaño máximo del niño. su niño ya está en el asiento de automóvil, verifique que esté...
- Page 12 MODES 3 LITE™ Use Positions • Positions MODES 3 LITE™ • Posiciones del uso MODES 3 LITE™...
- Page 13 2-B Parts List • Liste des pièces • Lista de piezas This model may not Ce modèle peut ne pas Este modelo podría no include some comprendre certaines des incluir algunas de las features shown caractéristiques décrites características que se below.
- Page 14 To Open Stroller • Ouvrir la poussette • Abrir el cochecito Be sure to place stroller on top of a piece of cardboard or some other protective cover to prevent any damage to floor. Assurez-vous de placer la poussette sur un morceau de carton ou un autre revêtement de protection pour prévenir tout dégât au plancher.
- Page 15 3. CHECK that the stroller is completely latched open every SNAP! time you open the stroller and ENCLENCHEZ! before continuing with the rest of ¡CRAC! the assembly steps. 3. VÉRIFIER que la poussette est entièrement verrouillée en position ouverte à chaque ouverture et avant d’effectuer les autres étapes du montage.
- Page 16 Rear Wheels • Les roues arrières • Las ruedas traseras 1. Brake levers point toward rear of stroller. 1. Leviers des freins vers l’arrière de la poussette. 1. Las palancas del freno deben apuntar hacia la parte trasera del cochecito. 2.
- Page 17 3. Insert axle rod through axle opening. Axle key must line up with key holes. 3. Insérez l’essieu à manchon à travers l’ouverture de l’essieu. La clé d’essieu doit s’alligner avec les troux des clés. 3. Inserte la varilla del eje por la apertura del eje.
- Page 18 5. Push straight side of pin through axle hole. Pin will separate around the axle. Curved end of pin MUST face up as shown. 5. Pousser le côté droit de la tige dans l’orifice de l’essieu. La tige va se séparer autour de l’essieu. La partie recourbée de la tige DOIT pointer vers le haut, tel qu’illustré.
- Page 19 Front Wheels • Roulettes avant • Las ruedas delanteras 1. Press and hold the spring button located in the bottom of the wheel hub down. 1. Maintenir le bouton à ressort situé au bas du point de jonction des roulettes appuyé, tel qu’illustré. 1.
- Page 20 2. Check that wheels are securely attached by pulling on wheel assembly. 2. S’assurer que les roulettes sont fixées solidement, en tirant sur leur module. 2. Verifique que las ruedas estén debidamente sujetadas tirando del ensamblaje de la rueda.
- Page 21 Parent’s Tray • Le plateau pour adulte • La bandeja para padres 1. Insert tray into slots. 1. Insérer le plateau dans les fentes. 1. Inserte la bandeja en las ranuras. 2. Make sure parent tray is snapped securely into slots on each side of the frame.
- Page 22 To Attach/Remove Toddler Seat • Pour fixer/retirer le siège pour bambin • Cómo sujetar/sacar el asiento para niño pequeño To Attach Toddler Seat •Pour fixer le siège pour bambin • Cómo sujetar el asiento para niño pequeño 1. To attach seat, place seat on mounts as shown until they lock into place on both sides of the stroller.
- Page 23 2. MAKE SURE seat mounts are securely attached to the stroller on both sides as shown. 2. S’ASSURER que les supports du siège sont solidement fixés des deux côtés de la poussette, tel qu’illustré. 2. ASEGÚRESE de que los SNAP! montantes del asiento estén ENCLENCHEZ! debidamente sujetados al...
- Page 24 To Remove Toddler Seat • Pour retirer le siège pour bambin • Cómo sacar el asiento para niño pequeño 1. Squeeze buttons on both sides of the seat and pull up as shown. 1. Comprimer les boutons situés des deux côtés du siège et soulever, tel qu’illustré.
- Page 25 Canopy • Baldaquin • Capota 1. Fasten hook and loop tape on the rear of canopy as shown. MAKE SURE canopy is always fastened with the hook and loop tape when used with infant carseat or when toddler seat is in use.
- Page 26 3. Push backwards to close canopy. 3. Pousser vers l’arrière pour fermer le baldaquin. 3. Empuje hacia atrás para cerrar la capota. 4. Pull flap forward to open and backwards to close canopy window. 4. Tirer le rabat vers l’avant pour ouvrir et vers l’arrière pour fermer la fenêtre du baldaquin.
- Page 27 To Secure Child • Pour installer votre enfant en toute sécurité • Cómo sujetar al niño WARNING Falling Hazard: Always use the seat belt. MISE EN GARDE Danger de chute : toujours se servir de la ceinture de sécurité. ADVERTENCIA Peligro de caídas: Use siempre el cinturón de seguridad.
- Page 28 3. Use slide adjuster at shoulder and waist for tighter adjustment. To Use slide adjuster at shoulder and change shoulder harness slots, waist for further adjustment. see page 31. Repeat on other side. 3. Utilisez le régulateur coulissant à Utilisez le régulateur coulissant l’épaule et à...
- Page 29 3 Point Buckle • Boucle à 3 point • Hebilla de 3 puntos 1. To open, press button on buckle to release the waist straps. 1. Pour ouvrir, appuyer sur le bouton de la boucle pour libérer les courroies abdominales. 1.
- Page 30 4. Attach waist straps to harness buckle as shown. 4. Fixer les courroies abdominales à la boucle du harnais, tel qu’illustré. 4. Sujete las correas para la cintura a la hebilla del arnés como se indica. 5. Use slide adjuster at waist for tighter adjustment.
- Page 31 Adjusting Shoulder Harness position • Réglage de la position du harnais d’épaules • Ajustar la posición del arnés para los hombros Shoulder harness anchor—larger child Harnais d 'ancrage à l 'épaule pour grand enfant Anclaje del arnés del hombro - niño grande Shoulder harness anchor—smaller child Harnais d 'ancrage à...
- Page 32 1. Push harness anchor through the front of the seat then re-insert through desired slots at the same height level. Use either shoulder harness anchor in the slots that are closest to child’s shoulder height. Use slide adjuster for further adjustment. 1.
- Page 33 To Recline • Pour incliner • Para reclinar WARNING When making adjustments to the stroller seat, make sure child’s head, arms, and legs are clear of moving seat parts and stroller frame. MISE EN GARDE Lorsque vous faites des ajustements au siège de la poussette, assurez-vous que la tête de l’enfant, ses bras, et ses jambes sont loin des pièces du siège et de l’armature de la poussette en mouvement.
- Page 34 Brakes • Les freins • Los frenos WARNING Always apply both brakes. CHECK that brakes are on by trying to push stroller. MISE EN GARDE Toujours utiliser les deux freins. VÉRIFIEZ que les freins fonctionnent en essayant de pousser la poussette. ADVERTENCIA Siempre use ambos frenos.
- Page 35 Swivel Wheels • Les roues pivotantes • Las ruedas giratorias Front swivel wheels lock for use on uneven surfaces such as grass, stones or gravel. Les roues pivotantes avant se barrent pour un usage sur les surfaces irrégulières tel que le gazon, les cailloux ou le gravier. Las ruedas giratorias delanteras se traban para el uso en superficies desparejas tales como césped, piedras o grava.
- Page 36 Click Connect™. Tout mauvais usage de ce produit avec un siège d’au- to peut occasionner des blessures sérieuses ou mortelles. Lire le manuel fourni avec le siège de retenue pour enfant Graco avant de l’utiliser avec ce produit. • Toujours attacher l’enfant avec le harnais du siège de retenue lorsqu’il est utilisé...
- Page 37 Este cochecito solamente es compatible con los asientos de automóvil para bebé Graco® SnugRide® con Click Connect™. Úselo solamente con los asientos de automóvil para bebé de Graco® que tienen el logotipo Click Connect™. El uso inadecuado de este producto con un asiento para automóvil podría resultar en lesiones serias o la muerte.
- Page 38 3. Find mounts in toddler seat. 3. Localiser les supports du siège pour bambin. 3. Busque los montantes en el asiento para niño pequeño. 4. Insert carseat into stroller and push down on car seat until the latches snap into the Click Connect™...
- Page 39 5. Check that infant car seat is securely attached by pulling up on it. 5. Vérifier si le siège de bébé est bien attaché en tirant vers le haut. 5. Verifique que el asiento de automóvil para bebé esté seguramente instalado tratando de tirarlo para arriba.
- Page 40 Infant Car Seat to Stroller ® Frame • Pour fixer le siège d’auto pour bébé Graco® au cadre de la poussette • Para sujetar el asiento de automóvil para bebé al armazón del cochecito 1. Infant car seat can be inserted in stroller frame rear and forward facing.
- Page 41 3. Check that infant car seat is securely attached by pulling up on it. 3. Vérifier si le siège de bébé est bien attaché en tirant vers le haut. 3. Verifique que el asiento de automóvil para bebé esté debidamente instalado tratando de tirarlo para arriba.
- Page 42 To Fold Stroller Frame without Toddler seat • Pour replier le cadre de la poussette sans le siège pour bambin • Cómo plegar el armazón del cochecito sin el asiento para niño pequeño 1. Before folding stroller: (a) remove infant carseat if in use (b) lock brakes 1.
- Page 43 3. Rotate handle down. 3. Tourner la poignée vers le bas. 3. Gire la manija hacia abajo. 4. CHECK that the storage latch is secure. 4. S’ASSURER que le loquet de rangement est bien enclenché. 4. VERIFIQUE que la traba de almacenamiento esté...
- Page 44 To Fold Stroller with Toddler seat attached • Pour replier le cadre de la poussette avec le siège pour bambin installé • Cómo plegar el cochecito con el asiento para niño pequeño sujetado 1. Before folding stroller: (a) remove infant carseat if in use (b) lock brakes 1.
- Page 45 3. Rotate handle down. 3. Tourner la poignée vers le bas. 3. Gire la manija hacia abajo. 4. CHECK that the storage latch is secure. 4. S’ASSURER que le loquet de rangement est bien enclenché. 4. VERIFIQUE que la traba de almacenamiento esté...
- Page 46 • FROM TIME TO TIME CHECK YOUR STROLLER for loose screws, worn parts, torn material or stitching. Replace or repair the parts as needed. Use only Graco replacement parts. • EXCESSIVE EXPOSURE TO SUN OR HEAT could cause fading or warping of parts.
- Page 47 • DE TEMPS EN TEMPS, VÉRIFIEZ VOTRE POUSSETTE pour des vis desserrées, pièces usagées, tissu ou couture déchiré. Remplacez ou réparez ces pièces si nécessaire. Utilisez seulement les pièces de remplacement Graco. • UNE EXPOSITION PROLONGÉE AU SOLEIL peut provoquer une décoloration prématurée du tissu et du plastique.
- Page 48 Cambie o repare las piezas según sea necesario. Use solamente repuestos marca Graco. • EL CONTACTO EXCESIVO CON EL SOL o el calor podría causar que se destiña o se tuerzan algunas piezas.
- Page 49 Notes • Notas...
- Page 50 Notes • Notas...
- Page 51 Notes • Notas...
- Page 52 Pour le moment nous n’acceptons pas d’inscriptions de produits des résidents hors des États-Unis. Para registrar su producto Graco desde dentro de los EE.UU., visítenos en línea en www.gracobaby.com/productregistration o envíe la tarjeta de registro provista con su producto.
- Page 53 SnugRide® Click Connect™35 ©2013 Graco PD261465A 10/13...
-
Page 54: Table Of Contents
1.0 Warning to Parents and Other Users .........4-5 2.0 Registration Information ..............6-7 2.1 Register Your Infant Restraint ...........6 2.2 For Recall Information ...............6 2.3 If You Need Help ...............7 2.4 Child Restraint/Base Useful Life ..........7 3.0 Important Information ..............8-12 3.1 Warnings for Use as an Infant Restraint ......8-10 3.2 Warnings for Use With a Stroller ..........10 3.3 Additional Warnings for Use as a Carrier ........11 3.4 Height and Weight Limits ............12... - Page 55 5.0 Features and Components ............20-25 5.1 Adjusting Handle ..............23 5.2 Removing and Attaching Infant Restraint ........23 5.3 Cold Weather Boot (on certain models, styles vary) ....24 5.4 Canopy Attachment ..............24 5.5 Head Support, Body Support and Harness Covers (on certain models) ..............25 6.0 How to Install the Infant Restraint/Base ........26-34 6.1 Installing the Infant Restraint Without Base Using Vehicle Belt ..............26-27...
-
Page 56: Warning To Parents And Other Users
1.0 Warnings to Parents and Other Users DO NOT PLACE THIS INFANT RESTRAINT IN A VEHICLE SEATING LOCATION THAT HAS A FRONT AIR BAG. If the air bag inflates, it can hit the infant restraint with great force and cause serious injury or death of your child. - Page 57 Failure to properly use this infant restraint increases the risk of serious injury or death in a sharp turn, sudden stop or crash. Your child’s safety depends on you installing and using this infant restraint correctly on every ride. Even if using this infant restraint seems easy to figure out on your own, it is very important to FOLLOW THE OWNER’S MANUAL.
-
Page 58: Registration Information
Child restraints could be recalled for safety reasons. You must register this restraint to be reached in a recall. Send your name, address and the restraints’ model number and date of manufacture to: Graco Children’s Products Inc. Attn: Customer Service 3 Glenlake Parkway... -
Page 59: If You Need Help
STOP using this child restraint or base and throw it away 7 years after the date of manufacture. Look for this sticker on rear of infant restraint or on the base: MODEL NAME Date of Manufacture year month GRACO CHILDREN'S PRODUCTS, INC. ATLANTA, GA 30328 1-800-345-4109 Made in China... -
Page 60: Important Information
3.0 Important Information 3.1 Warnings for Use as an Infant Restraint DO NOT INSTALL OR USE THIS INFANT RESTRAINT AND • BASE UNTIL YOU READ AND UNDERSTAND THE INSTRUCTIONS IN THIS MANUAL AND IN YOUR VEHICLE OWNER’S MANUAL. DO NOT let others install or use the infant restraint unless they understand how to use it. - Page 61 According to crash statistics, CHILDREN ARE SAFER • WHEN PROPERLY RESTRAINED IN REAR VEHICLE SEATING POSITIONS, RATHER THAN FRONT SEATING POSITIONS. For a vehicle with a front passenger air bag, refer to your vehicle owner’s manual as well as these instructions for infant restraint installation. NEVER LEAVE YOUR CHILD UNATTENDED.
-
Page 62: Warnings For Use With A Stroller
If you do not have an owner’s manual, please call toll-free, 1-800-345-4109 to obtain one, or visit our website at www.gracobaby.com. • Never use a Graco infant restraint with other manufacturer’s strollers, as this may result in serious injury or death. -
Page 63: Additional Warnings For Use As A Carrier
3.3 Additional Warnings for Use as a Carrier FALL HAZARD: Child’s movements also can move carrier. • NEVER place carrier on edges of countertops, tables or other high surfaces. Always stay within arms reach whenever carrier is not on floor/ground. BE SURE handle locks into position before lifting carrier. -
Page 64: Height And Weight Limits
3.4 Height and Weight Limits TO AVOID SERIOUS INJURY OR DEATH, DO NOT USE THE INFANT RESTRAINT WITH A CHILD LARGER OR SMALLER THAN THE WEIGHT AND HEIGHT RANGE LISTED BELOW. Your child MUST meet the following requirements: WEIGHT: 4-35 lbs. (1.8 kg-15.87 kg) •... -
Page 65: Choosing An Appropriate Vehicle Seat Location
Some vehicles do not have any seating positions that can be used safely with the infant restraint. If you are not sure where to place the infant restraint in your vehicle, consult your vehicle owner’s manual or call Graco at 1-800-345-4109. Whenever possible, secure the infant Ê... -
Page 66: Vehicle Seat Belt Requirements
Pay careful attention to these systems; some of the seat belts that are not safe to use look very much like seat belts that are safe to use. If you are unsure, consult your vehicle owner’s manual or call Graco at 1-800-345-4109. -
Page 67: Unsafe Vehicle Belt Systems
4.2.1 UNSAFE Vehicle Belt Systems LATCH can be used IN PLACE OF the vehicle belt system. Please refer to vehicle owner’s manual for LATCH locations. DO NOT use any of the following systems to secure the infant restraint. Lap Belts with Emergency Locking Retractor (ELR) •... -
Page 68: Safe Vehicle Belt Systems
4.2.2 SAFE Vehicle Belt Systems THE FOLLOWING BELT SYSTEMS CAN BE USED WITH YOUR INFANT RESTRAINT, IF the seat location meets all other requirements of these instructions and those in your vehicle owner’s manual. LATCH can be used in place of the vehicle belt system in designated locations. Please refer to vehicle owner’s manual for LATCH locations. - Page 69 The automatic locking Lap Belts with Automatic • retractor will not permit the Locking Retractor (ALR) lap belt to lengthen once it is buckled. Tighten the belt by feeding the belt back into the retractor while pushing down hard on the infant restraint. Once it is buckled, this type of Combination Lap/Shoulder Belt •...
- Page 70 This belt has a latch plate that slides Combination Lap/Shoulder • freely along the belt. Belt with Sliding Latch Plate This belt MUST be converted to prevent movement of the lap portion of the belt. You must use a locking clip (provided with the infant restraint) when using the infant restraint without the base unless Locking clip...
-
Page 71: Latch Locations
4.3 LATCH Locations Newer vehicles may have one or more seating positions with LATCH anchorage systems. If vehicle is equipped with LATCH, the vehicle lower anchor points may be visible at the vehicle seat crease. If not visible, they may be marked with the symbol See your vehicle owner’s manual for exact locations, anchor identification, and requirements for use with an infant restraint. -
Page 72: Features And Components
5.0 Features and Components FRONT VIEW Handle Harness slots Chest Harness clip straps Handle adjustment button Handle slots adjustment button Vehicle Crotch belt strap slots hook Harness buckle tongues Harness Harness adjustment Harness buckle strap adjustment button... - Page 73 REAR VIEW Canopy Release handle Harness slots Attachment hook Click Connect™ attachment Harness straps Hip strap pins Locking clip storage* Crotch strap clip Metal Harness adjustment junction plate strap The locking clip is stored on the bottom of *Locking the infant restraint. You will need to use it Clip with certain types of vehicle lap/shoulder seat belts.
- Page 74 BASE LATCH Connector LATCH Adjustment Instruction Level indicator Belt manual storage Knob for Adjustable Foot LATCH Adjustable Foot Storage United States Federal Motor Vehicle Safety Standards have defined a system for installing car seats in vehicles. The system is called LATCH. * LATCH may be used IN PLACE of vehicle belt ONLY if vehicle is equipped with LATCH anchor points.
-
Page 75: Adjusting Handle
5.1 Adjusting Handle 1. Press handle adjustment buttons on both sides of handle Ê . Ê 2. Rotate handle until it clicks into any of the 4 positions: Position A: MUST be used when carrying by handle, Position A,B,C,D: may be used in vehicle. BOTH handle adjustment buttons must pop out to lock Carrying... -
Page 76: Cold Weather Boot (On Certain Models, Styles Vary)
5.3 Cold Weather Boot (on certain models, styles vary) Some models come with a cold weather boot. To use, slide boot on end of seat and attach plastic flaps as shown. 5.4 Canopy Attachment Ê Attach canopy by inserting canopy bow into slots in canopy mounts on both sides of infant restraint as shown Ê. -
Page 77: Head Support, Body Support And Harness Covers (On Certain Models)
5.5 Head Support, Body Support and Harness Covers (on certain models, styles vary) To prevent ejection in sudden stop or crash: • Always make sure shoulder straps are threaded through slots and properly Ê positioned on shoulders. • Never allow body support to bunch or fold behind child. -
Page 78: How To Install The Infant Restraint/Base
6.0 How to Install the Infant Restraint/Base 6.1 Installing the Infant Restraint Without Base Using Vehicle Belt You must carefully follow the instructions provided by your vehicle manufacturer, in addition to the information in this manual. Before proceeding be sure you have read and understood section 4, “Choosing an Appropriate Ê... - Page 79 1. Place the infant restraint without base in a rear-facing position in a vehicle seat. 2. Thread the lap belt or lap portion of a lap/shoulder belt under both vehicle belt hooks: Lap/Shoulder Lap Belt Belt Ì 3. Buckle the vehicle belt. 4.
-
Page 80: Installing The Infant Restraint And Base Using Vehicle Belt
6.2 Installing the Infant Restraint and Base Using Vehicle Belt Ê 1. Make sure vehicle is on level ground in order to get the correct recline position. Ë Lap/Shoulder 2. Place the base Lap Belt in a rear-facing Belt position on a forward-facing vehicle seat. - Page 81 4. To create a secure installation, while pushing down on the base, pull the free end of the lap belt or the shoulder portion of the lap/shoulder belt to tighten 5. Check that belt does not move by pulling and pushing hard on base with hands near the vehicle belt path.
-
Page 82: Using Latch To Install Base
6.3 Using LATCH to Install Base 1. MAKE SURE vehicle is on level ground. Make sure to check your vehicle owner's manual for LATCH seating positions. Ê 2. For ease of installation, press button to extend LATCH to its MAXIMUM LENGTH Ê . Ë... - Page 83 9. Check that the LATCH stays tight and does not slip from the tightened position. If it does not stay tight, try another seating position or contact Graco at 1-800-345-4109. 10. To remove LATCH, push button while pulling on the LATCH belt as shown .
-
Page 84: Reclining Infant Restraint/Base
6.4 Reclining Infant Restraint/Base For your child’s safety, it is important that your infant restraint/base be properly reclined. Attached to the side of your infant restraint is a level indicator to help properly recline the infant restraint/base on the vehicle seat. Failure to properly recline the infant restraint on the vehicle seat increases the risk of serious injury or death. - Page 85 USING INFANT RESTRAINT AND BASE TOGETHER: 1) Vehicle MUST be level with ground to get correct recline position. 2) Use level indicator on base. When reading the level indicator on base, view it directly from side of the indicator. Check the level indicator. You must look straight on at the indicator.
- Page 86 Ê To Adjust Recline on Base: Turn the knob counter clockwise to the desired setting to lower the foot Ê. Turn the knob clockwise to raise the foot Ë. If there is still red in the level indicator when the foot is completely extended then raise the foot Ë...
-
Page 87: Using Infant Restraint
7.0 Using Infant Restraint 7.1 Positioning Harness Straps FAILURE TO PROPERLY ADJUST THE HARNESS STRAPS FOR YOUR CHILD INCREASES THE RISK OF SERIOUS INJURY OR DEATH IN THE EVENT OF A SHARP TURN, SUDDEN STOP, OR CRASH. The harness straps must be properly adjusted to fit your child according to the following instructions. - Page 88 A. Push the harness adjustment button Ì under the seat flap. Pull the shoulder straps out to loosen the harness Ì . B. From behind seat, remove the ends of the two shoulder straps from the metal junction plate . C.
- Page 89 Shoulder Straps for a SMALLER Baby: Use the lower 2 sets of harness slots Ê (if they are even with or just below your child’s shoulders) and the upper strap loops Ë. The ends of the straps must hang in front of the metal junction plate as shown in Ë, not as shown in Ì.
-
Page 90: Changing The Crotch Strap Position
7.2 Changing the Crotch Strap Position FOR SMALLER BABIES: Ê Turn infant restraint over and push crotch strap clip through Rear slot the front crotch slot Ê and seat pad. Re-insert clip through the front of seat pad into the rear crotch slot and seat as shown. -
Page 91: Securing Child In The Infant Restraint
7.3 Securing Child in the Infant Restraint Failure to properly secure your child in the infant restraint/carrier increases the risk of serious injury or death from suffocation or falls, or in the event of a sudden stop or crash. Even when used only as a carrier, make sure the harness straps are properly secured. - Page 92 5. Insert the two buckle tongues into the harness buckle on the crotch strap. Make sure that you hear each tongue click into the buckle . DO NOT use the infant restraint if the buckle tongues do not latch in place. Call Graco at 1-800-345-4109.
- Page 93 6. Snap chest clip pieces together . 7. Pull on harness adjustment strap to tighten straps as shown . CHECK that both straps are flat and snug on shoulders and thighs. 8. Position chest clip in middle of chest, ...
- Page 94 Final Safety Check: Every time you drive with your child, Ê PUSH DOWN on the top of the infant restraint slowly but firmly to make sure the vehicle belt does not lengthen at all and that the vehicle belt or LATCH is fastened securely around the infant restraint/base Ê...
-
Page 95: Additional Information
8.0 Additional Information 8.1 Airplane Use When installing in an airplane using the base, install the same way as in an automobile with a lap only belt. If using the infant restraint only, install following the same instructions as in an automobile. -
Page 96: Cleaning And Maintenance
8.3 Cleaning and Maintenance TO CLEAN SEAT PAD: Ê 1. Unfasten hook and loop patches and plastic flaps from infant restraint. 2. Pull out plastic flaps from under infant restraint lip Ê and Ë. 3. Unfasten hook and loop tape in seat area of pad and pull out from around harness hip straps. - Page 97 INFANT RESTRAINT METAL AND PLASTIC PARTS may be cleaned by wiping with a mild soap and water solution. DO NOT USE BLEACH OR DETERGENT which may weaken plastic parts. HARNESS STRAPS may be spot cleaned or replaced. DO NOT IMMERSE THE HARNESS STRAPS IN WATER.
-
Page 98: Buckle Cleaning Process
8.4 Buckle Cleaning Process Prevent serious injury or death: • Buckle must be properly latched. • Periodically inspect and clean buckle to remove objects or debris that could prevent latching. 1. Turn restraint over, push clip through Ê crotch strap slot Ê . 2. To clean buckle - place in a cup of warm water and gently agitate the buckle, press the red button several times while in the water Ë... - Page 99 Notes...
-
Page 100: Replacement Parts
9.0 Replacement Parts Bottom of Base To purchase parts or accessories or for warranty information in the United States, please contact us at the following: www.gracobaby.com 1-800-345-4109... - Page 101 SnugRide® Click Connect™35 ©2013 Graco PD261465A 10/13...
- Page 102 1.0 Advertencia a padres y otros usuarios ..........4-5 2.0 Información sobre el registro ..............6-7 2.1 Registro de su sistema de seguridad para niños .........6 2.2 Para obtener información sobre los retiros del mercado ......6 2.3 Si necesita ayuda .................7 2.4 Vida útil del Sistema de seguridad para niños/base ......7 3.0 Información importante................8-12 3.1 Advertencias sobre el uso como sistema de seguridad para niños ..................8-10...
- Page 103 5.0 Características y componentes ............20-25 5.1 Cómo ajustar la manija ...............23 5.2 Sacar y asegurar el sistema de seguridad para niños .......23 5.3 Bota para tiempo frío (en ciertos modelos) ........24 5.4 Instalación de la capota ..............24 5.5 El soporte del apoyacabeza, soporte del cuerpo y fundas del arnés (en ciertos modelos) ................25 6.0 Cómo instalar el Sistema de seguridad para niños/base....26-34 6.1 Instalación del sistema de seguridad para niños sin la base...
-
Page 104: Advertencia A Padres Y Otros Usuarios
1.0 Advertencias a padres y otros usuarios NO PONGA ESTE SISTEMA DE SEGURIDAD PARA NIÑOS EN UN LUGAR DEL ASIENTO DEL VEHÍCULO EQUIPADO CON UNA BOLSA DE AIRE DELANTERA. Si la bolsa de aire se infla, puede golpear al sistema de seguridad para niños con mucha fuerza y causar lesiones serias o la muerte a su niño. - Page 105 No usar debidamente este sistema de seguridad para niños aumenta el riesgo de lesiones serias o la muerte en una curva cerrada, parada repentina o accidente. La seguridad de su niño depende de que usted instale y use este sistema de seguridad para niños correctamente en cada viaje. A pesar de que el uso de este sistema de seguridad para niños parezca fácil de descifrar, es muy importante SEGUIR EL MANUAL DEL DUEÑO.
-
Page 106: Información Sobre El Registro
Debe registrar este sistema para que lo podamos contactar en dicho caso. Envíe su nombre, dirección, el número del modelo y la fecha de fabricación del sistema de seguridad a: Graco Children’s Products Inc. Attn: Customer Service 3 Glenlake Parkway... -
Page 107: Si Necesita Ayuda
7 años después de la fecha de fabricación. Busque esta etiqueta en la parte de atrás del sistema de seguridad para niños o en la base: MODEL NAME Date of Manufacture year month GRACO CHILDREN'S PRODUCTS, INC. ATLANTA, GA 30328 1-800-345-4109 Made in China... -
Page 108: Información Importante
3.0 Información importante 3.1 Advertencias sobre el uso como sistema de seguridad para niños • NO INSTALE O USE ESTE SISTEMA DE SEGURIDAD PARA NIÑOS Y BASE HASTA QUE HAYA LEÍDO Y ENTENDIDO LAS INSTRUCCIONES EN ESTE MANUAL Y EN EL MANUAL DEL DUEÑO DE SU VEHÍCULO. - Page 109 • Según las estadísticas de accidentes, LOS NIÑOS ESTÁN MÁS SEGUROS CUANDO ESTÁN DEBIDAMENTE SUJETADOS A LOS ASIENTOS TRASEROS DEL VEHÍCULO EN LUGAR DE LOS ASIENTOS DELANTEROS. En el caso de un vehículo con una bolsa de aire para el pasajero delantero, consulte el manual del dueño de su vehículo así como estas instrucciones para la instalación del sistema de seguridad para niños.
- Page 110 1-800-345-4109 para obtener uno, o visite nuestro sitio Web, www.gracobaby.com. • Nunca use un sistema de seguridad para niños Graco con los cochecitos de otros fabricantes, ya que podría resultar en una lesión seria o la muerte.
- Page 111 3.3 Advertencias adicionales para el uso como transportador • PELIGRO DE CAÍDA: Los movimientos del niño también pueden mover el transportador. NUNCA ponga el transportador en los bordes de mesadas, mesas u otras superficies altas. Manténgase siempre cerca cuando el transportador no esté en el piso/tierra.
-
Page 112: Limitaciones De Peso Y Altura
3.4 Limitaciones de peso y altura PARA EVITAR SERIAS LESIONES O LA MUERTE NO USE EL SISTEMA DE SEGURIDAD PARA NIÑOS CON UN NIÑO MÁS GRANDE O MÁS ALTO QUE LA ALTURA Y PESO QUE SE LISTAN A CONTINUACIÓN. Su niño DEBE cumplir los siguientes requisitos: • PESO: de 1,8 kg a 15.87 kg (4 a 35 libras) • ALTURA: 81 cm (32 pulgadas) o menos de altura. -
Page 113: Cómo Elegir Un Lugar Apropiado En El Asiento Del Vehículo
Si no está seguro dónde colocar el sistema de seguridad para niños en su vehículo, consulte su manual del dueño del vehículo o llame a Graco al 1-800-345-4109. • Cuando sea posible, asegure el sistema Ê... -
Page 114: Requisitos Del Cinturón De Seguridad Del Vehículo
Preste mucha atención a estos sistemas ya que muchos de los sistemas de cinturones de seguridad que no son seguros se parecen mucho a los que no presentan peligro. Si no está seguro, consulte su manual del dueño del vehículo o llame a Graco al 1-800-345-4109. -
Page 115: Sistemas Peligrosos De Cinturones De Vehículos
4.2.1 Sistemas PELIGROSOS de cinturones de vehículos El LATCH puede usarse EN LUGAR DEL sistema de cinturones del vehículo. Por favor, consulte el manual del dueño del vehículo para identificar las ubicaciones del LATCH. NO USE ninguno de los siguientes sistemas para sujetar el sistema de seguridad para niños. - Page 116 4.2.2 Sistemas SEGUROS de cinturones de vehículos LOS SIGUIENTES SISTEMAS DE CINTURONES PUEDEN USARSE CON SU SISTEMA DE SEGURIDAD PARA NIÑOS, SI la ubicación del asiento cumple todos los otros requisitos de estas instrucciones y las del manual del dueño del vehículo. El LATCH puede usarse en lugar del sistema de cinturones del vehículo en los lugares indicados.
- Page 117 El retractor de seguridad automático • Cinturones para la falda con no permitirá que el cinturón de retractor de seguridad automático seguridad para la falda se extienda (ALR) una vez que está sujetado en la hebilla. Ajuste el cinturón pasando el cinturón por el retractor mientras empuja con fuerza el sistema de seguridad para niños hacia abajo.
- Page 118 Este cinturón tiene una placa de seguridad que • Combinación cinturón para la se mueve libremente a lo largo del cinturón. falda y el hombro con placa de unión deslizante Este cinturón DEBE convertirse para prevenir el movimiento de la parte de la falda del cinturón.
- Page 119 4.3 Ubicación del LATCH Los vehículos nuevos tienen uno o varios asientos equipados con sistemas de anclaje LATCH. Si el vehículo viene equipado con el sistema LATCH, se podrían ver los puntos de anclaje inferiores en el pliegue del asiento del vehículo. Si no están visibles, pueden estar marcados con el símbolo Vea el manual del dueño de su vehículo para informarse sobre las ubicaciones exactas, la identificación de los anclajes y los requisitos para...
- Page 120 5.0 Funciones y componentes VISTA DELANTERA Manija Ranuras para el arnés Presilla para Correas el pecho del arnés Botón de ajuste de la manija Ranuras de Botón de la cadera ajuste de la manija Gancho del Ranuras cinturón del de la vehículo correa de la entrepierna...
- Page 121 VISTA TRASERA Capota Manija de liberación Ranuras para el arnés Gancho de seguridad Instalación Click Connect™ Correas arnés Presilla de las correas de la cadera Almacenamiento de la traba de seguridad* Presillas de la correa Placa de la unión de entrepierna Correa de ajuste metal...
- Page 122 BASE Conexiones del LATCH * Correa de ajuste del Almacenamiento Indicador del nivel ** LATCH del manual de instrucciones Perilla para pie ajustable Almacenamiento Pie ajustable del sistema LATCH Las Normas Federales para Seguridad de Automóviles de Estados Unidos han definido un sistema para la instalación de asientos de seguridad en los vehículos.
-
Page 123: Sacar Y Asegurar El Sistema De Seguridad Para Niños
5.1 Ajuste de la manija 1. Apriete los botones de ajuste de la manija en ambos Ê costados de la manija Ê . 2. Gire la manija hasta que se trabe en una de las 4 posiciones: Posición A: DEBE usarla cuando lo transporta agarrado de la manija, Posición A,B,C,D: se puede usar en el vehículo. -
Page 124: Bota Para Tiempo Frío (En Ciertos Modelos)
5.3 Bota para tiempo frío (en ciertos modelos) Algunos modelos vienen con una bota para tiempo frío. Para usarlo deslice la bota en el extremo del asiento y sujete las aletas de plástico como se indica. 5.4 Instalación de la capota Ê... -
Page 125: El Soporte Del Apoyacabeza, Soporte Del Cuerpo Y Fundas Del Arnés
5.5 El soporte del apoyacabeza, soporte del cuerpo y fundas del arnés (en ciertos modelos, los estilos varían) Para prevenir la eyección en un accidente o parada repentina: • A segúrese siempre que las correas del hombro pasan por las ranuras y están Ê debidamente instaladas en los hombros. • N unca deje que el soporte del cuerpo se apile o pliegue detrás del niño. -
Page 126: Cómo Instalar El Sistema De Seguridad Para Niños/Base
6.0 Cómo instalar el Sistema de seguridad para niños/base 6.1 Instalación del sistema de seguridad para niños sin la base usando el cinturón del vehículo Debe seguir detenidamente las instrucciones provistas por el fabricante de su vehículo, además de la información de este manual. Antes de seguir, asegúrese de haber leído y entendido la sección 4, “Cómo elegir un lugar apropiado en el asiento del vehículo”... - Page 127 1. Coloque el sistema de seguridad para niños sin la base orientado hacia atrás en un asiento del vehículo. 2. Pase el cinturón de la falda o parte de la falda de un cinturón para la falda y el hombre debajo de ambos ganchos del cinturón del vehículo: Cinturón para la falda y Cinturón el hombro...
-
Page 128: Instalación Del Sistema De Seguridad Para Niños Y La Base Usando El Cinturón Del Vehículo
6.2 Instalación del sistema de seguridad para niños y la base usando el cinturón del vehículo Ê Asegúrese de que el vehículo esté sobre piso nivelado para poder obtener la posición correcta de reclinación Ê Ë 2. Coloque la Cinturón del Cinturón base orientada hombro/falda... - Page 129 4. Para crear una instalación segura, mientras empuja a la base hacia abajo, tire la punta libre del cinturón para la falda o la parte del hombro del cinturón para el hombro/falda para apretarlo 5. Verifique que el cinturón no se mueve tirando y empujando con fuerza con las manos sobre la base cerca de la vía del cinturón del vehículo.
-
Page 130: Utilización Del Latch Para Instalar La Base
6.3 Utilización del LATCH para instalar la base 1. ASEGÚRESE de que el vehículo esté en un piso Ê nivelado. Asegúrese de verificar el manual del dueño de su vehículo para obtener las posiciones del asiento con LATCH. 2. Para facilitar la instalación, oprima el botón Ë... - Page 131 De no mantenerse apretado, colóquelo en otro lugar en el asiento o póngase en contacto con Graco llamando al 1-800-345-4109. 10. Para sacar el LATCH, oprima el botón mientras .
- Page 132 6.4 Reclinación del Sistema de seguridad para niños/base Es importante que su sistema de seguridad para niños/base esté debidamente reclinado para mayor seguridad de su niño. En el costado de su sistema de seguridad para niños hay un indicador del nivel para ayudar a reclinar debidamente el sistema de seguridad para niños/base en el asiento del vehículo.
- Page 133 USAR JUNTOS LA BASE Y EL SISTEMA DE SEGURIDAD PARA NIÑOS: 1) El vehículo DEBE estar nivelado con el piso para obtener la posición correcta de reclinación. 2) Use el indicador del nivel en la base. Cuando lee el indicador del nivel en la base, véalo directamente desde el costado del indicador.
- Page 134 Ê Para ajustar la inclinación sobre la base: Gire la perilla en el sentido contrario a las agujas del reloj hasta alcanzar el valor deseado para bajar el pie Ê. Gire la perilla en el sentido de las agujas del reloj para levantar el pie Ë.
-
Page 135: Uso Del Sistema De Seguridad Para Niños
7.0 Uso del sistema de seguridad para niños 7.1 Colocación de las correas del arnés NO AJUSTAR DEBIDAMENTE LAS CORREAS DEL ARNÉS DEL NIÑO AUMENTA EL RIESGO DE SUFRIR LESIONES SERIAS O LA MUERTE EN CASO DE UNA CURVA CERRADA, PARADA REPENTINA O ACCIDENTE. - Page 136 A. Empuje el botón de ajuste del arnés debajo Ì de la aleta del asiento. Tire las correas de los hombros para aflojar el arnés Ì . B. Desde detrás del asiento, saque los extremos de las dos correas de los hombros de la placa de unión de metal .
- Page 137 Correas para los hombros para un bebé MÁS PEQUEÑO: Use los 2 juegos de ranuras inferiores del arnés Ê (si están parejas o apenas debajo de los hombros de su niño) y los nudos superiores de la correa Ë . Los extremos de las correas deben quedar al frente de la placa de unión de metal como se indica en Ë...
-
Page 138: Cambiar La Posición De La Correa De La Entrepierna
7.2 Cambiar la posición de la correa de la entrepierna PARA BEBÉS MÁS PEQUEÑOS: Ê De vuelta el sistema de seguridad para niños y pase la correa de la entrepierna por Ranura trasera la ranura delantera de la entrepierna Ê y la almohadilla del asiento. -
Page 139: Asegurar Al Niño En El Sistema De Seguridad
7.3 Asegurar al niño en el sistema de seguridad No ajustar debidamente a su niño en el sistema de seguridad para niños/ transportador aumenta el riesgo de lesiones serias o la muerte por asfixia o caídas, o en caso de una parada repentina o accidente. Inclusive cuando lo usa solamente como transportador, asegúrese que las correas del arnés estén debidamente ajustadas. - Page 140 Asegúrese que escucha el clic de cada lengua en la hebilla . NO use el sistema de seguridad para niños si las lengüetas de la hebilla no se traban en su lugar. Llame a Graco al 1-800-345-4109.
- Page 141 7. Trabe las partes de la traba del pecho juntas . 8. Tire de la correa de ajuste del arnés para ajustar las correas como se indica ASEGÚRESE que ambas correas estén planas y ajustadas sobre los hombros y los muslos.
- Page 142 Verificación final de seguridad: Cada vez que sale en automóvil con su niño, Ê EMPUJE HACIA ABAJO lenta pero firmemente la parte de arriba del sistema de seguridad para niños para asegurarse que el cinturón del vehículo no se alarga y que el cinturón del vehículo o el LATCH esté...
-
Page 143: Información Adicional
8.0 Información adicional 8.1 Uso en aviones Cuando la instala en una avión usando la base, instálela de la misma manera que en un automóvil con el cinturón de la falda solamente. Si solamente usa el armazón, instálela siguiendo las mismas instrucciones que para un automóvil. -
Page 144: Limpieza Y Mantenimiento
8.3 Limpieza y mantenimiento PARA LIMPIAR LA ALMOHADILLA DEL ASIENTO: 1. Desabroche los parches de gancho y nudo y aletas plásticas del sistema de seguridad para niños. Ê 2. Tire las aletas de plástico de abajo del borde del sistema de seguridad para niños Ê y Ë. 3. - Page 145 LAS PIEZAS DE METAL Y DE PLÁSTICO DEL SISTEMA DE SEGURIDAD PARA NIÑOS pueden limpiarse con una solución de jabón suave y agua. NO USE BLANQUEADOR O DETERGENTE porque podría debilitar a las piezas de plástico. LAS CORREAS DEL ARNÉS pueden limpiarse a mano o cambiarse. NO SUMERJA LAS CORREAS DEL ARNÉS EN AGUA.
-
Page 146: Proceso De Limpieza De La Hebilla
8.4 Proceso de limpieza de la hebilla Prevenga lesiones graves o la muerte: • La hebilla debe abrocharse correctamente. • I nspeccione y limpie la hebilla periódicamente para quitar objetos o desechos que podrían impedir que se trabe. 1. De vuelta el sistema de seguridad, pase Ê la presilla por la ranura de la correa de la entrepierna Ê. - Page 147 Notas...
-
Page 148: Piezas De Repuesto
9.0 Piezas de repuesto El lado inferior de la base Para comprar piezas o accesorios o para obtener información sobre la garantía en los Estados Unidos, por favor comuníquese con nosotros en: www.gracobaby.com 1-800-345-4109...
Need help?
Do you have a question about the MODES 3 LITE and is the answer not in the manual?
Questions and answers