Magliner Liftkar 170 Ergo Instruction Manual
Hide thumbs
Also See for Liftkar 170 Ergo:
- Operator's manual (14 pages) ,
- Start-up instructions (20 pages)
Table of Contents
Advertisement
Quick Links
Advertisement
Table of Contents

Related Manuals for Magliner Liftkar 170 Ergo


Summary of Contents for Magliner Liftkar 170 Ergo
- Page 1 Powered Stair Climbing Hand Truck Operator’s Manual 1-800-363-0697 www.doverco.ca 250 Trowers Road, Unit 7 2111 32nd Avenue Montreal (Lachine), Quebec H8T 3J1 Vaughan, Ontario L4L 5Z6 Tel.: (514) 420-6060 Tel.: (289) 256-2141 Fax: (514) 420-6015 Fax: (289) 256-2142...
-
Page 2: Table Of Contents
Contents INSTALLATION OF NOSE ................3 INTRODUCTION ..................3 2.1 General Safety Instructions..................... 3 2.2 Before Using Your Liftkar ....................... 3 2.3 Specifications of Liftkar Models....................4 2.4 Specifications of Liftkar Battery....................4 CONTROLS ....................5 3.1 Model ............................. 5 3.2 Safety Flap ..........................5 3.3 Main Switch.......................... -
Page 3: Installation Of Nose
Always remove the battery when unit is not in use, during transit, and prior to any maintenance procedures to prevent accidental operation. Always use a Magliner Liftkar Battery Charger to charge your Liftkar battery Before Using Your Liftkar Read the entire Operator’s Manual... -
Page 4: Specifications Of Liftkar Models
Specifications of Liftkar Models Specifications 140 Ergo 170 Ergo 140 Uni 110 Fold 140 Ergo BW Capacity 375 lbs. 300 lbs. 300 lbs. 240 lbs. Maximum speed (steps/minute) Weight without battery 35 lbs. 35 lbs. 35 lbs. 35 lbs. Maximum step height 8”... -
Page 5: Controls
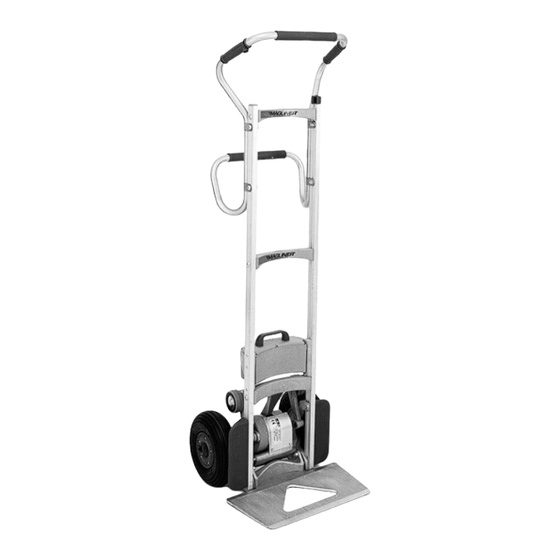
Controls Model Red Handle Grips and O-Rings Control box Round-up switch Red Handle Upper crossbar Wheel guard Nose plate Small Gray Wheels Swing arm Safety Flap It may be necessary to use your foot to assist in tilting back your loaded Liftkar. To do this, use the swing arm, a main wheel, or the lower portion of the drive unit. -
Page 6: Main Switch
Caution ! Only turn main battery switch on after tilting the load. Main Switch The main switch is located on the battery cover and is used to turn the power supply on and off (see section 3.1 Model). Power can be shut off by doing one of the following: Turning the main switch on the battery unit Removing the battery Pressing the ascend / descend button for 3 seconds or longer... -
Page 7: Round Up Switch
Round up Switch The round up switch (see page 5) is active only in the ascend mode and turns the lifting mechanism on and off. The swing arm assembly will begin to rotate when the round up switch is depressed. Battery Caution ! Always remove the battery when Liftkar is not in use and when performing any... -
Page 8: Battery Chargers
Lead-acid batteries will self-discharge when not used The battery automatically has a 4.5 hour cut-out time, so overcharging is impossible The optimum temperature for charging the battery is 65°–75° Fahrenheit (18° to 24° Celsius). Temperatures outside this range may reduce battery capacity If the battery has not been fully charged or tends to lose charge too rapidly, this will reduce the speed and capacity of the Liftkar and it may go into the overload mode as a result, even with light loads... -
Page 9: Operation
Compensation / Trickle Charging Once the battery is fully charged, the charging unit switches over to compensation/ trickle charge. On the display, the battery symbol is shown with 4 bars and remains solid. If charging does not begin, there are two possible reasons: Display: symbols blink alternately indicating polarity reversal. -
Page 10: Descending Stairs
Descending Stairs Press ascend / descend button briefly until the indicator light shines green continuously (see section 3.4 Control Box). The Liftkar is now in the ascend mode. Select high or low speed. Pressing the round up switch in the upper handle operates the support wheels and will lift the Liftkar over the step continuing until the button is released. -
Page 11: Important Operator Information
Caution ! As soon as the Liftkar rolls off the step, be sure the main wheels are kept against the rise until the support wheels reach the descend position. Just before the swing arm reaches the descending position, the support wheels reach the upper edge of the stair and lift the Liftkar approximately half an inch. - Page 12 Never throw loads onto the Liftkar. The impact of throwing loads onto the Liftkar could result in fracturing the drive unit. If necessary to load the Liftkar in a horizontal position be sure the support wheels are raised between the main wheels and carefully place the item on the Liftkar.
-
Page 13: Warranty And Liability
If the battery fails to reach a certain voltage value within a pre- determined time, the charger will automatically cut out. After automatic cut out 1. Unplug the charger from the AC wall outlet 2. Disconnect the charger from the battery 3. -
Page 14: Liability
7.2 Liability SANO Transportgeräete GmbH as manufacturer and Magline, Inc. as distributor are not responsible for the safety of the Liftkar if: The Liftkar is used for purposes other than those for which it is intended The Liftkar is not regularly maintained properly by a mechanical workshop The instructions in this Operator’s Manual are not observed Non-Liftkar parts are installed or connected to the Liftkar Original parts are removed...
Need help?
Do you have a question about the Liftkar 170 Ergo and is the answer not in the manual?
Questions and answers