Table of Contents
Advertisement
Available languages
Available languages
Quick Links
Advertisement
Chapters
Table of Contents

Related Manuals for GRILL MEISTER GAS BARBECUE


Summary of Contents for GRILL MEISTER GAS BARBECUE
- Page 1 GAS BARBECUE GAS BARBECUE GASGRILL Instructions for use Gebrauchsanleitung PLYNOVÝ GRIL Návod k použití OWIM GmbH & Co. KG Stiftsbergstraße 1 74167 Neckarsulm GERMANY Model No./Modell-Nr: HG09946 Version: 12/2022 IAN 407126_2207 IAN 407126_2207...
- Page 2 Instructions for use Page Návod k použití Strana DE/AT/CH Gebrauchsanleitung Seite...
-
Page 3: Table Of Contents
List of pictograms used ..........Page Introduction . -
Page 4: List Of Pictograms Used
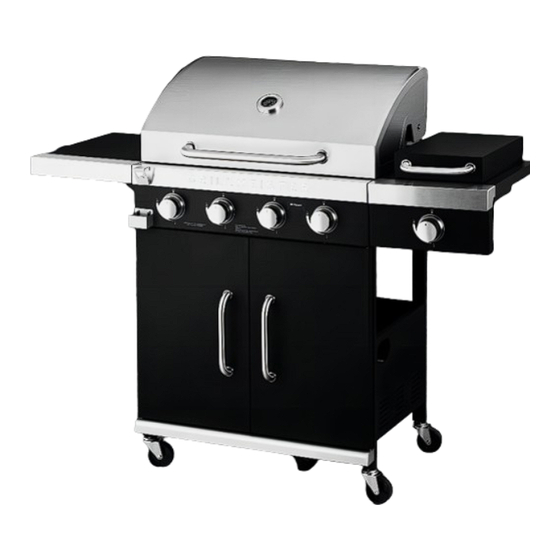
Congratulations on the purchase of your new The product is only suitable for outdoor use gas barbecue, hereafter referred to only as “the and it must not be used indoors. product”. The manufacturer will not be held liable for You have chosen a high-quality product. - Page 5 Grate Side burner drip tray case Cast iron grill grate Grate Grate with grill-in-grill system Lid handle Main burner drip tray handle Mounts for lid handle (2×) Bottle top collecting container Knob Bracket for side tray, front Knob mount Rear left supporting leg Temperature gauge Bracket for rear left supporting leg Right side wall...
-
Page 6: Technical Data
Technical data Set up the product on a level, non-flammable surface. Net weight: 42 kg (without gas bottle) Set up the product so that it is at least 1 m away from flammable materials. Dimensions when built: 140 cm × 59 cm × 119 cm DANGER! Risk of explosion and fire due to escaping gas! Grill area:... -
Page 7: Assembly
Assembly Fig. Description Unpacking the product and Fit the brackets for rear left supporting basic cleaning and the brackets for front left supporting leg to the rack. 1. Take the product out of the packaging and remove all packaging materials and plastic Fit the door handles to the left wrappings. -
Page 8: Setting Up The Product
Usage Fig. Description Prior to use Fit the drip tray and the drip tray case to the side burner DANGER! Risk of fire and explosion! Regularly check the knobs and the low Insert the main burner drip tray into pressure regulator with gas hose for leaks the product. -
Page 9: Connecting The Gas Bottle
Maximum diameter and height of the gas Before connecting the gas bottle to the bottle: 300 mm × 580 mm (Ø × H). product, remove any dirt from the heads of the gas bottle, the regulator or the burner. Dirt, spiders and insects could be inside and block the burner or Venturi tube at the opening. -
Page 10: Piezo Ignition
Piezo ignition Burn-in technique DANGER! Risk of fire! Risk of injuries! Risk of burns! Do not spray the oil directly onto the main burners, the high-power burners and the side burner Do not leave the product unattended at all times during the burn-in process. Switch off all burners and let the product cool down before leaving the product. -
Page 11: Switching Off
Barbecuing Start by switching on one burner to a setting with low temperature. Repeat this step with the Cooking with a closed lid other burners. Let the burners burn on low heat Gas barbecues with a lid make gentle cooking for 3 to 5 minutes. -
Page 12: Cleaning And Maintenance
Problem Possible cause Solution No flame or low output There is a blockage in the gas Clean the gas nozzle, gas nozzle, gas hose or gas hose and gas valve. valve. The flame diffuser Get the flame diffuser defective. replaced. The wind is too strong in the area Set up the product in an area around the product. -
Page 13: Warranty
Warranty If functional or other defects occur, contact the service department listed below either by The product has been manufactured to strict quality telephone or by e-mail. guidelines and meticulously examined before delivery. In the event of material or manufacturing Once the product has been recorded as defective defects you have legal rights against the retailer of you can return it free of charge to the service... - Page 14 Seznam použitých piktogramů a symbolů ......Strana Úvod ..............Strana Použití...
-
Page 15: Seznam Použitých Piktogramů A Symbolů
Seznam použitých piktogramů a symbolů OPATRNĚ! – Označuje ohrožení s NEBEZPEČÍ! – Označuje ohrožení s nízkým stupněm rizika, které může mít, vysokým stupněm rizika, které má, pokud pokud se mu nezabrání, za následek se mu nezabrání, za následek smrt nebo lehké... - Page 16 Tácek na odkapávání hlavního Boční hořák hořáku Tácek na odkapávání bočního Držák pro boční odkládací polici, hořáku vzadu Kryt tácku na odkapávání bočního Rošt hořáku Litinový rošt grilu Rošt Rošt se systémem gril v grilu Rukojeť víka Rukojeť tácku na odkapávání Upevňovací...
-
Page 17: Technické Údaje
Technické údaje Nenechávejte výrobek v průběhu používání bez dozoru. Váha netto: 42 kg (bez plynové lahve) Výrobkem nepohybujte, pokud je v používání. Umístěte výrobek na rovný nehořlavý povrch. Rozměry v Postavte výrobek tak, aby byl alespoň 1 metr sestaveném od hořlavých materiálů. stavu: 140 cm ×... -
Page 18: Montáž
Montáž Obr. Popis Výrobek vybalte a vyčistěte jej Namontujte na stojan držáky levé zadní stojné nohy a držáky levé přední 1. Vyjměte výrobek z obalu a odstraňte veškeré stojné nohy balicí materiály a ochranné fólie. 2. Zkontrolujte, zda jsou k dispozici všechny díly a Namontujte kliky dveří... -
Page 19: Instalace Výrobku
Použití Obr. Popis Před použitím Namontujte tácek na odkapávání kryt tácku na odkapávání na boční NEBEZPEČÍ! Riziko požáru a výbuchu! hořák Pravidelně kontrolujte těsnost regulátorů a nízkotlakého regulátoru s plynovou Vložte tácek na odkapávání hlavního hadicí (např. kartáčem s mýdlovou hořáku do výrobku. -
Page 20: Připojte Plynovou Láhev
Maximální průměr a výška plynové lahve: Před připojením plynové lahve k výrobku 300 mm × 580 mm (Ø × V). odstraňte veškeré nečistoty z hlavïc plynové lahve, regulátoru nebo hořáku. Mohou se tam nacházet nečistoty, pavouci a hmyz a může se ucpat hořák nebo Venturiho trubice v otvoru. -
Page 21: Piezo Zapalování
Piezo zapalování Nestříkejte olej přímo na hlavní hořáky, vysoce výkonné hořáky a boční hořák Nenechávejte výrobek v průběhu vypalování bez dozoru. Vypněte všechny hořáky a nechte výrobek vychladnout, než se od něj vzdálíte. INFO: Proveďte metodu vypalování, abyste vyčistili vnitřní součásti a spálili veškeré zbytky z výroby. -
Page 22: Vypnout
Grilování INFO: Důležité – není nutné zapnout boční hořák Vařte při zavřeném víku Plynové grily s víky umožňují jemné vaření 7. Postupně zvyšujte teplotu hořáků. Zvyšte větších kusů masa a drůbeže, podobně jako v teplotu na střední stupeň. Nechte hořáky troubě. -
Page 23: Čištění A Údržba
Problém Možná příčina Řešení Žádný plamen nebo nízký Vyčistěte plynovou trysku, plynovou Plynová tryska, plynová hadice výkon hadici a plynový ventil. nebo plynový ventil jsou zablokovány. Rozdělovač plamene je vadný. Nechte rozdělovač plamene vyměnit. Vítr kolem výrobku je příliš silný. Postavte výrobek na místo chráněné... -
Page 24: Záruka
Záruka Pokud dojde k jakýmkoli funkčním chybám nebo jiným závadám, kontaktujte prosím telefonicky Výrobek byl vyroben podle přísných kvalitativních nebo e-mailem níže uvedené servisní oddělení. směrnic a před expedicí pečlivě zkontrolován. V případě závad materiálu nebo výrobní vady máte Jakmile je výrobek identifikován jako vadný, možnost uplatnění... - Page 25 Liste der verwendeten Piktogramme/Symbole ....Seite Einleitung ............. . . Seite Bestimmungsgemäßer Gebrauch.
-
Page 26: Liste Der Verwendeten Piktogramme/Symbole
Liste der verwendeten Piktogramme/Symbole GEFAHR! – Bezeichnet eine Gefahr VORSICHT! – Bezeichnet eine Gefahr mit hohem Risikograd, die, wenn sie mit niedrigem Risikograd, die, wenn sie nicht vermieden wird, den Tod oder eine nicht vermieden wird, eine leichte bis schwere Verletzung zur Folge hat (z. B. mäßige Verletzung zur Folge haben kann Erstickungsgefahr) (z. - Page 27 Hochleistungs brenner- Abdeckung der rechten Ablage (2×) Flammenverteiler Seitenbrenner Haken (3×) Seitenbrenner-Abtropfschale Seitenablage, links Seitenbrenner-Abtropfschalen- Hauptbrenner-Abtropfschale gehäuse Halterung für Seitenablage, hinten Rost Rost Deckelgriff Gusseisen-Grillrost Befestigungen für Deckelgriff (2×) Rost mit Grill-in-Grill-System Regler Hauptbrenner-Abtropfschalengriff Befestigung für Regler Thermometer Sammelbehälter für Kronkorken Halterung für Seitenablage, vorne Rechte Seitenwand Hinteres linkes Standbein...
-
Page 28: Technische Daten
Technische Daten Halten Sie Kinder und Haustiere vom Produkt fern. Nettogewicht: 42 kg (ohne Gasflasche) Lassen Sie das Produkt während des Gebrauchs nicht unbeaufsichtigt. Abmessungen Bewegen Sie das Produkt nicht während des im aufgebauten Gebrauchs. Zustand: 140 cm × 59 cm × 119 cm Stellen Sie das Produkt auf einer ebenen, nicht Grillbereich: 70 cm ×... -
Page 29: Montage
Wenden Sie sich im Falle einer Beschädigung, Abb. Beschreibung für Reparaturen oder bei anderen Problemen Montieren Sie die rechte Seite des mit dem Produkt an unseren Kundendienst oder Gestells mit dem hinteren rechten eine Fachkraft vor Ort. Standbein , dem vorderen rechten Tragen Sie beim Gebrauch des Produkts keine Standbein und der rechten... -
Page 30: Produkt Aufstellen
Abb. Beschreibung Abb. Beschreibung Lösen Sie 6 Schrauben vom Setzen Sie folgende Komponenten in Seitenbrenner . Entfernen Sie den das Produkt ein: unteren Teil des Seitenbrenners. Flammenverteiler INFO: Diese Komponente und die Hochleistungs brenner-Flammen- 6 Schrauben werden in Schritt U verteiler erneut benötigt. -
Page 31: Niederdruckregler Und Gasschlauch
Maximaler Durchmesser und maximale Höhe INFO: Ersetzen Sie den Niederdruckregler mit der Gasflasche: 300 mm × 580 mm (Ø × H). Gasschlauch innerhalb von 2 Jahren nach dem Herstellungsdatum (siehe Typenschild/ Aufkleber auf dem Niederdruckregler). Niederdruckregler und Gasschlauch GEFAHR! Explosions- und Brandrisiko durch entweichendes Gas! Ersetzen Sie sofort verschlissene oder beschädigte Gasschläuche. -
Page 32: Gasflasche Anschließen
Gasflasche anschließen 3. Schließen Sie den Niederdruckregler an der Gasflasche an (siehe „Gasflasche GEFAHR! Brand- und Explosionsrisiko! anschließen“). Stellen Sie die Gasflasche auf den Gas- 4. Schalten Sie den Brenner mit dem Regler ein. flaschen halter (Abb. I). Stellen Sie die 5. -
Page 33: Einbrennmethode
4. Optional: Gehen Sie wie zuvor beschrieben 4. Besprühen Sie folgende Komponenten mit Öl: vor, um die anderen Brenner mit den – Warm halte rost Reglern (2), (3), (4) und (5) zu entzünden. – Flammenverteiler 5. Stellen Sie die gewünschte Temperatur anhand –... -
Page 34: Ausschalten
Ausschalten Keramik-Seitenbrenner entzünden INFO: Gas strömt in den Brenner. Dies GEFAHR! Verbrennungsrisiko! Lassen ist notwendig, um den Brenner mit Gas zu Sie das Produkt nach dem Grillen abkühlen. befüllen und ein Vakuum aufzubauen. 1. Schließen Sie das Ventil an der Gasflasche. 1. -
Page 35: Reinigung Und Wartung
Reinigung und Wartung Lagerung Reinigung GEFAHR! Brandrisiko! Lassen Sie das Produkt nach dem Grillen und bevor Sie es Beachten Sie die folgenden Anweisungen, wenn abdecken abkühlen. Sie die Oberflächen reinigen und warten: WARNUNG! Verbrennungsrisiko! Kurzzeitige Lagerung Lassen Sie das Produkt nach dem Grillen Falls Sie das Produkt in einem ungeschützten abkühlen. -
Page 36: Abwicklung Im Garantiefall
Service Sollte das Produkt innerhalb von 3 Jahren ab Kaufdatum einen Material- oder Herstellungsfehler Service Deutschland aufweisen, werden wir es – nach unserer Wahl Tel.: 0800 5435 111 – kostenlos für Sie reparieren oder ersetzen. E-Mail: owim@lidl.de Die Garantiezeit verlängert sich durch einen Service Österreich stattgegebenen Gewährleistungsanspruch nicht. -
Page 37: Lieferumfang
Scope of delivery/Rozsah dodávky/Lieferumfang... -
Page 39: Explosionszeichnung
Explosion view/Rozložený pohled/Explosionszeichnung (8×) (2×) M6×12 (55×) (1×) (2×) M6×20 (8×) WAF10/ (1×) M6×30 (2×) WAF14 (4×) M6×12 (2×) M6×15 (4×) M4×8 (15×) -
Page 40: Montage
Assembly/Montáž/Montage × 4 × 4... - Page 41 × 4 × 6...
- Page 42 × 2 × 2 × 1...
- Page 43 × 6 × 4...
- Page 44 × 8 × 4 × 4...
- Page 45 × 4...
- Page 46 × 6 × 4...
- Page 47 × 4 × 4 × 7...
- Page 48 × 2 × 2 × 2 × 2 × 2...
- Page 49 × 2...
- Page 50 × 2 × 2 × 2...
- Page 51 × 2 × 2...
- Page 52 × 3...
Need help?
Do you have a question about the GAS BARBECUE and is the answer not in the manual?
Questions and answers