Table of Contents
Advertisement
Quick Links
Advertisement
Table of Contents

Related Manuals for PCE Instruments PCE-MO 2010


Summary of Contents for PCE Instruments PCE-MO 2010
- Page 1 10A MICRO-OHM METER PCE-MO 2010 INSTRUCTION MANUAL...
-
Page 2: Table Of Contents
INDEX PAGE 1. INTRODUCTION......2. SAFETY NOTES......3. FEATURES........4. SPECIFICATIONS......5. GENERAL........6. INSTRUMENT LAYOUT....7. MEASUREMENT......8-12 8. MAINTENANCE......9. INTERFACE CONNECTION AND OPERATION......14-22 10. Contact.......... 11. Disposal......... -
Page 3: Introduction
1. INTRODUCTION NOTE This meter has been designed and tested According to CE Safety Requirements for Electronic Measuring Apparatus, IEC / EN 61010-1 and other safety standards. Follow all warnings to ensure safe operation. WARNING READ "SAFETY NOTES" (NEXT PAGE) BEFORE USING THE METER. -
Page 4: Safety Notes
2. SAFETY NOTES ● Read the following safety information carefully Before attempting to operate or service the meter. ● Use the meter only as specified in this manual. Otherwise, the protection provided by the meter may be impaired. ● Rated environmental conditions : (1) Indoor Use. -
Page 5: Features
3. FEATURES ● Maximum testing current of 10A ● Ranges: 200.0μΩ / 2000μΩ 20.00mΩ / 200.0mΩ 2.000Ω / 20.00Ω 100mA 200.0Ω 10mA ● Maximum resolution of 0.1μΩ at 10A ● Four terminal measurement ● 4 Lines × 20 Characters LCD ●... -
Page 6: Specifications
4. SPECIFICATIONS 4-wire method measurement 200.0μΩ / 0.1μΩ 2000μΩ / 1μΩ 20.00mΩ / 0.01mΩ Measuring ranges 200.0mΩ / 0.1mΩ / resolution 2.000Ω / 1mΩ 20.00Ω / 0.01Ω 200.0Ω / 0.1Ω 200.0μΩ ~ 2000μΩ: ±(2% + 8dgt) Accuracy 20.00mΩ ~ 200.0Ω: ±(1% + 4dgt) 10A: 200.0μΩ... -
Page 7: General
5. GENERAL ● Operating temperature: 0~40°C. ● Operating humidity: 80% RH. ● Dimensions: 322(L) × 260(W) × 135(D)mm ● Weight: Approx. 3137g (battery included) ● Power source: Rechargeable battery DC14.8V 5200mAh 79.69Wh ● Accessories: Instruction manual Test leads Data transmission cable Software for PC interface Shoulder belt Charger... -
Page 8: Instrument Layout
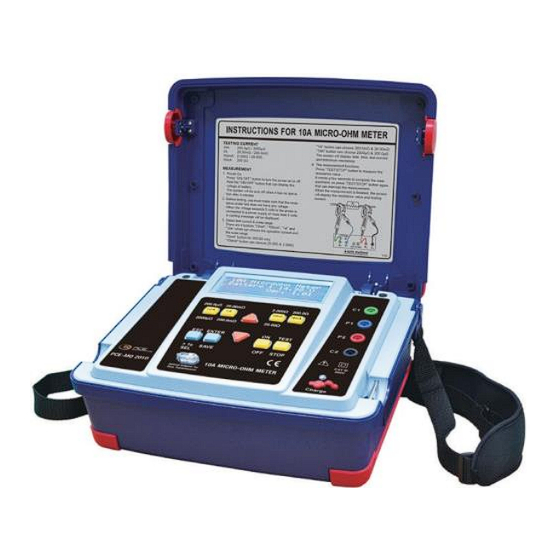
6. INSTRUMENT LAYOUT ⑴ ⑵ ⑶ ⑿ ⒀ 200.0µΩ 2.000Ω 20.00mΩ 200.0Ω ⒁ ⑷ 100mA 10mA 2000µΩ 20.00 Ω 200.0mΩ ⑸ ⒂ ESC ENTER TEST > 1s SAVE OFF STOP CAT III ⒃ 300V PCE-MO 10A MICRO-OHM 2010 ⒄ METER Optical Adapter for Data Transmission Charge... - Page 9 (1) 4 Lines × 20 characters LCD (2) 10A Button (11) TEST / STOP Button (3) 1A Button (12) C1 Terminal (4) 100mA Button (13) P1 Terminal (5) 10mA Button (14) P2 Terminal ▲ Button (15) C2 Terminal ▼ Button (16) Charge LED (8) ESC / SEL Button (17) Charge Socket...
-
Page 10: Measurement
7. MEASUREMENT 1. Power On : Press "ON/OFF" button to turn the power on or off. Hold the "ON/OFF" button that can display the voltage of battery. The system will be auto off when it has no operation after 3 minutes. 2.Before testing, you must make sure that the resistance under test does not have any voltage. - Page 11 4.The measurement function Press "TEST/STOP" button to measure the resistance value. It needs a few seconds to complete the measurement, so press "TEST/STOP" button again that can interrupt the measurement. 4-wire method Charge CAT III 300V When the measurement is finished, the screen will display the resistance value and testing current.
- Page 12 5.Record saving function When the measurement is finished, press "SAVE/ENTER" button to save the result of measurement. At the same time, the last line will display the number of records. The memory can record up to 200 records. 6.Minor function Press "ESC/SEL"...
- Page 13 Press "ESC/SEL" button to leave the Date/Time ADJ. Press "UP" or "DOWN" button to set the correct number. Press "TEST/STOP" button to switch to the next unit of date or time and go on the required adjustment. After all adjustments are completed, press "SAVE/ ENTER"...
- Page 14 ● RECORD CLEAR Press "SAVE/ENTER" button to clear all records in the memory. Press "ESC/SEL" button to return back to the minor function menu. REMEMBER TO CHARGE THE BATTERY! ALWAYS recharge the battery when the Low Battery info appears on the display. Leaving the battery uncharged for a long period of time may affect the lifespan of the battery.
-
Page 15: Maintenance
8. MAINTENANCE Charge: When low battery warning information "LoBAT" appears, please charge the battery. 1. Plug one end of charger into the charge socket and the other end into the ACV power socket. 2. If ACV plug socket is energized, the charge LED is lit on indicating that charge is underway. -
Page 16: Interface Connection And Operation
9. INTERFACE CONNECTION AND OPERATION (A) Microohm Meter Setup Installation: 1. Install the "Micoohm Setup" on the personal computer. 2. Click the "Next" button. 3. To install into a different folder, click Browse and Select another folder. If it's not necessary, click the "Next"... - Page 17 4. Click the "Next" button. 5. All the files are installing to your personal computer. -15-...
- Page 18 6. The Microohm Meter program has been successfully installed and then click "Finish" button. 7. The software driver file: "CDM 2.08.24 WHQL Certified x64-64bit" and "CDM 2.08.24 WHQL Certified x86-32bit" files. (Note: New Windows system will install the software driver automatically. It's necessary to install the software driver only if it is the old windows system) -16-...
- Page 19 (B) Windows Comm Port setting: 1. Plug CA-232 data transmission cable into the personal computer USB port. 2. On the windows system, right click the "This PC" icon to find manager. ➔ ①Right click "This PC" icon 3. Click the "Device Manager" to find ports (COM &...
- Page 20 4. Click the Ports (COM & LPT) to find USB Serial Port (COM6). ③Click Ports(COM &LPT) USB Serial Port(COM6) (Note: USB Serial Port will indicate automatically different "COM" port) -18-...
- Page 21 (C) Microohm Meter Software Comm Ports Setting: 1. Connect CA-232 data transmission cable to the Insulation Tester. 2. Click the "Microohm Meter" icon to the personal computer. 3. On the Microohm Meter windows, select the correct "Comm Port" and click the "connect button".
- Page 22 4. The Comm Port selection is workable when the red signal turns green signal. Green Signal 5. Click the "Download Log from Device" button can show the data. ①Click the Download Log from Device button ②Click Save Log button -20-...
- Page 23 6. Click the "Save Log" button to save the data records to the personal computer. (D) Microohm Meter Windows Interface Introduction: RS232 Connection Main Recording windows interface -21-...
- Page 24 Cleaning and Storage : WARNING To avoid electrical shock or damage to the instrument, do not get water inside the case. Periodically wipe the case with a damp cloth and detergent. Do not use abrasives or solvents. Due to our policy of constant improvement and development, we reserve the right to change specifications without notice.
-
Page 25: Contact
10 Contact If you have any questions, suggestions or technical problems, please do not hesitate to contact us. You will find the relevant contact information at the end of this user manual. 11 Disposal For the disposal of batteries in the EU, the 2006/66/EC directive of the European Parliament applies. - Page 26 -italia.it info@pce-instruments.co.uk www.pce-instruments.com/turkish www.pce -instruments.com/italiano www.pce-instruments.com/english The Netherlands United States of America Denmark PCE Instruments Denmark ApS Birk PCE Brookhuis B.V. PCE Americas Inc. Centerpark 40 Institutenweg 15 1201 Jupiter Park Drive, Suite 8 7400 Herning 7521 PH Enschede...
Need help?
Do you have a question about the PCE-MO 2010 and is the answer not in the manual?
Questions and answers