Chapters
Table of Contents

Related Manuals for HomeMatic HmIP-DRBLI4


Summary of Contents for HomeMatic HmIP-DRBLI4
- Page 1 Jalousieaktor für Hutschienenmontage – 4-fach Blind Actuator for DIN rail mount – 4 channels HmIP-DRBLI4 Installations- und Bedienungsanleitung Installation and operating manual...
-
Page 2: Table Of Contents
Installations- und Bedienungsanleitung Inhaltsverzeichnis Lieferumfang ....................3 Hinweise zur Anleitung ................3 Gefahrenhinweise ..................3 Homematic IP – Smart wohnen, einfach komfortabel......4 Funktion und Geräteübersicht ..............5 Inbetriebnahme .....................6 Installationshinweise ..................6 Montage und Installation .................. 7 Anlernen ....................... 9 Bedienung ....................10 Fehlerbehebung ..................12 Befehl nicht bestätigt ..................12 Duty Cycle ...................... -
Page 3: Lieferumfang
Schäden, z. B. am Gehäuse, an Lesen Sie diese Anleitung sorgfältig, Bedienelementen oder an den bevor Sie Ihre Homematic IP Geräte Anschlussbuchsen ausweist. Las- in Betrieb nehmen. Bewahren Sie die sen Sie das Gerät im Zweifelsfall Anleitung zum späteren Nachschlagen... -
Page 4: Homematic Ip - Smart Wohnen, Einfach Komfortabel
Isolierung verfügen. wHhnenn, einfach Eine Überlastung kann zur Zerstö- HmfHrtaael rung des Geräts, zu einem Brand Dieses Gerät ist Teil des Homematic IP oder zu einem elektrischen Schlag Smart-Home-Systems und kommuni- führen. ziert über das Homematic IP Funkpro- tokoll. Alle Geräte des Systems können... -
Page 5: Funktion Und Geräteübersicht
Fun tiHn und Geräteüaersicht Sie die Möglichkeit, Homematic IP tors („Hoch“) Geräte über die Homematic IP Zentrale G Anschlussklemmen für Außenleiter CCU3 oder in Verbindung mit vielen H Anschlussklemme für Taster/Schal- Partnerlösungen zu betreiben. Welcher ter Kanal 2, 4, 6, 8 („Hoch“) Funktionsumfang sich innerhalb des Verrastung für die Hutschienen-... -
Page 6: Inbetriebnahme
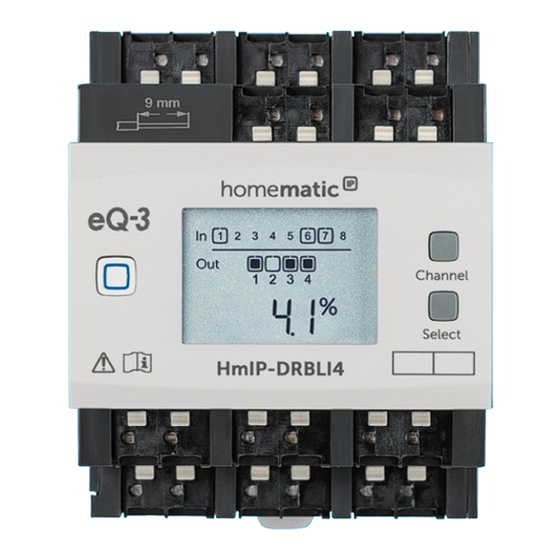
Inaetrieanahme Hinweis! Installation nur durch Displayübersicht (s. Abbildung 1): Personen mit einschlägigen elekt- Symbol Bedeutung rotechnischen Kenntnissen und Kanal eingeschaltet Erfahrungen!* Kanal ausgeschaltet Durch eine unsachgemäße Installation Eingang nicht betätigt gefährden Sie • Ihr eigenes Leben; Eingang betätigt • das Leben der Nutzer der elektri- Daten werden empfangen schen Anlage. -
Page 7: Montage Und Installation
Inaetrieanahme bedingungen (klassische Nullung, Entfernen Sie die Abdeckung des Schutzerdung, erforderliche Zu- Stromkreisverteilers. satzmaßnahmen etc.). • Setzen Sie den Jalousieaktor auf die Hutschiene auf. Achten Sie da- rauf, dass die Schrift auf dem Gerät Beachten Sie bei der Installation und im Display für Sie lesbar ist und die Gefahrenhinweise gemäß... - Page 8 Inaetrieanahme schlossen werden. Der Anschluss für den Außenleiter ist mit einem Pfeil in Richtung • Schließen Sie den Außenleiter für Gerätemitte und die geschalteten den gewünschten Kanal an die Phasen mit einem Pfeil nach au- entsprechende Klemme (G) an ßen gekennzeichnet. Zum An- (s.
-
Page 9: Anlernen
Zum Anlernen des Geräts gehen Sie • Leuchtet die LED rot, versuchen Sie wie folgt vor: es erneut. • Öffnen Sie die Homematic IP App • Wählen Sie die gewünschte Lösung auf Ihrem Smartphone. für Ihr Gerät aus. • Wählen Sie den Menüpunkt „Gerät •... -
Page 10: Bedienung
Bedienung Bedienung Der ausgewählte Kanal wird durch Blinken des Symbols gekennzeichnet. Über die folgenden Tasten stehen Ih- Die aktuelle Höhe ( ) und die aktuelle nen einfache Bedienfunktionen direkt Lamellenstellung ( ) des ausgewählten am Gerät zur Verfügung: Kanals werden abwechselnd im LC- •... - Page 11 Bedienung Bei jeder Betätigung wird ein Zustand Schalter: weiter geschaltet. Bei den Eingangska- • Umlegen des Schalters für Kanal 1, nälen wird durch Drücken der Select- 3, 5, 7: Der Motor für die Rollläden Taste ein kurzer Tastendruck für den oder die Markise fährt bis zur End- ausgewählten Eingang simuliert.
-
Page 12: Befehl Nicht Bestätigt
Stunde). Die Geräte dürfen bei Erreichen des 1 %-Limits nicht mehr senden, bis diese zeitliche Begrenzung vorüber ist. Gemäß dieser Richtlinie, werden Homematic IP Geräte zu 100 % normenkonform entwickelt und pro- duziert. Im normalen Betrieb wird der Duty Cycle in der Regel nicht erreicht. Dies kann jedoch in Einzelfällen bei der... -
Page 13: Fehlercodes Und Blinkfolgen
Wiederherstellung der Wer seinstellungen Fehlercodes und Blinkfolgen Blinkcode Bedeutung Lösung Geben Sie die letzten vier Kurzes Ziffern der Geräte-Serien- oranges Blinken Anlernmodus aktiv nummer zur Bestätigung (s. „6.3 Anlernen“ auf (alle 10 s) Seite 9). Achten Sie auf die Anzeige in Ihrer App oder wenden 6x langes rotes Blinken Gerät defekt... -
Page 14: Wartung Und Reinigung
Behörden wendet und keine Zusicherung von Eigenschaf- Hiermit erklärt die eQ-3 AG, Maiburger ten beinhaltet. Str. 29, 26789 Leer, Deutschland, dass Bei technischen Fragen zum Gerät der Funkanlagentyp Homematic IP wenden Sie sich bitte an Ihren HmIP-DRBLI4 der Richtlinie 2014/53/ Fachhändler. -
Page 15: Technische Daten
Technische Daten 13 Technische Daten Geräte-Kurzbezeichnung: HmIP-DRBLI4 Versorgungsspannung: 230 V/50 Hz Stromaufnahme: 25 mA max. Leistungsaufnahme Ruhebetrieb: 280 mW typ. (Displaybeleuchtung aus) Lastart: Motorlast Relais: Wechsler, µ-Kontakt Schaltspannung: 230 V~ Strombelastbarkeit (Kanal): 2,2 A Verlustleistung des Geräts für Wärmeberechnungen: max. 2,8 W Leitungsart und -querschnitt: starre und flexible Leitung, 0,75-2,5 mm²... - Page 16 Installation and operating manual Taale Hf cHntents Package contents..................17 Information about this manual ..............17 Hazard information ..................17 Homematic IP – Smart living, simply comfortable.......19 Function and device overview ..............19 Start-up ......................20 Installation instructions ...................20 Mounting and installation ................21 Pairing .........................
-
Page 17: Package Contents
There is a fore beginning operation with your risk of electric shock if the device Homematic IP component. Keep the is opened. If you have any doubts, manual so you can refer to it at a later have the device checked by an date if you need to. - Page 18 Hazard infHrmatiHn Only shutters and blinds with limit out work on the 230 V mains. Ap- switches (mechanical or electro- plicable accident prevention regu- nic) should be used. Before put- lations must be complied with ting the actuator into operation, whilst such work is being carried check that the limit switches on out.
-
Page 19: Homematic Ip - Smart Living, Simply Comfortable
4 HHmematiccIIP – mart Device overview: A System button (pairing button and livingn, simply cHmfHrtaale LED) This device is part of the Homematic IP B Channel button smart home system and works with C Select button the Homematic IP radio protocol. All... -
Page 20: Start-Up
tart-up Display overview (see figure 1, p. 19): • your own life at risk; • and the lives of other users of the Symbol Meaning electrical system. Channel switched on Incorrect installation also means that Channel switched off you are running the risk of serious da- mage to property, e.g. -
Page 21: Mounting And Installation
tart-up Please note the insulation stripping length of the conductor to be con- nected, indicated on the device. Permitted cable cross sections for con- necting to the blind actuator are: rigid cable flexible cable without ferrule [mm²] 0,75 - 2,50 0,75 - 2,50 Figure 3 •... -
Page 22: Pairing
tart-up ding terminal ( ) (F) (see figure 5+6). The connection (looping through) of conductors via the network terminals • Connect the switched phase con- of the device to other devices is not ductor to move the blinds down permitted! for the selected channel to the corresponding terminal ( ) (E) (see •... -
Page 23: Operation
• To confirm, enter the last four di- tem and to enable control via the free gits of the device number (SGTIN) Homematic IP app, you must pair the in your app or scan the QR code. device to your Homematic IP Access Therefore, see the sticker supplied Point first. - Page 24 OperatiHn • External push-buttons/switches (H After switching on the blind actu- and L) ator, the blinds/shutters/awnings are in an unknown position. The current height and slats position System button of a channel until reaching a limit By pressing the system button briefly, switch cannot be displayed.
-
Page 25: Troubleshooting
Switch: limit until this time restriction comes to • Turning over the switch for channel an end. Homematic IP devices are de- 1, 3, 5, 7: The motor for the shut- signed and produced with 100% con- ters/awnings moves down to the formity to this regulation. -
Page 26: Adjustment Of The Slats Not Possible
TrHualeshHHting by one long red lighting of the device LED (A) , and may manifest itself in the device temporarily working incorrect- ly. The device starts working correctly again after a short period (max. 1 hour). Adjustment of the slats not possible If it is not possible to control the slats of a blind or if they do not move when... -
Page 27: Restore Factory Settings
RestHre factHry settings 9 RestHre factHry settings 10 Maintenance and cleaning The factory settings of the device The product does not require any can be restored. If you do this, you maintenance. Enlist the help of an will lose all your settings. expert to carry out any mainte- nance or repairs. -
Page 28: Disposal
26789 Leer/Germany declares that the The CE mark is a free trademark radio equipment type Homematic IP that is intended exclusively for the HmIP-DRBLI4 is in compliance with Di- authorities and does not imply any rective 2014/53/EU. The full text of the assurance of properties. -
Page 29: Technical Specifications
Technical specificatiHns 13 Technical specificatiHns Device short name HmIP-DRBLI4 Supply voltage: 230 V~/50 Hz Current consumption: 25 mA max. Standby power consumption: 280 mW typically (display lights off) Load type: motor load Relay: changeover contact, µ contact Switching voltage: 230 V~... - Page 30 Kostenloser Download der Homematic IP App! Free download of the Homematic IP app! Bevollmächtigter des Herstellers: Manufacturer’s authorised representative: eQ-3 AG Maiburger Straße 29 26789 Leer / GERMANY www.eQ-3.de...
Need help?
Do you have a question about the HmIP-DRBLI4 and is the answer not in the manual?
Questions and answers