
Subscribe to Our Youtube Channel
Related Manuals for ZOSI C1 Pro


Summary of Contents for ZOSI C1 Pro
- Page 1 Quick Start Guide This guide will get you going with your camera. For more details and information of the camera, please visit our official website: www.zositech.com V2.W.02.Z...
-
Page 2: What's In The Box
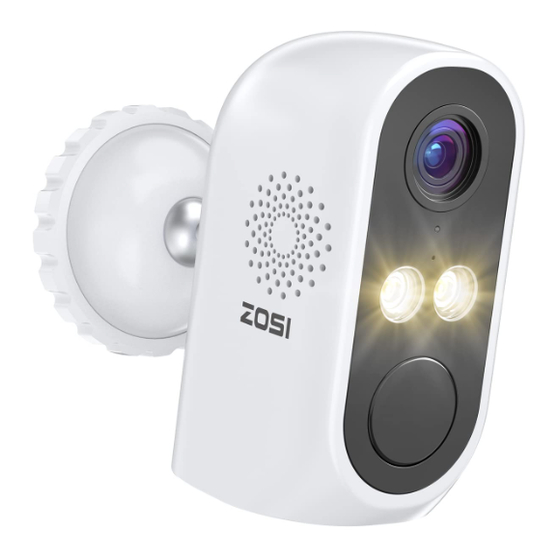
What’s in the box Battery Camera USB Cable Mounting Screws Adhesive Pad Magnetic Base Mounting Bracket Quick Start Guide Reset Needle Warning Sticker NOTE: Accessories are subject to the model you purchased. English... - Page 3 Gallery & Specs IR LEDs HD Lens Status Indicator Microphone Spotlights PIR Sensor Speaker Wall Mount Magnetic Mount Power Switch DC 5V Power Port Charge Indicator Micro SD Card Slot Reset Hole NOTE: The actual appearance varies by different models. Hold 3-5 seconds Turn ON/OFF Power Switch Reset Button Hold 3-5 seconds Device Reset Status Indicator...
-
Page 4: Battery Charging
Power-ON Press and hold the power switch on the back of the camera for 3 seconds, the network indicator lights blink red. Power on the NVR, the camera network indicator’s blinking red lights will turn into solid blue lights, and the NVR will automatically connect and display video. - Page 5 Add Extra Devices NOTE: The camera system has been matched before shipment. After the camera is powered on, the system will automatically connect and display video. If you want to add or reset a camera, follow the steps below. • Press and hold the power switch on the back of the camera for 3 seconds, and you will hear "Device is waiting to connect", and the network indicator light will flash red slowly.
-
Page 6: Mount The Camera
• When you hear "wireless configuration succeed" from the camera, the network indicator light comes solid red for about 20 seconds, the camera will be automatically added to the system and display video. The operation video is as follows: Tutorial Video Mount the Camera 1. - Page 7 Unscrew the Mount Base Screw the Mount Base on the Wall Adjust the Camera Angle Attach the Bracket to the Base 3. Install with Magnetic Bracket • Please wipe the wall surface and the bottom of the magnetic bracket before installation. English...
- Page 8 Tear the protective film on one side of the double-sided tape and paste it in the position where you want to install. please noted that you have to press the double-sided tape for more than 3 minutes to squeeze the air between the double-sided tape and the wall.
-
Page 9: Installation Environment
Installation Environment Height: Install the camera 6-9 ft (2-3m) above the ground. Distance: Best accuracy for objects within 5-50 ft (1.5-15 m). Angle: Tilt the camera down about 30°-60°from the horizontal position. It is suggested to adjust the angle between camera and detected object larger than 10°. -
Page 10: Installation Precautions
Installation Precautions • Do not face the camera to any light source. • Do not point the camera at glass windows or reflective objects. Otherwise, it may result in poor image performance due to reflections from infrared LEDs, ambient lights or status lights. •... -
Page 11: Notification Of Compliance
(2) This device must accept any interference received, including interference that may cause undesired operation. 2. CE Simplified EU Declaration of Conformity ZOSI declares that product is in compliance with the essential requirements and other relevant provisions of Directive 2014/53/EU. 3. Correct Dispose of this product This marking indicates that this product should not be disposed with other household waste throughout the EU. - Page 12 Copyright © 2023 ZOSI Technology Co., Ltd. No part of this publication may be reproduced in any way without the written permission of ZOSI. The information in this publication is believed to be accurate in all respects. ZOSI assumes no responsibility for any consequenc- es resulting from their use.
Need help?
Do you have a question about the C1 Pro and is the answer not in the manual?
Questions and answers