
Related Manuals for Froggit HP2000


Summary of Contents for Froggit HP2000
- Page 1 HP2000 Display console WiFi Internet Wireless Weather Station Manual EN Support/updates/manuals/spare parts: www.froggit.de...
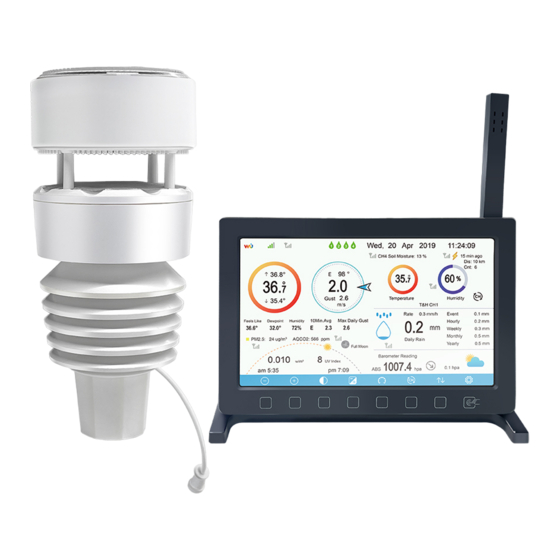
- Page 2 Overview Display console Figure 1: Display console Temperature, humidity and barometric 3-in-1 sensor 2. Micro SD card slot 3. USB Port 4. Power jack Table 1: Display console identification Note: The USB port in the console of weather station is only for firmware update, not for data communication (USB cable not included).
- Page 3 Figure 7: Display Console Screen Layout Description Description Outdoor temperature Last lightning strikes detected time / distance; daily counts (optional sensor) Outdoor Feels Like/Dew Indoor humidity point/Humidity/10Min. Average Wind Direction/Max Daily Gust PM2.5 concentration(optional RF signal bar for multi-channel sensor) temperature and humidity sensor(optional sensor) RF signal bar for PM2.5...
- Page 4 Indoor temperature Table: Display Date and time Solar Radiation console detailed items console detailed items Soil moisture(optional sensor) Initial Display Console Set Up Initial Display Console Set Up Immediately after power up (inserting power adapter), the unit will turn on the display, and the unit Immediately after power up (inserting power adapter), the unit will turn on the display, and the unit Immediately after power up (inserting power adapter), the unit will turn on the display, and the unit will start to look for reception of the indoor and outdoor sensor data.
- Page 5 Brightness control key Brightness control key Press this key to enhance the Press this key to enhance the brightness Backlight on/off key Press this key to on/off the backlight Press this key to on/off the backlight Background key Press this key to choose between dark background display and light Press this key to choose between dark background display and light background display Pressure display key...
- Page 6 5.4.3.2 Humidity Icon Humidity Range Color Ring Color Ring Humidity Range Color Ring 0%, No signal or 50 to 60 dashes 1 to 10 60 to 70 10 to 20 70 to 80 20 to 30 80 to 90 30 to 40 90 to 99 40 to 50 100%...
- Page 7 While in Scroll display mode, the scroll icon will be displayed next to the indoor humidity, and will scroll every 5 seconds. Note: For multi channel sensors, only the current data of each sensor can be viewed on the console, and no history data will be saved or uploaded to any weather servers.
- Page 8 Figure 10: History record Screen Icon Description File Select key Press this key to clear all history record Press this key to clear all history record Page Select key Press this key to enter particular page of the history data. Each Press this key to enter particular page of the history data.
- Page 9 5.5.2.2 View a specific page of history iew a specific page of history While in History Record Mode, press the While in History Record Mode, press the key to enter the page selection mode: key to enter the page selection mode: Figure Figure 12: view a specific page of history Screen Press...
- Page 10 Solar radiation Rainfall hourly and daily Barometer (REL & ABS) 5.5.4 View Channel Data While in normal display, press the While in normal display, press the key four times to enter Channel Data Mode. Mode. If you purchase the optional sensor, soil moisture sensor or PM2.5 sensor or multi If you purchase the optional sensor, soil moisture sensor or PM2.5 sensor or multi If you purchase the optional sensor, soil moisture sensor or PM2.5 sensor or multi-channel temperature and humidity sensor, their data can be showed on Channel Data screen.
- Page 11 Figure 15: Setup Menu Screen Icon Description Select key Press this key to select the unit or scrolls the value Select key Press this key to select the unit or scrolls the value. Left key Press this key to select the set value. Right key Press this key to select the set value.
- Page 12 Figure Figure 16: Time and date Setup Screen Time setting (hour/minute/second) Time setting (hour/minute/second) Press key to select time setting field, and the hour digit will turn red, press the key to select time setting field, and the hour digit will turn red, press the key to select time setting field, and the hour digit will turn red, press the to change the hour setting.
- Page 13 5.6.4 Temperature unit setting Temperature unit setting Press to change the temperat to change the temperature units of measure between °F and °C. 5.6.5 Barometric unit Press to change the temperature units of measure between to change the temperature units of measure between inHg, mmHg and hpa 5.6.6 Wind speed unit Press...
- Page 14 Figure 18: rename the sensor Screen Press key to select Register setting field, press the key to select Register setting field, press the key to register the key to register the selected sensor 5.6.10 Backlight setting While in Menu Setting Mode, press While in Menu Setting Mode, press key to select Backlight Setup field, press key to select Backlight Setup field, press...
- Page 15 Right key Press this key to select the set value Press this key to select the set value. Up arrow key Press this key to change the activated option field Press this key to change the activated option field Down arrow key Press this key to change the activated option field Press this key to change the activated option field Return key...
- Page 16 sensors that other services don’t support. Weather https://www.wunderground. https://www.wunderground. Weather Underground is a free Underground weather hosting service that allows you to send and view your weather station data real- time, view graphs and gauges, import text data for more detailed analysis and use iPhone, iPad and Android applications available at...
- Page 17 Select Add New Device. Find Personal Weather Station. Select ‘other’ and click Find Personal Weather Station. Select ‘other’ and click ‘Next’. Select ‘Address’ or ‘Manual’ option, and find your local position. Press ‘Next’. Select ‘Address’ or ‘Manual’ option, and find your local position. Press ‘Next’. Select ‘Address’...
- Page 18 This time you will be asked details about your weather station. Go ahead and fill out the form. This time you will be asked details about your weather station. Go ahead and fill out the form. This time you will be asked details about your weather station. Go ahead and fill out the form. After completing the weather station, you will see station After completing the weather station, you will see station ID and key/password ID and key/password.
- Page 19 Figure 21: WU Server setup screen 15. scroll 16. scroll 17. Scroll 18. Scroll 19. return value value field field down down Setup 1) Set Station ID: Press to highlight the Station ID. Enter your station ID. Press to highlight the Station ID. Enter your station ID. Press display the keyboard.
- Page 20 5.6.15 .2 Viewing data on wunderground.com Viewing data on wunderground.com The most basic way to observe your The most basic way to observe your weather station’s data is by using the wunderground.com web weather station’s data is by using the wunderground.com web site.
- Page 21 https://itunes.apple.com/us/app/wu https://itunes.apple.com/us/app/wu-storm/id955957721 Weather Weather Underground: Underground: Forecast Forecast: Android Android application application forecasts forecasts https://itunes.apple.com/us/app/weather https://itunes.apple.com/us/app/weather-underground-forecast/id486154808 https://play.google.com/store/apps/details?id=com.wunderg https://play.google.com/store/apps/details?id=com.wunderground.android.weather&hl=en round.android.weather&hl=en PWS Weather Station Monitor PWS Weather Station Monitor: View weather conditions in your neighborhood, or even right in neighborhood, or even right in your your backyard.
- Page 22 5.6.15.3 Weathercloud server setup server setup To register with Weathercloud follow these steps: To register with Weathercloud follow these steps: Visit weathercloud.net and enter a Username, Email and Password to sign up. and enter a Username, Email and Password to sign up. and enter a Username, Email and Password to sign up.
- Page 23 Figure Figure 31: Weathercloud Server setup screen scroll value scroll value Scroll field Scroll field return to down down Setup Weather Observations Website (WOW) Weather Observations Website (WOW) server setup 5.6.15.4 To have your weather station upload data to the Met Office’s WOW site you will need to complete the To have your weather station upload data to the Met Office’s WOW site you will need to complete the To have your weather station upload data to the Met Office’s WOW site you will need to complete the following steps:...
- Page 24 The actual form is longer, but all questions should be self The actual form is longer, but all questions should be self-explanatory. Complete and submi explanatory. Complete and submit the form. You will receive the following notice on completion: You will receive the following notice on completion: Confirm your email with WOW Confirm your email with WOW Respond to the validation email from W...
- Page 25 Make sure you are (still) logged in to the WOW site. Login as necessary. Now click on “My Sites” in Make sure you are (still) logged in to the WOW site. Login as necessary. Now click on “My Sites” in Make sure you are (still) logged in to the WOW site.
- Page 26 Ecowitt.net server setup server setup 5.6.15.5 Figure Figure 23: Ecowitt Server setup screen scroll value scroll value Scroll field Scroll field return to down down Setup To register with Ecowitt follow these steps: follow these steps: 1) On the Weather Server page, page, set the reporting interval time(default: 1 minute).
- Page 27 You may add a shortcut to the ecowitt.net website on the home page of your phone so that you can You may add a shortcut to the ecowitt.net website on the home page of your phone so that you can You may add a shortcut to the ecowitt.net website on the home page of your phone so that you can visit it just like opening an app.
- Page 28 Weather Map Email Alerts Ecowitt.net is a responsive design and mobile friendly. Simply open your mobile devices web Ecowitt.net is a responsive design and mobile friendly. Simply open your mobile devices web Ecowitt.net is a responsive design and mobile friendly. Simply open your mobile devices web browser, browse to ecowitt.net, and bookmark your dashboard for quick access ecowitt.net, and bookmark your dashboard for quick access.
- Page 29 Customized server setup server setup 5.6.15.7 For highly experienced users, it offers the option to send data to the user highly experienced users, it offers the option to send data to the user’s own server. Press s own server. Press the “setup”...
- Page 30 5.6.16 Wi-Fi scan Figure Figure 25: Select Wi-Fi Network Screen Press key to select the Wi key to select the Wi-Fi network. Press key to confirm and enter the password. key to confirm and enter the password. Press key to return to normal display mode. It is possible that your network is not listed when Wi key to return to normal display mode.
- Page 31 5.6.17 Reset Daily Rain While in Menu Setting Mode, press While in Menu Setting Mode, press key to select Reset Daily Rain Setup field, press Setup field, press key to Reset Daily Rain begin it from 00:00 to 23:00 ,Default Reset Daily Rain begin it from 00:00 to 23:00 ,Default in 00:00 5.6.18 More This screen is for optional sensors calibration and...
- Page 32 Press key to select setting field, press the key to select setting field, press the key to enter option sensors enter option sensors calibration mode or Sensor ID setup mode. calibration mode or Sensor ID setup mode. Figure Figure 27: Soil Moisture Calibration Screen Figure 28: Multi-channel Temperature and Humidity channel Temperature and Humidity Sensor calibaration Screen...
- Page 33 Figure 30: PM2.5, PM10 and CO2 Air Quality Sensor Calibration : PM2.5, PM10 and CO2 Air Quality Sensor Calibration : PM2.5, PM10 and CO2 Air Quality Sensor Calibration Note: To calibrate the optional soil moisture sensor, please refer to the manual of the WH51 soil moisture To calibrate the optional soil moisture sensor, please refer to the manual of the WH51 soil moisture To calibrate the optional soil moisture sensor, please refer to the manual of the WH51 soil moisture senor.
- Page 34 Figure 31: Sensors ID Sensors ID setup Screen This screen list all sensors can work with HP25 all sensors can work with HP2564 console. This package just included W his package just included WS90 outdoor sensor array and T&HP (Temperature, humidity and pressure) indoor sensor. These two sensors signal array and T&HP (Temperature, humidity and pressure) indoor sensor.
- Page 35 pop up the pop up the Scroll field Scroll field return to keyboard or keyboard or down Setup confirm the confirm the operation operation 5.7 Alarm Setting Mode Figure 32: Alarm Setting Screen...
- Page 36 Icon Description Select key Press this key to select the unit or scrolls the value Press this key to select the unit or scrolls the value Select key Press this key to select Press this key to select the unit or scrolls the value. Left key Press this key to select the set value Press this key to select the set value.
- Page 37 To adjust the parameter, press to scroll to the parameter you wish to change. Press highlight the sign (positive vs. negative, if applicable) and significant digit. Press change the calibrated value. Parameter Type of Default Typical Calibration Source Calibration Temperature Offset Current Red Spirit or Mercury Thermometer (1)
- Page 38 psychrometer. (3) The display console displays two different pressures: absolute (measured) and relative (corrected to sea-level). To compare pressure conditions from one location to another, meteorologists correct pressure to sea-level conditions. Because the air pressure decreases as you rise in altitude, the sea-level corrected pressure (the pressure your location would be at if located at sea-level) is generally higher than your measured pressure.
- Page 39 the internet, radio, television or newspapers. The purpose of your weather station is to measure he internet, radio, television or newspapers. The purpose of your weather station is to measure he internet, radio, television or newspapers. The purpose of your weather station is to measure conditions of your surroundings, which vary significantly from location to location.
- Page 40 5.9.6 Clear Max/Min Press key to select Clear Max/Min. Press key to popup the Message Box ”Clear the max/min record?” Press to select Yes or No. Press the key to confirm the selection. 5.9.7 Backup data Press key to select Backup data. Press key to popup the Message Box ”Copy history data to SD card?”...
- Page 41 24 - 31 mph, or 38.6 - 49.9 km/h String breeze 31 - 38 mph, or 49.9 - 61.2 km/h Near gale 38 - 46 mph, or 61.2 - 74.1 km/h Gale 46 - 54 mph, or 74.1 - 86.9 km/h Strong gale 55 - 63 mph, or 88.5 - 101.4 km/h Storm...
- Page 42 Pressure rapidly decreases, temperature ≤0℃ Note: When outdoor temperature is below 0 and the forecast is Rainy or Stormy, the LCD will display Note: When outdoor temperature is below 0 and the forecast is Rainy or Stormy, the LCD will display Note: When outdoor temperature is below 0 and the forecast is Rainy or Stormy, the LCD will display Snowy and Storm Snowy 6.4 Lightning Alert...
- Page 43 Day 7 Day 20 Day 8 Day 21 Day 9 Day 22 Day 10 Day 23 Day 11 Day 24 Day 12 Day 25 Day 13 Day 26 Full Moon New Moon Indoor sensor Specification Temperature range -10°C – 60°C (14°F - 140°F) Temperature resolution 0.1°C, or 0.1°F Humidity range...
- Page 44 This manual may contain errors and misprints. However, the information in this manual is regularly reviewed and corrections made in the next issue. We accept no liability for technical errors or printing errors, and their consequences. All trademarks and copyrights are acknowledged. www.froggit.de...
- Page 45 Hereby we declare, HS-Group GmbH & Co.KG, Escherstr. 31, 50733 D-Cologne, that this product is in compliance with the essential requirements and other relevant provisions of Directive 2014/53/EU. The declaration of conformity for this product can be found at: www.froggit.de or on request.
Need help?
Do you have a question about the HP2000 and is the answer not in the manual?
Questions and answers