
Related Manuals for HighPoint Rocket 1628A


Summary of Contents for HighPoint Rocket 1628A
- Page 1 Rocket 1628A (R1628A) 8x NVMe Port to PCIe 5.0 x16 NVMe Switch Adapter Quick Installation Guide V1.01...
-
Page 2: System Requirements
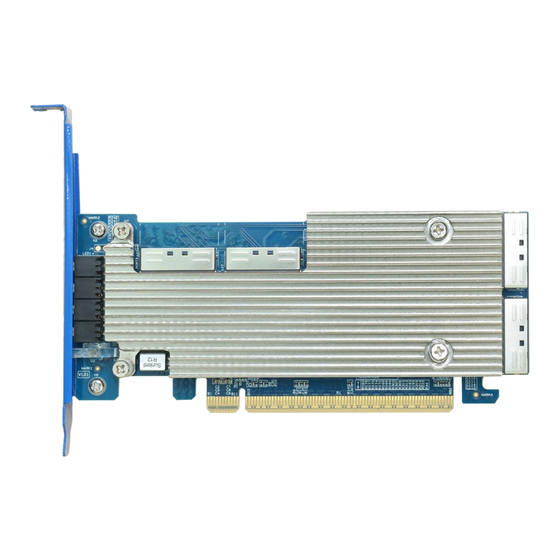
System Requirements PC Requirements System with a free PCIe5.0 (or 3.0 or 4.0) x16 slot All the Operating Systems with Native NVMe Driver R1628A Kit Content 1x R1628A NVMe Switch Adapter 1x Quick Installation Guide 1x Low Profile Bracket... - Page 3 R1628A Hardware Front View Four MCIO Connector PCIe 5.0 x16 Host Interface Full-height bracket (optional low-profile bracket included)
- Page 4 LED View SSD1 LED SSD0 LED SSD3 LED SSD2 LED SSD5 LED SSD4 LED SSD7 LED SSD6 LED Status LED Fault LED Note: Please refer to the detailed description of LED colors and their status in the R1628A NVMe Switch Adapter User Guide on the official website.
-
Page 5: Hardware Installation
Hardware Installation The R1628A provides four MCIO connectors. These connectors accept a variety of HighPoint Certified Cable Accessories (see the Accessories section towards the end of this guide for more information). The following steps explain how to connect U.2 NVMe SSDs directly to the R1628A using HighPoint CIO8-8639-110 cable. - Page 6 Align the R1628A to one of the motherboard’s available slots. Press down gently but firmly to seat the R1628A correctly in the slot. Note: Replace the full-height bracket on the R1628A with the optional low-profile bracket if required by your system.
- Page 7 Connect the SFF-8639 connector of the CIO8-8639-110 cable to the NVMe SSD, and connect the 15-pin SATA power connector to the power supply. SFF-8639 15-pin SATA power connector Connect the MCIO connector of the CIO8-8639-110 cable to the R1628A.
- Page 8 Connect the remaining NVMe SSDs to the R1628A as described above. Turn on the power to the system. Note: Please ensure the cables are securely connected to the R1628A’s device ports and the NVMe SSDs or backplanes. Loose connections can lead to various problems, including instability, slower-than-expected performance, and dropped disks.
- Page 9 Optional Certified Cable Accessories CIO8-8639-110 MCIO (x8) Host to U.2 SFF-8639 Device cable with a 15-pin SATA power connector. Each cable supports two NVMe SSDs. Length: 1M (100cm)/39.37" CIO8-CIO8-110 MCIO (x8) Host to MCIO (x8) Device cable. Each cable can host up to two NVMe SSDs. Length: 1M (100cm)/39.37"...
- Page 10 A variety of guides and FAQs are available for the R1628A NVMe Switch Adapter. For Documentation and more information about this product, please visit the following website: https://www.highpoint-tech.com/nvme-aic/r1628a Certified Accessories: https://www.highpoint-tech.com/nvme-accessories FAQ & Troubleshooting: FAQ - HighPoint Technologies, Inc. (helpjuice.com)
-
Page 11: Customer Support
Customer Support If you encounter any problems while utilizing the R1628A or have questions about this or any other HighPoint Technologies, Inc. product, please contact our Customer Support Department. Web Support: https://www.highpoint-tech.com/support-and-services HighPoint Technologies, Inc. websites: https://www.highpoint-tech.com © Copyright 2024 HighPoint Technologies, Inc. All rights reserved.
Need help?
Do you have a question about the Rocket 1628A and is the answer not in the manual?
Questions and answers