Advertisement
Quick Links
BEFORE YOU BEGIN
1. Please read the instructions carefully and verify that each
item is in the list.
2. Please retain these installation instructions for further
reference and parts ordering information.
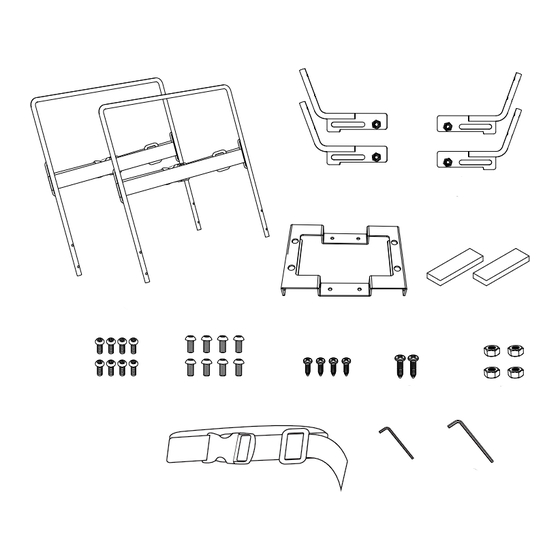
PRODUCT INFORMATION
1
Bracket C (with 38x600mm tie strap)
2
Bracket B-1
3
Bracket B-2
4
Bracket A
5
EVA foam
6
M3x10mm round head hexagon socket screw
7
M6x14mm round head hexagon socket screw
8
M6x15mm cross large flat head self-tapping nail
9
M6x25mm cross large flat head self-tapping nail
10
M6 nut
11
38x450mm tie strap
12
M3 hexagonal L wrench
13
M6 hexagonal L wrench
INSTALLATION TIPS
STEP 1
1
As shown in the diagram, assemble the brackets [1,2,3]
using 4 M3x10mm screws [6]. Repeat the process to
assemble another bracket.
K
www.kemimoto.com
K
PRODUCT MANUAL
SKU: B1406-04201BK
x2
x2
x2
x1
x2
x8
x8
x4
x2
x4
x1
x1
x1
6
6
6
6
2
3
3
2
Designed by Kemimoto Group
Complete journey of dreams
IMPORTANT
1. Please read the installation instructions carefully before you start.
2. If the vehicle is clean and free of other debris, it will be easy to install.
3. For your safety and to ensure a satisfactory installation, please
complete all the installation steps in the order shown below.
1
6
STEP 2
4
1
7
Use 8 M6x14mm screws [5] and 4 nuts [10] to combine the
bracket [4] with the assembly from step 1. Then attach the EVA
foam [5] to the bracket [4] in the position shown in the diagram.
(Note: DS do not require EVA foam [5].)
1 of 2
K
Kemimoto All Rights Reserved,Infringement must be prosecuted.
2
4
7
8
11
10
10
5
3
5
9
10
12
13
Advertisement

Related Manuals for Kemimoto B1406-04201BK

Summary of Contents for Kemimoto B1406-04201BK
- Page 1 [4] with the assembly from step 1. Then attach the EVA assemble another bracket. foam [5] to the bracket [4] in the position shown in the diagram. (Note: DS do not require EVA foam [5].) 1 of 2 www.kemimoto.com Designed by Kemimoto Group Kemimoto All Rights Reserved,Infringement must be prosecuted.
- Page 2 Then use a supplied strap [11] to Release the strap buckles on the bracket and place your tie the refrigerator handle to the golf cart frame. refrigerator in the bracket. 2 of 2 www.kemimoto.com Designed by Kemimoto Group Kemimoto All Rights Reserved,Infringement must be prosecuted.
Need help?
Do you have a question about the B1406-04201BK and is the answer not in the manual?
Questions and answers