Advertisement
Quick Links
Advertisement

Subscribe to Our Youtube Channel
Related Manuals for NATHAN JAMES Aaron 56001


Summary of Contents for NATHAN JAMES Aaron 56001
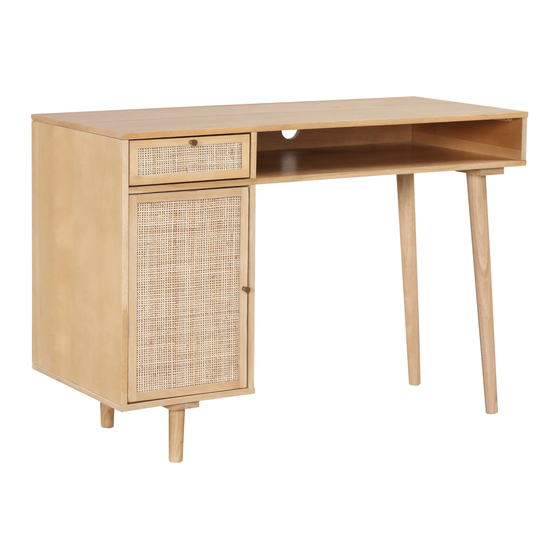
- Page 1 Let’s build the Aaron Desk SKU 56001 Scan me! Free Lifetime Warranty 23-0414...
-
Page 2: What's Included
Ok, let’s What’s included get rolling Description Desktop Subassembly This should be easy, just follow Large Side Panel (Left) our instructions and you will be back to Netflix in no time. Small Side Panel (Right) Estimated time for assembly D Cabinet Back Panel 60:00 Cabinet Bottom Panel What you need... - Page 3 The goods IMPORTANT 1. Do not tighten bolts / screws completely until all bolts / screws are lined up and inserted into holes. 2. Do not over tighten screws and bolts to avoid stripping.
- Page 4 What’s included Description 1/4” x 1 1/8” Hex Button Head Bolt 1/4” x 2” Hex Button Head Bolt 1/4” x 3/8” Spring Washer 1/4” x 1/2” Flat Washer 1/4” x 12mm Barrel Nut Allen Key 8*20mm Wooden Dowel Knob 5/32” x 3/4” Knob Bolt Cam Bolt Cam Lock Hinge...
- Page 6 Step 1 Alright, let’s get started! Start off by inserting the Cam Bolts (10) into the holes indicated below in the Large Side Panel (B), Small Side Panel (C) and Cabinet Bottom Panel (E). Tighten using a Phillips head screwdriver (not included). Step 2 Next, insert the Wooden Dowels (7) into the holes indicated below in the Large Side Panel (B).
- Page 7 How to use Did you know? Cam locks are used to join two panels together, cam locks usually the edge of one to the flat side of another. First, your cam bolt (or cam pin) will need to be properly inserted into the flat side of the board. Important Note: Only tighten the cam bolt until it is secure.
- Page 8 Step 3 Now insert the Wooden Dowels (7) into the side of the Cabinet Back Panel (D). Slide the Small Side Panel (C) into place by lining up the holes with the Wooden Dowels and Cam Bolts you already inserted into the Cabinet Back Panel (D).
- Page 9 Step 5 Now it’s time to attach the cabinet you’ve been building to the Desktop Subassembly (A) using the Wooden Dowels (7). Secure in place using the 1/4” x 1 1/8” Hex Button Head Bolts (1). Don’t forget to use the 1/4” x 1/2” Flat Washers (4) and 1/4” x 3/8” Spring Washers (3).
- Page 10 Step 6 You’re halfway there and doing great! Now it’s time to attach the legs. Attach the Short Legs (G) and Long Legs (H) by twisting into place.
- Page 11 Step 7 Now insert the Shelf Pins (14) into the cabinet at your desired height. Step 8 Next, slide the Adjustable Shelf (F) into the cabinet on top of the Shelf Pins you inserted in Step 7.
- Page 12 Step 9 Almost done! Let’s get the hinges installed now. To do this, place the Hinges (12) in the Door (I) and secure in place using the M3 x 15mm Screws (13). Step 10 Next, attach the Door (I) to the desk by securing the Hinges in place using the M3 x 15mm Screw (13).
- Page 13 Step 11 Attach the Knobs (8) to the desk using the 5/32” x 3/4” Knob Bolts (9). Step 12 Finally, secure your new desk to the wall to prevent tipping. Secure the Plastic Brackets (16)to your wall and the desk using the appropriate screws listed below.
- Page 14 How to use drywall anchors 1. Drill hole with 5/16” bit 2. Pinch and insert 3. Begin tightening 4. Anchor is secure when screw is tightened to 100%.
- Page 15 No heartburn, when we handle the return Give us a call 1-866-619-1004 or shoot us a message at help@nathanjames.com we will issue you a free replacement with zero hassle. Our way Their way Give us a call Re-package item Replacement Schedule pick up Track package Replacement...
-
Page 16: Proper Use
Any modifications will Nathan James and its parent companies cannot present the risk of creating significant safety issues which NJ will not be responsible for. be held legally responsible for any injuries or death resulted from failure to follow instructions or improper use of this product. - Page 17 If you are happy with your product, tell your friends and family about us or even better leave us a review online. Spreading the word gives us the opportunity to make more people happy and keep our prices low for your next purchase. Brooklyn Burdon Founder, Nathan James...
Need help?
Do you have a question about the Aaron 56001 and is the answer not in the manual?
Questions and answers