Advertisement
Quick Links
Technical Support and E-Warranty Certificate www.vevor.com/support
CAR SIDE AWNING USER MANUAL
We continue to be committed to provide you tools with competitive price.
"Save Half", "Half Price" or any other similar expressions used by us only represents an
estimate of savings you might benefit from buying certain tools with us compared to the major
top brands and does not necessarily mean to cover all categories of tools offered by us. You
are kindly reminded to verify carefully when you are placing an order with us if you are
actually saving half in comparison with the top major brands.
Advertisement

Subscribe to Our Youtube Channel
Related Manuals for VEVOR ATSA1420


Summary of Contents for VEVOR ATSA1420
- Page 1 Technical Support and E-Warranty Certificate www.vevor.com/support CAR SIDE AWNING USER MANUAL We continue to be committed to provide you tools with competitive price. "Save Half", "Half Price" or any other similar expressions used by us only represents an estimate of savings you might benefit from buying certain tools with us compared to the major top brands and does not necessarily mean to cover all categories of tools offered by us.
- Page 2 This is the original instruction, please read all manual instructions carefully before operating. VEVOR reserves a clear interpretation of our user manual. The appearance of the product shall be subject to the product you received. Please forgive us that we won't inform you again if...
-
Page 3: Specifications
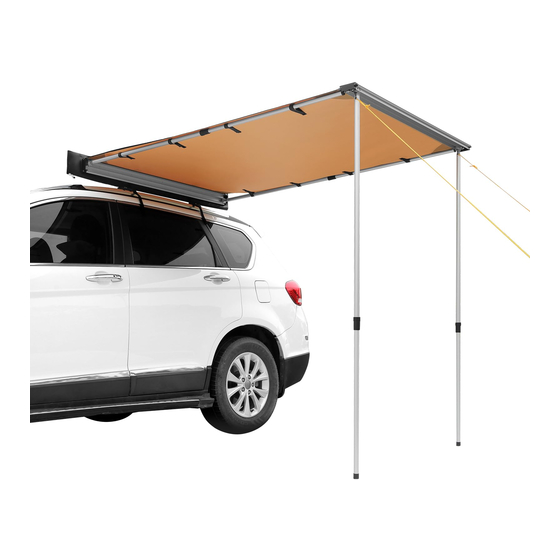
SPECIFICATIONS ATSA1420 Model Product Size 4.6×6.6ft Color Biege ATSA2025 Model 6.6×8.2ft Product Size Color Biege COMPONENTS FITTING PICTURE LIST-SPECIFICATIONS Manual x1 Stainless Steel Ground Peg x4 Black Powdercoated Steel L - Bracket x2 lack Powdercoated Steel Backing Plate x2 2.7m Rope with Plastic Fixed... -
Page 4: Installation
Do not attempt to set up the awning in windy conditions. All guy ropes must be properly attached to the awning and pegged to the ground at all times. Guy ropes are trip hazards in the day and night. ... - Page 5 ●FOR ROOFTOP BASKET NOTE: You can choose option A or option B to install according to your requirement. OPTION A OPTION B ●FOR CROSS BAR (DRILLING MIGHT BE NEEDED) NOTE: If there are no holes in the cross bar, it is necessary to drill the holes before installing the bracket.
- Page 6 STEP3 STEP4 Open the lateral support poles. Rotate the lower part of the poles to adjust the length of the pole. STEP5 STEP6 Unfold the awning. Open the vertical support poles. STEP7 Rotate the lower part of the poles to adjust standing height.
- Page 7 STEP8 Tie camping ropes through joint holes, set ground pegs and tension all ropes. SETUP PROCEDURE 1. Clean only with cold water and a soft brush-do not use soap or detergent. 2. Do not expose to petrol, oil or solvents 3.
- Page 8 Technical Support and E-Warranty Certificate www.vevor.com/support...
Need help?
Do you have a question about the ATSA1420 and is the answer not in the manual?
Questions and answers