Advertisement
Available languages
Available languages
Quick Links
INSTALLATION INSTRUCTIONS FOR PART 95-8244HG
Toyota Avalon 2013-up
KIT FEATURES
• Double DIN radio provision
• Painted high-gloss black
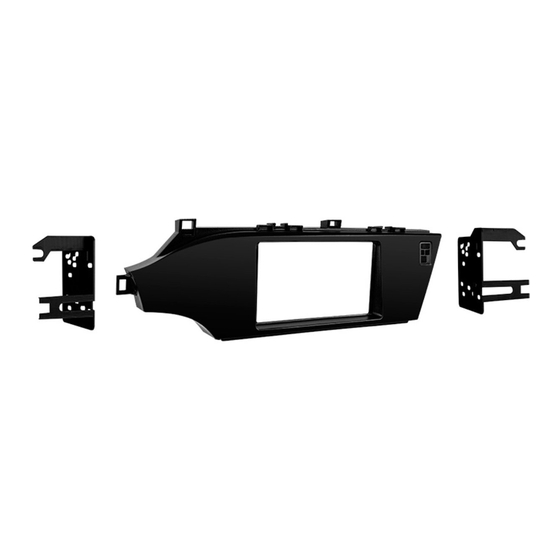
KIT COMPONENTS
• A) Radio housing • B) Radio brackets • C) (1) Passenger Air Bag Light board cover • D) (2) Panel clip mounts
• E) (7) #4 x 3/8" pan-head Phillips screws • F) (1) Air-Bag sticker (not shown)
A
B
WIRING & ANTENNA CONNECTIONS (sold separately)
Wiring Harness: • 70-1761 Toyota wire harness • TYTO-01 Toyota amplified interface
Antenna Adapter: • 40-LX11 Toyota/Lexus antenna adapter
METRA. The World's best kits.
APPLICATIONS
95-8244HG
C
D
1-800-221-0932
™
Dash Disassembly
–
Toyota Avalon 2013-up .....................................2-5
Kit Preparation
Kit Assembly
– Double DIN radio provision ................................... 7
TOOLS REQUIRED
• Panel removal tool • Phillips screwdriver
E
• Socket wrench
CAUTION: Metra recommends disconnecting the
negative battery terminal before beginning any
installation. All accessories, switches, and especially
air bag indicator lights must be plugged in before
reconnecting the battery or cycling the ignition.
NOTE: Refer to the instructions included with the
aftermarket radio.
metraonline.com
Table of Contents
.................................................
© COPYRIGHT 2014 METRA ELECTRONICS CORPORATION
6
Advertisement

Related Manuals for Metra Electronics 95-8244HG


Summary of Contents for Metra Electronics 95-8244HG
- Page 1 INSTALLATION INSTRUCTIONS FOR PART 95-8244HG APPLICATIONS Table of Contents Toyota Avalon 2013-up 95-8244HG Dash Disassembly – Toyota Avalon 2013-up ........2-5 ..........Kit Preparation Kit Assembly KIT FEATURES – Double DIN radio provision ........7 • Double DIN radio provision • Painted high-gloss black KIT COMPONENTS •...
- Page 2 95-8244HG Dash Disassembly 1. Unclip and remove the a/c vent 3. Remove (4) 10mm bolts (2 on Upper bolts panel above the factory radio and top and 2 on bottom) securing surrounding the instrument cluster. the factory radio then unclip and (Figure A) remove.
- Page 3 95-8244HG Dash Disassembly 4. Remove (4) small Phillips screws securing the panel clip and screw mount to the factory radio. Retain for kit assembly. (Figure E) 5. Remove (9) small Phillips screws securing the radio chassis to the main panel of the factory radio.
- Page 4 95-8244HG Dash Disassembly 6. Remove (2) remaining Phillips screws securing the Passenger Air Bag Light board to the main factory radio panel. Retain board for kit assembly. (Figure G) 7. Remove the remaining (2) yellow panel clips and retain for kit assembly.
- Page 5 95-8244HG Dash Disassembly 8. Remove (2) Phillips screws and then unclip the chrome trim around the outside of the radio/climate control assembly. Retain for kit assembly. (Figure I) 9. Remove the radio brackets and the climate control from the factory radio.
- Page 6 95-8244HG Kit Preparation 1. Attach the Passenger Air Bag Light 5. Attach the (2) panel clip mounts board to the radio housing with the to the radio housing using (4) factory hardware. (Figure A) #4 x 3/8” Phillips screws supplied.
- Page 7 95-8244HG Kit Assembly Double DIN radio provision 1. Mount the radio brackets to the radio with the screws supplied with the radio. (Figure A) 2. Mount the radio/bracket assembly to the radio housing/climate control assembly with the factory hardware. 3. Locate the factory wiring harness and antenna plug in the dash.
- Page 8 INSTALLATION INSTRUCTIONS FOR PART 95-8244HG NOWLEDGE IS OWER Enhance your installation and fabrication skills by enrolling in the most recognized and respected mobile electronics school in our industry. Log onto www.installerinstitute.com or call 800-354-6782 for more information and take steps toward a better tomorrow.
- Page 9 INSTRUCCIONES DE INSTALACIÓN PARA LA PIEZA 95-8244HG AplicAciones Indice Toyota Avalon 2013 y mas 95-8244HG Desmontaje del tablero – Toyota Avalon 2013 y mas.........2-5 Preparación del kit ..........6 Ensamble del kit cArActerísticAs del kit • Provisión de radio doble DIN –...
- Page 10 95-8244HG Desmontaje del tablero 1. Desenganche y quite el panel de 3. Quite los (4) pernos de 10 mm Pernos superiores la rejilla de aire acondicionado de (2 arriba y 2 abajo) que sujetan arriba del radio de fábrica y que el radio de fábrica, luego...
- Page 11 95-8244HG Desmontaje del tablero 4. Quite los (4) tornillos Phillips que sujetan el gancho del panel y atornille el soporte al radio de fábrica. Retenga para el ensamble del kit. (Figura E) 5. Quite los (9) tornillos Phillips pequeños que sujetan el chasís del radio al panel principal del radio de fábrica.
- Page 12 95-8244HG Desmontaje del tablero 6. Quite los (2) tornillos Phillips restantes que sujetan el tablero de la luz de la bolsa de aire del pasajero al panel de radio de fábrica principal. Retenga el tablero para el ensamble del kit.
- Page 13 95-8244HG Desmontaje del tablero 8. Quite los (2) tornillos Phillips y luego desenganche la moldura cromada de alrededor del exterior del ensamble del control del radio/ clima. Retenga para el ensamble del kit. (Figura I) 9. Quite los soportes del radio y el control de clima del radio de fábrica.
- Page 14 95-8244HG Preparación del kit 1. Coloque el tablero de la luz de 5. Coloque los (2) dos soportes del la bolsa de aire del pasajero en gancho del panel en la carcasa la carcasa del radio usando la del radio usando los (4) tornillos tornillería de fábrica.
- Page 15 95-8244HG Ensamble del kit Provisión de radio doble DIN 1. Monte los soportes del radio en el radio con los tornillos que vienen con el mismo. (Figura A) 2. Monte el conjunto del radio/soporte al conjunto de la carcasa del radio/ control de clima utilizando la tornillería de fábrica.
- Page 16 INSTRUCCIONES DE INSTALACIÓN PARA LA PIEZA 95-8244HG EL CONOCIMIENTO ES PODER NOWLEDGE IS OWER Mejore sus habilidades de instalación y fabricación Enhance your installation and fabrication skills by inscribiéndose en la escuela de dispositivos electrónicos enrolling in the most recognized and respected mobile electronics school in our industry.
Need help?
Do you have a question about the 95-8244HG and is the answer not in the manual?
Questions and answers