Advertisement
Quick Links
Advertisement

Subscribe to Our Youtube Channel
Related Manuals for SUNON DTM8002R/L


Summary of Contents for SUNON DTM8002R/L
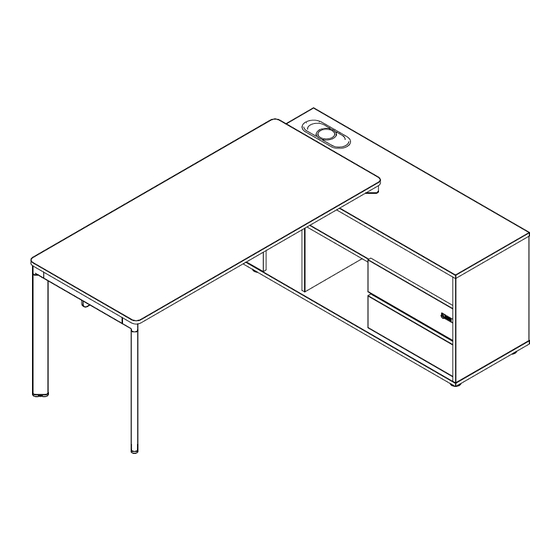
- Page 1 WAX Manager Table DTM8002R/L INSTALLATION MANUAL...
-
Page 2: Attention Points
ATTENTION POINTS Take soft, ensure the protect foam below ATTENTION Over 2 staff carry to keep safety Any question contact Sunon... - Page 3 explosive view name item Item name Desk Top Middle panel 1 Middle panel 2 Modesty panle+accessary Fixed suppport beam Metal frame below desk top Top shelf Fixed shelf Bottom board Bottom drawer Upper drawer Left panel Right panle Back board...
- Page 4 ACCESSARY LIST LD Bottom LD bottom Adjustable leg modesty modesty Cliper support Up adjustable New 3-1 Wirebox sockets connector mechanical Flat head self- Countersunk self Not regular code lock tapping tapping screws screws countersunk Hill screw Cross screew hex screw Cross flat Flat head self-tapping three-section rail...
- Page 5 ACCESSARY LIST Main desk beam Main Table support Oval column beam Longer connector Smaller connector Connector B Beauty Sticker Longer connector B...
- Page 6 Step 1. With 10 cross screws M6*15 to fix the adjustable legs with the bottom board of the side cabinet Step 2. with 1 D80 wirebox fix on the hole of the bottom board...
- Page 7 Step 1.With the Three-one connector to fix the Left side board with back board Step 2.To fix the middle stand board1,middle stand board2, fixed shelf, drawer panel with the new 3-1 connector Step 3. with the step 1 &2 to connector with right side panel,use the same 3-1 connector Step 4.With the Hill screws to connect the items after above 3 step and bottom board.
- Page 8 Step 1. With the new 3-1 connector to fix top board and with the items after above steps Step 2.To fixed the pup-up wirebox with top board, and fixed together with the base plate...
- Page 9 Step1. With the new 3-1 connector to fix left side drawer panle ,right side drawer panel, drawer back board, and inster the drawer bottom board into the slot Step 2.Fixed the Drawer surface and locker Step 3.Fixed the three section rails together with the side drawer panle(Pay attention to the innder rail direction) Step 4.Use the 3-1 connector to fix the drawer surface and drawer.
- Page 10 Step 1.Use the Flat head self-tapping screws to connect the slider rail and middle board Step 2.To insert the two drawer into the side cabinet, inner rain connect together with outer rail...
- Page 11 Step 1. With the inner hexagon screw M8*40 connect the round stand beam+longer connector, Use M8*30 Cylindrical head hexagon to connector with staff table Step 2.With the innder hexagon screws M8*40 to fix the smaller beam, and connect the M8*30 together with the staff beam Step 3.With the inner hexagon screw M6*14 to fix the main table beam,and connector with the fixed metal leg Step 4.WIth Inner hexagon screwM6*14 to connect the hanger...
- Page 12 Step 1.With the LD bottom panel to support main body and additional body , fixed with Cross flat head screws Step 2.With the Large flat head self tapping screws and LD botton modesty panel to fix together with desk top...
- Page 13 Step1. Fixed with the screw M6*50 for desk top and metal frame...
- Page 14 Use Cylindrical head hexagon screw 2 nos M8*70 to fix the side cabinet and metal frame . From the bottom of the side cabiet to upper to fix...
- Page 15 Pay attention for the Quality checking Product cleanning Attention points Product Hand over Cleanning site...
- Page 16 China Sunon Technological Innovation Park The Intersection of Gaoxin No.10 Road and Airport City Avenue, Xiaoshan District, Hangzhou, Zhejiang, China TEL: 4008 600 666 Website...
Need help?
Do you have a question about the DTM8002R/L and is the answer not in the manual?
Questions and answers