
Related Manuals for SUNON DAM6026


Summary of Contents for SUNON DAM6026
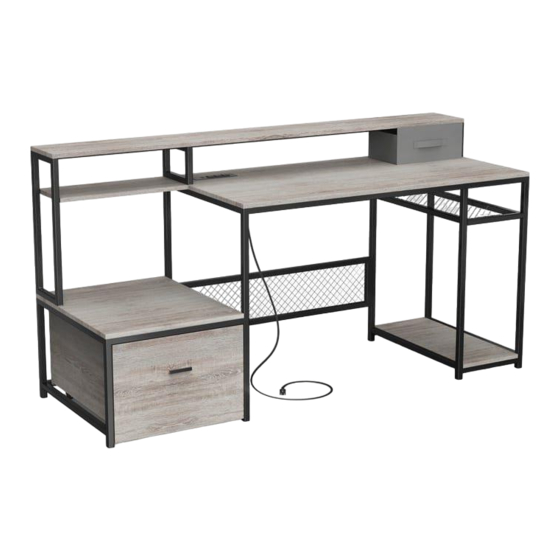
- Page 1 Assembly Manual OFFICE DESK DAM6026 Please read this manual carefully before any operation and keep it properly for future use. Customer Service : sara@isunon.com...
-
Page 2: Components List
Warnings ATTENTION: Lock pin FUNCTION OF KLIX CAM 1/2 RIGHT TURN FOR LOCKING MAKE SURE THE ARROW OVER AGAINST THE TOPSIDE OF CAM LOCK PIN BEFORE INSERTING INTO THE PANEL'S HOLE IMPORTANT! After 180° right turn, if there is a gap between the boards, please check whether the cam lock pin is tightened enough. - Page 3 Assembly Instruction Components List Components List Two People Assemble Time Angle iron NOTE : Component(4)*2PCS Component(5)*2PCS Component(10)*2PCS Component(13)*2PCS Drawer handle Component(24)*2PCS Power socket Drawer 2 2 2...
-
Page 4: Assembly Instruction
Assembly Instruction STEP 1 Connect frame (1) and (2) with tubing (10). STEP 2 Attach tubing (3) and (4) to the assembled frame with screws(K and A). - Page 5 Assembly Instruction STEP3 Attach tubing (5,6 and 9) with screws (A). Attach modesty panel(8) to the assembled frame with screws(B). STEP 4...
- Page 6 Assembly Instruction Attach iron mesh panel(7) and bottom panel(19) with screws (A and STEP 5 Attach table top to assmebled frame with screws(B). STEP 6 B*16...
- Page 7 Assembly Instruction Components List STEP 7 Attach the power socket to the table top with screws(H). STEP 8 Put tubing(11,12,13 and 25)together with screws(A).
- Page 8 Assembly Instruction Components List Attach panels(15 and 17) to the frame assembled in the last step with dowels(J) and screws(B). Please do NOT screw completely until all the STEP 9 screws are right in the holes so that you can adjust the position easily during the assembly process.
- Page 9 Assembly Instruction Components List STEP 11 Attach shelf board to the frame with screws(A,F,D and G). Attach the angle iron to the frame with screws(G) first, and then attach the board(8) with screws(F,D and A). Screw the lock pins on the backside of front board of drawer(20) first. And then insert side boads(21), bottom panel(23) and boards(24) with casters to the slot of the front panel(20) of drawer.
- Page 10 Assembly Instruction Components List attach backboard(22) to the drawer with screws(A).And then attach STEP 13 the handle to front board of drawer(27) with screws(E). STEP 14 Completed drawer.
- Page 11 Assembly Instruction Components List Put the assembled drawer in the bottom-right corner. STEP 15 STEP 16 Place the non-woven drawer where you want to organize your stuffs.
Need help?
Do you have a question about the DAM6026 and is the answer not in the manual?
Questions and answers