Advertisement
Quick Links
INSTALLATION MANUAL
Level of Difficulty
Easy
Installation difficulty levels are based on time
and effort involved and may vary depending on
the installer level of expertise, condition of the
vehicle and proper tools and equipment.
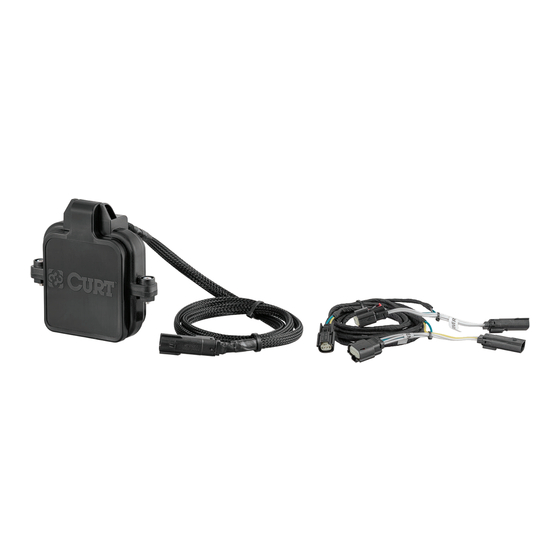
Parts List
Item Qty Description
1
1
Accessory sensor, top half
2
1
Accessory sensor, bottom half
3
1
Wiring harness
4
2
Socket head cap screw, 5/32"
5
2
Flat washer
6
2
Nylock nut
7
10
Zip tie
Tools Required
Ratchet
Torx bit, T-20
Socket, 1/2"
Allen wrench, 5/32"
Socket extension
Cutting tool
CURTMFG.COM
•
PRODUCT SUPPORT: 877.287.8634
WARNING
Do not exceed product rating or tow vehicle lamp load rating, whichever is lower.
Product Photo
1
2
NOTICE
Visit www.curtmfg.com for a full-color copy of this
instruction manual, as well as helpful videos, guides and much more!
Before you begin installation, read all instructions thoroughly.
Proper tools will improve the quality of installation and reduce the time required.
All steps must be followed to ensure the product will function properly. Once installed,
test for proper function by using a test light or connecting a properly wired trailer.
When the hitch cover is flipped open to accept an
accessory, the inner tailgate panel will not operate.
When the hitch cover is closed, the inner taillgate panel will operate normally.
In either open or closed position the truck's taillights will
flash when the button on the truck or key fob is pushed.
Periodic inspection of all wires and connections should be
performed to ensure there is no visible damage or loose connections.
Product Registration and Warranty
CURT stands behind our products with industry-leading warranties. To get copies of the product
warranties, register your purchase or provide feedback, visit: warranty.curtgroup.com/surveys
•
58266-INS-RB
•
02/18/2021
•
ECN7915
•
PAGE 1
58266
3
Advertisement

Subscribe to Our Youtube Channel
Related Manuals for curt 58266


Summary of Contents for curt 58266
- Page 1 Periodic inspection of all wires and connections should be performed to ensure there is no visible damage or loose connections. Product Registration and Warranty CURT stands behind our products with industry-leading warranties. To get copies of the product warranties, register your purchase or provide feedback, visit: warranty.curtgroup.com/surveys CURTMFG.COM •...
- Page 2 Make sure there are no accessories in the receiver tube that can hit the tailgate. Press the lower button on the tailgate to lower the tailgate. CURTMFG.COM • PRODUCT SUPPORT: 877.287.8634 • 58266-INS-RB • 02/18/2021 • ECN7915 • PAGE 2...
- Page 3 1/2" socket to remove the four tailgate and multi-function locking mechanism fasteners. Remove the outer tailgate locking mechanism fasteners (main tailgate) first, followed by the inner tailgate mechanism fasteners (multi-function feature). CURTMFG.COM • PRODUCT SUPPORT: 877.287.8634 • 58266-INS-RB • 02/18/2021 • ECN7915 • PAGE 3...
- Page 4 Close the main tailgate and loosely zip tie any loose wires to the factory harness. Open the main tailgate and reinstall the tailgate cover. NEED CLARITY HERE CURTMFG.COM • PRODUCT SUPPORT: 877.287.8634 • 58266-INS-RB • 02/18/2021 • ECN7915 • PAGE 4...
Need help?
Do you have a question about the 58266 and is the answer not in the manual?
Questions and answers