Advertisement
Quick Links
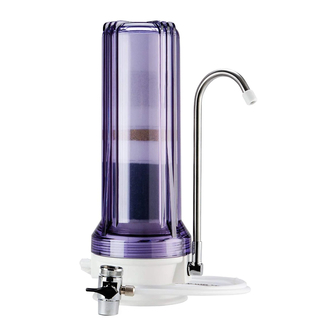
CKC Series and CT10 Series Countertop Water Filter Installation and Conditioning Instructions
Manufactured by: iSpring Water Systems, United States
Parts Availability:
Important - Always use genuine replacement cartridges and parts to guarantee the manufacturer's performance claims.
Spare 10-stage filter cartridge (part #FCT10).
Spare 10" CTO carbon block cartridge (part #FC15).
Spare 10" GAC granular activated carbon cartridge (part #FG15).
Operating Parameters:
Maximum Operating Pressure*: 80 psi (690 Kpa)
Maximum Operating Temperature: 100°F (38°C)
Minimum Operating Pressure: 10 psi (69 Kpa)
Minimum Operating Temperature: 41°F (5°C)
Carton Contents:
The LittleWell CKC series and CT10 series Countertop Water Filter carton contains the following for assembly:
Base with Housing Cap & Spout
Filter Housing (10 inch)
Housing Wrench
Tubing (1/4 inch by 3 ft.)
Metal Diverter Valve with Faucet Thread Adapters (male to male)
Filter Cartridge in shrink wrap (2.5 inch x 10 inch)
1.0 Installation:
1.1 Selecting a position for the filter
The filter is designed to be free standing on flat surfaces, such as countertops. WARNING: For cold water only.
1.2 Installing the filter cartridge
Wash and dry your hands thoroughly and ensure that any open cuts are covered to prevent contamination of the filter cartridge and
housing. Separate the filter cap and housing by unscrewing the housing in a counter clockwise direction (when viewing from above).
Observe the housing O-ring. Remove the shrink wrap from the filter cartridge.
**PLACE THE FILTER WITH THE BLACK CARBON SIDE POINTING DOWN**
Place the center hole of the black carbon end of the filter cartridge into the housing cap (Please ignore the "This side up" text on this
end, which is intended for the undersink model). While making sure the O-ring is in place, screw the housing back on by turning it
in a clockwise direction. Hand tightening is typically enough, but you can use the housing wrench to turn it an additional 1/4 to 1/2
of a turn if necessary. Do not over tighten the housing, as this can make future cartridge replacements difficult.
1.3 Connecting the tubing and diverter valve to kitchen faucet
Remove the aerator from the kitchen faucet. If the faucet is left with a female thread, screw in the included male to male
thread adapter in place of the aerator, then screw the diverter valve into the adapter. The male to male adapter can
typically be hand tightened, but you can use a hex screwdriver or another available tool to tighten it further if needed. If
your faucet already has a male thread, simply screw the diverter valve directly onto the faucet. On the diverter valve,
remove the nut from the 1/4" knob and slip it onto the tubing. Then push the tubing onto the knob, and tighten the nut
down to create the seal.
Advertisement

Related Manuals for Ispring Little Well CKC Series


Summary of Contents for Ispring Little Well CKC Series
- Page 1 CKC Series and CT10 Series Countertop Water Filter Installation and Conditioning Instructions Manufactured by: iSpring Water Systems, United States Parts Availability: Important - Always use genuine replacement cartridges and parts to guarantee the manufacturer's performance claims. Spare 10-stage filter cartridge (part #FCT10).
- Page 2 2.0 Conditioning the Filter The filter should now be ready to fill with water. To avoid any problems caused by airlocks in the filter housing, the unit should be held upside down over the kitchen sink. Partially turn on the cold tap, then pull the valve stem on the diverter valve to allow the water to gently fill the unit for the first time.
- Page 3 1/4” tubing to eliminate any extreme variations in pressure. iSpring Water Systems LLC has been working to make the world's water safe to drink since 2005. The early innovation associated with the LittleWell name has continued well into cyber space with an increasingly sophisticated range of water filtration products being developed to bring the best water purification systems to more people.
- Page 4 WEB: www.123Filter.com Email: support@123Filter.com Local / International: 1-678-261-7611 Office Hours: Monday - Friday 9:00 a.m. - 5:00 p.m. EST Mailing Address: 2480 Industrial Park Blvd, Cumming, GA 30041 iSpring Warranty Registration Form Your Name: Your Email: Your Phone: Order Date...
Need help?
Do you have a question about the Little Well CKC Series and is the answer not in the manual?
Questions and answers