ABB Busch-Watchdog PRO Product Manual
Hide thumbs
Also See for Busch-Watchdog PRO:
- Product manual (40 pages) ,
- Product manual (39 pages) ,
- Product manual (31 pages)

Related Manuals for ABB Busch-Watchdog PRO


Summary of Contents for ABB Busch-Watchdog PRO
- Page 1 Product manual │ 24.06.2024 Busch-Watchdog ® 6851/9-xxx-500 Busch-Watchdog ® 90° BT 6851/22-xxx-500 Busch-Watchdog ® 220° BT 6851/22S-xxx-500 Busch-Watchdog ® 220° select Branding -- Release 2018-01-01...
-
Page 2: Table Of Contents
Table of contents Table of contents Notes on the instruction manual ........................4 Safety ................................5 Information and symbols used ......................5 Intended use ............................6 Improper use ............................6 Target group / Qualifications of personnel ..................7 2.4.1 Operation ............................. 7 2.4.2 Installation, commissioning and maintenance ................ - Page 3 Table of contents Cleaning ............................38 Notes ................................39 Index ................................40 Product manual 2CKA001473B5790 │3...
-
Page 4: Notes On The Instruction Manual
If you pass the device on, also include on this manual along with it. ABB accepts no liability for any failure to observe the instructions in this manual. If you require additional information or have questions about the device, please contact ABB or visit our Internet site at: www.abb.com... -
Page 5: Safety
However, residual hazards remain. Read and adhere to the safety instructions to prevent hazards of this kind. ABB accepts no liability for any failure to observe the safety instructions. Information and symbols used The following Instructions point to particular hazards involved in the use of the device or provide... -
Page 6: Intended Use
ABB is not liable for damages caused by use deemed contrary to the intended use of the device. The associated risk is borne exclusively by the user or operator. -
Page 7: Target Group / Qualifications Of Personnel
Safety Target group / Qualifications of personnel 2.4.1 Operation No special qualifications are required to operate the device. 2.4.2 Installation, commissioning and maintenance Installation, commissioning and maintenance of the device must only be carried out by trained and properly qualified electrical installers. The electrical installer must have read and understood the manual and follow the instructions provided. -
Page 8: Safety Instructions
Safety Safety instructions Danger - Electric voltage! Electric voltage! Risk of death and fire due to electric voltage of 100 to 240 V. Dangerous currents flow through the body when coming into direct or indirect contact with live components. This can result in electric shock, burns or even death Work improperly carried out on current-carrying parts can cause fires. -
Page 9: Information On Protection Of The Environment
Information on protection of the environment Information on protection of the environment Environment Consider the protection of the environment! Used electric and electronic devices must not be disposed of with household waste. – The device contains valuable raw materials that can be recycled. Therefore, dispose of the device at the appropriate collecting facility. -
Page 10: Setup And Function
The Busch-Watchdog are passive infrared motion detectors. They switch connected loads via a timer when heat sources move within the detection range. The remote control and parameter setting is carried out via the ABB-free@home ® Next App app in the respectively most current version. -
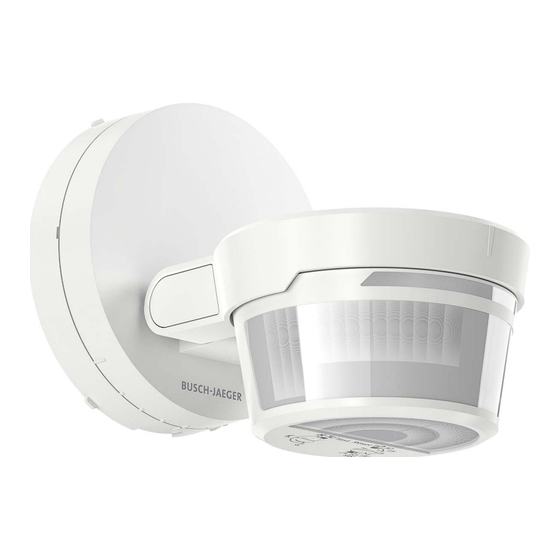
Page 11: Device Overview
Setup and function Article Number Colour 6851/x-131 brown, RAL 8017 6851/x-133 aluminium silver, RAL 9006 6851/x-134 studio white, RAL 9016 6851/x-135 anthracite, RAL 7016 6851/x-136 Stainless steel Tab.2: Colour variants Device overview Fig. 1: Device overview 6851/9-xxx, 6851/22S-xxx and 6851/22-xxx Pos. -
Page 12: Technical Data
Technical data Technical data Designation Value Nominal voltage 230 V AC ± 10 % 50 / 60 Hz Switching capacity 2300 W/VA Switching capacity LEDi 400 VA Maximum power loss < 0.3 W Twilight sensor Typ. 0.5 - 1000 / ∞ lux Switch-off delay 10 seconds - 30 minutes Short-time pulse... - Page 13 Technical data Technical Technical data 6851/22S-xxx Designation Value Front lens 220° select Horizontal detection 220° Maximum transmission range for installation at a height of 2.5 m 16 m in radius ■ ■ for installation at a height of 1.5 m 16 m in radius ■...
-
Page 14: Dimensional Drawings
Technical data Dimensional drawings Fig. 2: Dimensions Fig. 3: Dimensions with design frame (optional) Notice All dimensions are in mm. Product manual 2CKA001473B5790 │14... -
Page 15: Detection Range
Technical data Detection range 90° BT 90° max. m max. max. 1 m 12 m Fig. 4: Detection area 6851/9-xxx Detection range The detection range is 90°. ■ The maximum range is 12 m frontally and 8 m laterally. ■ In addition, the motion detector has a rear field monitoring of one metre. - Page 16 Technical data 220° select BT 220° select max. 16 m Fig. 6: Detection area 6851/22S-xxx Detection range The detection range is 220°. ■ The maximum range is 16 m in radius. ■ The vertical aperture angle is > 5°, so detection with an animal track is possible with wall ■...
-
Page 17: Connection, Installation / Mounting
Connection, installation / mounting Connection, installation / mounting Danger - Electric voltage! Electric voltage! Risk of death and fire due to electric voltage of 100 to 240 V. Dangerous currents flow through the body when coming into direct or indirect contact with live components. -
Page 18: Electrical Connection
Connection, installation / mounting Electrical connection Standard connection Fig. 7: Standard connection Standard connection with NC button Fig. 8: Standard connection with NC button The connected load is switched on for the duration of the set run-on time after the break contact is pressed. - Page 19 Connection, installation / mounting Terminal assignment [⏚] Green/yellow [L] Brown [N] Blue [↓] Grey The stripping length is 11 mm. Fig. 10: Skinning length Attention! Protection of the skinned lengths – Do not remove the wire end sleeves on the device cables. Danger - Electric shock due to short-circuit! Risk of death due to electrical voltage of 100 to 240 V during short-circuit in the low-voltage line.
-
Page 20: Mounting
Connection, installation / mounting Mounting Danger - Electric voltage! Risk of death and fire due to electric voltage of 100 to 240 V. – Work on the 100 - 240 V supply system may only be performed by authorised and qualified electricians. –... - Page 21 Connection, installation / mounting 4. Fit the plinth. – The screw-on options [A] of the base are compatible with any existing holes in old ® Busch-Watchdog – Do not use countersunk screws to mount the base. – Use screws with a head diameter of 6.5 ... 8.5 mm. Fig.
- Page 22 Connection, installation / mounting 7. Attach the cover so that the markings are above each other. Fig. 17: Align markings 8. Turn the upper part clockwise until it engages with an audible click. Product manual 2CKA001473B5790 │22...
- Page 23 Connection, installation / mounting Mounting the design frame (optional) Notice The Busch-Watchdog ® 6851/DR-xxx design frame is not included in the scope of delivery and can be ordered separately. Notice ® The Busch-Watchdog 6851/DR-xxx design frame is suitable for wall and ceiling mounting, but not for corner mounting.
- Page 24 Connection, installation / mounting Mounting the corner adapter (optional) Fig. 20: Mounting the corner adapter (optional) Notice The corner adapter (not included in the scope of delivery) can be used for corner mounting of 6851/22-xxx and 6851/22S-xxx. Product manual 2CKA001473B5790 │24...
-
Page 25: Mounting Situation
Connection, installation / mounting Mounting situation ® There are different types of installation for Busch-Watchdog 6851/9-xxx, 6851/22-xxx and 6851/22S-xxx. Ceiling mounting Fig. 21: Ceiling installation, example canopy Wall mounting 6851/9-xxx Fig. 22: Wall mounting on centre-row house 6851/9-xxx Fig. 23: Wall mounting on centre-row house for limited detection radius 6851/9-xxx Product manual 2CKA001473B5790 │25... - Page 26 Connection, installation / mounting Wall mounting 6851/22-xxx 2,5 m Fig. 24: Wall mounting on a detached single-family house 6851/22-xxx Fig. 25: Wall mounting on detached single-family house with floor lens 6851/22-xxx Wall mounting on a slope 6851/22-xxx Wall mounting on a slope is recommended, for example, for a building on a hill or with a gradient.
- Page 27 Connection, installation / mounting Wall mounting 6851/22S-xxx Fig. 27: Wall mounting on a detached single-family house 6851/22S-xxx Fig. 28: Wall mounting on detached single-family house without floor lens 6851/22S-xxx Installation for curtain monitoring 6851/22S-xxx Fig. 29: Installation for curtain monitoring 6851/22S-xxx Animal corridor 6851/22S-xxx Fig.
-
Page 28: Changing The Range
Connection, installation / mounting Changing the range Change the range as follows: 1. Change the range by raising or lowering the device head (at least 6 metres). Fig. 31: Coverage Installation site Ceiling mounting is not recommended in confined spaces. ■... -
Page 29: Commissioning
Commissioning Commissioning Reduction of the detection range The detection area can be reduced using the film supplied or via the app. The detection angle can be specifically limited by gluing on the enclosed foil. The detection range of the Busch-Watchdog ®... -
Page 30: Changing The Lateral Detection Area
Commissioning Changing the lateral detection area Change the lateral detection area as follows: 1. Adjust the lateral detection range by turning the head of the device. Fig. 34: Lateral detection area Adaptation to slopes To adjust the detection area to the slope, proceed as follows: 1. -
Page 31: Commissioning The Device Via The App
Commissioning Commissioning the device via the app Notice Detailed information on the setting options and operation via ABB-free@home ® ® Next App can be found in the app manual for Busch-Watchdog PRO motion detectors. Walking test The walking test is used to check the detection range by pacing. A run-on time of two seconds is activated during the walking test;... - Page 32 Commissioning Completing the walking test The device terminates the "Walk test" function under the following conditions: Automatically 10 minutes after the start of the walking test if the selector switch has been ■ set to any brightness value. Manual termination of the walking test –...
-
Page 33: Operation
Operation Operation Operating modes for on-site operation Standard function Lighting during advancing twilight remains switched on for 3 minutes after the last detection. Selector switch 6851/9-xxx Selector switch 6851/22-xxx 6851/22S-xxx Fig. 37: Standard operation Notice After switching on the mains voltage, the device is in "Walk test" mode for 10 minutes (see chapter 7.5 "Walking test "... -
Page 34: Operating Modes For Operation Via The App
The lock can only be cancelled via the app. Operating modes for operation via the app Notice Detailed information on the setting options and operation via ABB-free@home ® ® Next App can be found in the app manual for Busch-Watchdog PRO motion detectors. -
Page 35: Led Status Display
Operation LED status display Fig. 40: LED position [1] LED Indication Function Starting the device after the return of voltage, when the Blue LED - flashes twice (1 Hz) device is in factory status and has not been connected with ■... -
Page 36: Reset (Resetting The Device)
Master reset via selector switch directly on the device – Master reset via app Notice Local operation can be disabled via ABB-free@home ® Next App. In this case, both operation and the master reset via the selector switch on the device are deactivated. - Page 37 Operation Master reset via app Notice Detailed information on the setting options and operation via ABB-free@home ® Next App can be found in the app manual for Busch-Watchdog ® PRO motion detectors. Product manual 2CKA001473B5790 │37...
-
Page 38: Maintain
Maintain Maintain Maintenance-free device The unit is maintenance-free. In case of damage, e.g. during transport or storage, do not perform repairs. Once the device is opened, the warranty is void. Access to the device must be guaranteed for operation, testing, inspection, maintenance and repairs (according to DIN VDE 0100-520). - Page 39 Notes Notes Product manual 2CKA001473B5790 │39...
- Page 40 Index Index Activation test ............31, 33 Maintain ............... 38 Maintenance-free device ..........38 Mounting ..............20 Cleaning ............... 38 Mounting situation............25 Commissioning ............29 Commissioning the device via the app ......31 Connection, installation / mounting ......17 Notes ................
- Page 41 Busch-Jaeger Elektro GmbH A member of the ABB Group Freisenbergstraße 2 D-58513 Lüdenscheid, Germany https://new.abb.com/en Customer service: Tel.: +49 2351 956-1600 Copyright © 2024 Busch-Jaeger Elektro GmbH All rights reserved...
Need help?
Do you have a question about the Busch-Watchdog PRO and is the answer not in the manual?
Questions and answers