Table of Contents
Advertisement
Quick Links
Advertisement
Table of Contents

Related Manuals for ABB Busch-Watchdog 6747-500 AGM Series


Summary of Contents for ABB Busch-Watchdog 6747-500 AGM Series
- Page 1 1473-1-8136 │ Rev. 01 │ 11.2012 Operating Instructions ® Busch-Wächter Pos: 2 /#Neustruktur#/Online-Dokumentation (+KNX)/Titelblätter/Waechter/Titelblatt - 6747 WaveLINE @ 28\mod_1347265067099_15.docx @ 232467 @ @ 1 6747-500 AGM-… 220 WaveLINE === Ende der Liste für Textmarke Cover ===...
-
Page 2: Table Of Contents
Operating Instructions ® Busch-Wächter Pos: 4 /#Neustruktur#/Online-Dokumentation (+KNX)/Inhaltsverzeichnis (--> Für alle Dokumente <--)/Inhaltsverzeichnis @ 19\mod_1320649044386_15.docx @ 109653 @ @ 1 Safety ..................................3 Intended use ................................3 Environment ................................3 Setup and function ..............................4 Features of function and equipment ......................4 Detection ranges ............................. -
Page 3: Safety
Operating Instructions ® Busch-Wächter Safety Pos: 6 /#Neustruktur#/Online-Dokumentation (+KNX)/Überschriften (--> Für alle Dokumente <--)/1. Ebene/S - T/Sicherheit @ 18\mod_1302612791790_15.docx @ 103357 @ 1 @ 1 Safety Pos: 7 /#Neustruktur#/Online-Dokumentation (+KNX)/Sicherheitshinweise und Hinweise (--> Für alle Dokumente <--)/Warnhinweise/Sicherheit - 230 V @ 18\mod_1302606816750_15.docx @ 103308 @ @ 1 Warning Electric voltage! Risk of death and fire due to electrical voltage of 230 V. -
Page 4: Setup And Function
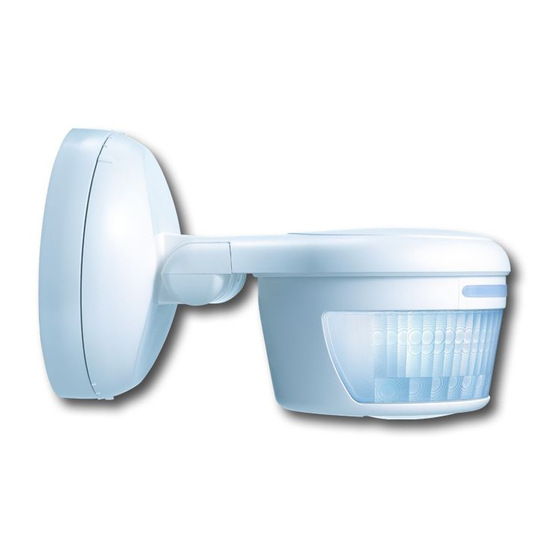
Operating Instructions ® Busch-Wächter Setup and function Pos: 12 /#Neustruktur#/Online-Dokumentation (+KNX)/Überschriften (--> Für alle Dokumente <--)/1. Ebene/A - F/Aufbau und Funktion @ 11\mod_1279185435352_15.docx @ 83027 @ 111 @ 1 Setup and function Pos: 13 /#Neustruktur#/Online-Dokumentation (+KNX)/Aufbau und Funktion/Waechter/Funktionen - 6747 220 WaveLINE @ 28\mod_1347518563988_15.docx @ 233247 @ 222222233332233 @ 1 The Busch-Watchdog 220 WaveLINE is a versatile cableless movement detector with a 220°... -
Page 5: Detection Ranges
Operating Instructions ® Busch-Wächter Setup and function Pos: 17 /#Neustruktur#/Online-Dokumentation (+KNX)/Überschriften (--> Für alle Dokumente <--)/2. Ebene/A - F/Erfassungsbereiche @ 19\mod_1320393658466_15.docx @ 109558 @ 2222221111 @ 1 Detection ranges Pos: 18 /#Neustruktur#/Online-Dokumentation (+KNX)/Überschriften (--> Für alle Dokumente <--)/3. Ebene/U - Z/Übersicht der Erfassungsbereiche @ 18\mod_1308563903037_15.docx @ 106965 @ 3333332123 @ 1 4.2.1 Overview of the detection ranges Pos: 19 /#Neustruktur#/Online-Dokumentation (+KNX)/Erfassungsbereiche/Waechter/Erfassungsbereiche - 6747 220 WaveLINE @ 28\mod_1347518519689_15.docx @ 233233 @ 1333222113333333 @ 1... -
Page 6: Radio Transmission Coverage
Operating Instructions ® Busch-Wächter Setup and function Pos: 23 /#Neustruktur#/Online-Dokumentation (+KNX)/Überschriften (--> Für alle Dokumente <--)/2. Ebene/P - R/Reichweiten der Funkübertragung @ 28\mod_1347342242381_15.docx @ 232587 @ 22 @ 1 Radio transmission coverage Pos: 24 /#Neustruktur#/Online-Dokumentation (+KNX)/Montage/Waechter/Reichweiten der Funkübertragung @ 28\mod_1347342169669_15.docx @ 232573 @ 21 @ 1 220 WaveLINE z. -
Page 7: Technical Data
Operating Instructions ® Busch-Wächter Technical data Pos: 26 /#Neustruktur#/Online-Dokumentation (+KNX)/Überschriften (--> Für alle Dokumente <--)/1. Ebene/S - T/Technische Daten @ 11\mod_1279185386320_15.docx @ 83019 @ 31133333322233 @ 1 Technical data Pos: 27 /#Neustruktur#/Online-Dokumentation (+KNX)/Technische Daten/Waechter/Technische Daten - 6747 @ 28\mod_1347265128303_15.docx @ 232494 @ 332222323333 @ 1 Designation Value Power supply... -
Page 8: Installation And Electrical Connection
Operating Instructions ® Busch-Wächter Installation and electrical connection Pos: 30 /#Neustruktur#/Online-Dokumentation (+KNX)/Überschriften (--> Für alle Dokumente <--)/1. Ebene/M - O/Montage und elektrischer Anschluss @ 23\mod_1336477157864_15.docx @ 209033 @ 222222222222322222222232 @ 1 Installation and electrical connection Pos: 31 /#Neustruktur#/Online-Dokumentation (+KNX)/Sicherheitshinweise und Hinweise (--> Für alle Dokumente <--)/Warnhinweise/Sicherheit - Niederspannungs- und 230 V-Leitungen @ 23\mod_1336558868201_15.docx @ 209164 @ 111111111111 @ 1 Warning Electric voltage! Risk of death due to electrical voltage of 230 V during short-circuit in the low-voltage line. -
Page 9: Mounting
Operating Instructions ® Busch-Wächter Installation and electrical connection Pos: 34 /#Neustruktur#/Online-Dokumentation (+KNX)/Überschriften (--> Für alle Dokumente <--)/2. Ebene/M - O/Montage @ 18\mod_1302615960458_15.docx @ 103424 @ 2222222222222222333333333 @ 1 Mounting Pos: 35 /#Neustruktur#/Online-Dokumentation (+KNX)/Sicherheitshinweise und Hinweise (--> Für alle Dokumente <--)/Warnhinweise/Sicherheit - 230 V @ 18\mod_1302606816750_15.docx @ 103308 @ 22222222222233222333333333 @ 1 Warning Electric voltage! Risk of death and fire due to electrical voltage of 230 V. -
Page 10: Preparing The Installation
Operating Instructions ® Busch-Wächter Installation and electrical connection 6.2.2 Preparing the installation To prepare the installation of the device, perform the following steps: Fig. 4: Preparing the installation Function Locking screw 2 … 5 Clamps 1. Remove the locking screw (1) (if installed). 2. -
Page 11: Mounting Steps
Operating Instructions ® Busch-Wächter Installation and electrical connection 6.2.3 Mounting steps Mount the device to the wall. Do not use countersunk head screws for mounting ∅6,5 mm - 8,5 mm to the wall. Use screws with a head diameter of 6.5 mm - 8.5 ∅3,5 mm - 3,9 mm 2. - Page 12 Operating Instructions ® Busch-Wächter Installation and electrical connection 3. Mount the upper part of the device. The bolting dimensions of the base may be compatible with existing bores on older versions of the Busch-Watchdog. Latch the upper part of the device onto the base. 4.
-
Page 13: Commissioning
Operating Instructions ® Busch-Wächter Commissioning Pos: 38 /#Neustruktur#/Online-Dokumentation (+KNX)/Überschriften (--> Für alle Dokumente <--)/1. Ebene/G - L/Inbetriebnahme @ 11\mod_1279185496977_15.docx @ 83035 @ 332221221122 @ 1 Commissioning Pos: 39 /#Neustruktur#/Online-Dokumentation (+KNX)/Inbetriebnahme/Waechter/Inbetriebnahme - 6747 @ 28\mod_1347265305804_15.docx @ 232536 @ 222222222222233332233 @ 1 Setting / limiting the coverage and the detection range Caution Risk of damaging the device! -
Page 14: Activation Test
Operating Instructions ® Busch-Wächter Commissioning Fig. 8: Adjusting the detection range by masking 3. The range can be specifically limited by gluing on the enclosed foil. – Cut the enclosed foil to the size required. The coverage and the detection range are set. Activation test The activation test can also be triggered via the service remote control (see separate operating manual). -
Page 15: Operation
Operating Instructions ® Busch-Wächter Operation Pos: 41 /#Neustruktur#/Online-Dokumentation (+KNX)/Überschriften (--> Für alle Dokumente <--)/1. Ebene/A - F/Bedienung @ 11\mod_1279185541649_15.docx @ 83043 @ 3222222222233332233 @ 1 Operation Pos: 42 /#Neustruktur#/Online-Dokumentation (+KNX)/Bedienung/Waechter/Bedienung - 6747 @ 28\mod_1347265103443_15.docx @ 232480 @ 22222222322233332233 @ 1 Control elements Fig. -
Page 16: Group Mode
Operating Instructions ® Busch-Wächter Operation 8.2.3 Group mode Fig. 13: Group mode If persons move in the detection area, switching signals will be transmitted. The brightness limit value can freely selected. The switch-off delay has to be set via the actuator (receiver). In this operating mode, several watchdogs and actuators can communicate with each other. -
Page 17: Programming The Device
Operating Instructions ® Busch-Wächter Operation Programming the device 8.4.1 Programming the device For programming, perform the following steps: Fig. 16: Selector switch of the receiver 1. Set the selector switch of receiver 6701 on "P", LED flashes green. Fig. 17: Programming button 2. -
Page 18: Deleting Programmed Devices
Operating Instructions ® Busch-Wächter Operation 8.4.2 Deleting programmed devices Tor delete all programming take the following steps: Fig. 19: Selector switch of the receiver 1. Set the selector switch of receiver 6701 on "E", LED flashes red. Fig. 20: Programming button 2. - Page 19 Operating Instructions ® Busch-Wächter Operation === Ende der Liste für Textmarke Content === Operating Instructions | 1473-1-8136 — 19 —...
- Page 20 PO box contents of this document without prior notice. 58505 Lüdenscheid The detailed specifications agreed to at the time of ordering apply to all orders. ABB accepts no Freisenbergstraße 2 responsibility for possible errors or 58513 Lüdenscheid incompleteness in this document.
Need help?
Do you have a question about the Busch-Watchdog 6747-500 AGM Series and is the answer not in the manual?
Questions and answers