Table of Contents
Advertisement
Available languages
Available languages
Advertisement
Chapters
Table of Contents

Related Manuals for Rexton M-CORE R-LI


Summary of Contents for Rexton M-CORE R-LI
- Page 1 M-CORE R-LI User Guide www.rexton.com...
-
Page 2: Table Of Contents
Content Maintenance and care Hearing instruments Ear pieces Welcome Professional maintenance Your hearing instruments Important safety information Instrument type Getting to know your hearing instruments Further information Components and names Safety information Controls Accessories Hearing programs Operating, transport, and storage conditions Features Disposal information Symbols used in this document Daily use Troubleshooting Charging Country-specific information Turning on and off Service and warranty Switching to standby mode Inserting and removing the hearing instruments 14 Adjusting the volume Changing the hearing program Further adjustments (optional) Special listening situations On the phone Audio streaming with iPhone Bluetooth ... -
Page 3: Welcome
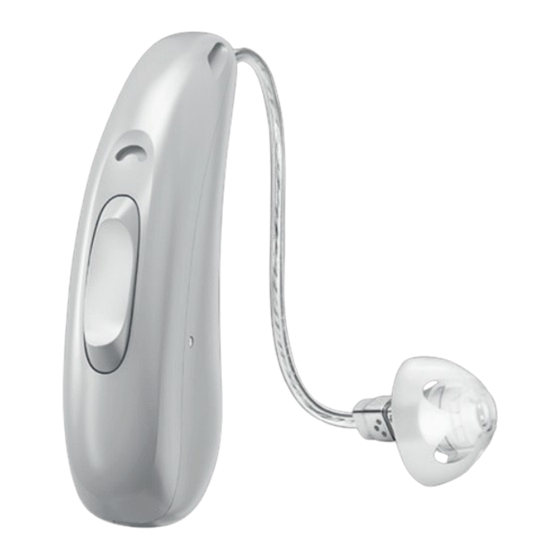
Welcome Your hearing instruments Thank you for choosing our hearing instruments to This user guide describes optional features that accompany you through everyday life. Like anything new, your hearing instruments may or may not have. it may take you a little time to become familiar with them. Ask your Hearing Care Professional to indicate the features that are valid for your hearing instruments. This guide, along with support from your Hearing Care Professional, will help you understand the advantages Instrument type and greater quality of life your hearing instruments offer. Your hearing instruments are a RIC (Receiver-in-Canal) To receive the most benefit from your hearing model. The receiver is placed within the ear canal and instruments, it is recommended that you wear them every connected to the instrument via a receiver cable. The day, all day. This will help you get adjusted to them. instruments are not intended for children under the age CAUTION of 3 years or persons with a developmental age of under It is important to read this user guide and the safety 3 years. manual thoroughly and completely. Follow the A power cell (lithium-ion rechargeable battery) is safety information to avoid damage or injury. permanently built into your hearing instrument. This enables easy charging with our inductive charger. Before using your hearing instruments for the first time, fully charge them. Follow the instructions in The wireless functionality enables advanced audiological the charger's user guide. features and synchronization between your two hearing instruments. Your hearing instruments feature Bluetooth low energy* ® technology allowing for easy data exchange with your smartphone, and for seamless audio streaming with your iPhone**. -
Page 4: Getting To Know Your Hearing Instruments
Getting to know your hearing instruments Components and names It is recommended to familiarize yourself with your new ➌ ➍ hearing instruments. With the instruments in your hand try using the controls and note their location on the ➏ instrument. This will make it easier for you to feel and ➊ ➎ ➋ press the controls while wearing the hearing instruments. If you have problems pressing the controls of your hearing instruments while wearing them, you can ask your Hearing Care Professional whether a ➊ ➎ Ear piece Rocker switch remote control or a smartphone app to control your (control, on/off switch) instruments is available. ➋ Receiver ➏ Side indicator ➌ Receiver cable (red = right ear, blue = left ear) and ➍ Microphone openings receiver connection... -
Page 5: Controls
You can use the following standard ear pieces: Controls With the rocker switch you can, for example, switch Standard ear pieces Size hearing programs. The Hearing Care Professional has Click Sleeve programmed your desired functions to the rocker switch. (vented or closed) Click Dome™ single (open or closed) Rocker switch function Press briefly: Click Dome semi-open Program up/down Volume up/down Click Dome double Tinnitus Function: level up/down TV stream on/off You can easily exchange the standard ear pieces. Read Press for about 2 seconds: more in section "Maintenance and care". Program up/down Volume up/down Custom-made ear pieces Tinnitus Function: level up/down Custom shell TV stream on/off Press for more than 3 seconds: Click Mold™ Turn on/off L = Left, R = Right You can also use a remote control to change hearing programs and adjust the volume of your hearing instruments. With our smartphone app you have even more control options. -
Page 6: Hearing Programs
Daily use Hearing programs To assure comfortable and easy use of your hearing instruments they are equipped with an onbard control element. In addition we offer an app for Android as well as iPhones which makes handling your devices even easier. Contact your Hearing Care Professional for downloading and installing the smartphone app. Read more in section "Changing the hearing program". Charging Place your hearing instruments in the charger. Follow the Features instructions in the The Tinnitus Function generates a sound to distract charger's user you from your tinnitus. guide. You can also find useful tips for charging in the charger's user guide. Low power indication You will hear an alert signal to indicate the power cell is running low. The signal will be repeated every 20 minutes. Depending on the usage of your hearing instruments, you have approximately 1.5 hours to charge your hearing instruments before they stop working. Note that the power cell runtime is reduced if too many features are used simultaneously. -
Page 7: Turning On And Off
Turning on and off Switching to standby mode You have the following options to turn your hearing Via remote control or smartphone app, you can switch instruments on or off. your hearing instruments to standby mode. This mutes the hearing instruments. When you leave standby mode, Via charger: the previously used volume and hearing program are set. Turning on: Take the instruments out of the charger. The startup melody is played in your hearing Note: instruments. The default volume and hearing program ■ In standby mode, the hearing instruments are not are set. turned off completely. They draw some power. Turning off: Place the hearing instruments in the Therefore we recommend to use standby mode only charger. for a short period of time. Note that the charger must be connected to the power ■ If you want to leave standby mode, but the remote supply. For details refer to the charger's user guide. control or app is not at hand: Turn your hearing instruments off and on again (via rocker switch or by Via rocker switch: shortly placing them in the charger until one or more Turning on: Press and hold the lower orange LEDs light up). In this case, the default volume part of the rocker switch until the and hearing program are set. startup melody starts to play. Release the rocker switch while the melody is playing. The default volume and hearing program are set. Turning off: Press and hold upper or lower part of the rocker switch for several seconds. A power down ... -
Page 8: Inserting And Removing The Hearing Instruments
Inserting and removing the hearing instruments Hold the receiver cable at the bend closer to the ear piece. Your hearing instruments have been fine-tuned for your Carefully push the ear piece in right and left ear. Colored markers ➊ the ear canal indicate the side: Twist it slightly until it sits well. ■ red marker = right ear Open and close your mouth to ■ blue marker = left ear avoid accumulation of air in the ear canal. Inserting a hearing instrument: Lift the hearing instrument and For Click Sleeves, take care that the bend of the slide it over the top of your ➋ Click Sleeve is in line with the bend of the receiver cable. CAUTION Correct: Risk of injury! Insert the ear piece carefully and not too deeply into the ear. ■ It may be helpful to insert the right hearing instrument with the right hand and the left hearing instrument with the left hand. ■ Incorrect: If you have problems inserting the ear piece, ... - Page 9 The optional retention strand helps to securely retain the Removing a hearing instrument: ear piece in your ear. To position the retention strand: Lift the hearing instrument and Bend the retention strand and slide it over the top of your ➊ position it carefully into the bottom of the bowl of your ear If your hearing instrument is (refer to the picture). equipped with a custom shell or a Click Mold, remove it by pulling the small removal cord toward the back of your head. For all other ear pieces: Grip the receiver in the ➋ ear canal with two fingers and pull it carefully out Do not pull the receiver cable. CAUTION Risk of injury! In very rare cases the ear piece could remain in your ear when removing the hearing instrument. If this happens, have the ear piece removed by a medical professional. Clean and dry your hearing instruments after usage. Read more in section "Maintenance and care".
-
Page 10: Adjusting The Volume
Adjusting the volume Changing the hearing program Your hearing instruments automatically adjust the volume Depending on the listening situation, your hearing to the listening situation. instruments automatically adjust their sound. If you prefer manual volume adjustment, press the Your hearing instruments may also have several hearing upper part of the rocker switch to increase the volume programs which allow you to change the sound, if or press the lower part to decrease the volume. needed. An optional signal tone can indicate the program change. Refer to section "Controls" for the setting of your rocker switch. To change the hearing program, press the rocker switch briefly. An optional signal can indicate the volume change. Once the maximum or minimum volume has been reached, you Refer to section "Controls" for the setting of the rocker may hear an optional signal tone. switch. Refer to section "Hearing programs" for a list of your hearing programs. The default volume is applied. Further adjustments (optional) You can also use the hearing instrument controls to change other features, for example, the level of the Tinnitus Function. Refer to section "Controls" for the setting of your controls. -
Page 11: Special Listening Situations
Special listening situations Audio streaming with iPhone Your hearing instruments are Made for iPhone hearing instruments. This means you can get phone calls and On the phone listen to music from your iPhone directly into your hearing When you are on the phone, hold instruments. the telephone receiver slightly above For more information about compatible iOS devices, your ear. The hearing instrument and pairing, audio streaming and other useful functions, telephone receiver have to be aligned. contact your Hearing Care Professional. Turn the receiver slightly so that the ear is not completely covered. Bluetooth Your hearing instrument is equipped with Bluetooth Telephone program wireless technology to enable audio streaming from You may prefer a certain volume when using the phone. mobile phones or other compatible devices. Ask your Hearing Care Professional to configure a In an airplane, the use of Bluetooth functionality may telephone program. be restricted, especially during take-off and landing. If Switch to the telephone program whenever you are on this is the case, you can switch off Bluetooth wireless the phone. technology in your hearing instruments via the smartphone app. If a telephone program is configured for your hearing instruments, it is listed in section "Hearing programs". ... -
Page 12: Maintenance And Care
Maintenance and care Storage ■ Short-term storage (up to several days): Turn off your hearing instruments via the rocker switch or place To prevent damage it is important that you take care of them in the powered charger. your hearing instruments and follow a few basic rules, which will soon become a part of your daily routine. The charger must be connected to the power supply. If the charger is not connected to power supply and Hearing instruments you place your hearing instruments in the charger, the hearing instruments are not turned off. Cleaning Note that when you turn off the hearing instruments Your hearing instruments have a protective coating. via a remote control or smartphone app, the hearing However, if not cleaned regularly you may damage the instruments are not turned off completely. They are in hearing instruments or cause personal injury. standby-mode and still draw some power. Clean your hearing instruments daily with a soft, dry ■ Long-term storage (weeks, months, ...): First, fully tissue. charge your hearing instruments. Turn them off via Never use running water or immerse the the rocker switch before storing them. We recommend devices in water. using drying products while storing the hearing Never apply pressure while cleaning. instruments. Ask your Hearing Care Professional for recommended At 6 month intervals you will have to charge the cleaning products, special care sets, or more hearing instruments to avoid an unrecoverable information on how to keep your hearing instruments deep-discharge of the power cell. Deep-discharged in good condition. power cells cannot be charged anymore and they ... -
Page 13: Ear Pieces
Ear pieces Exchanging Exchange standard ear pieces approximately every Cleaning three months. Replace them sooner if you notice Cerumen (ear wax) may accumulate on the ear pieces. cracks or other changes. The procedure for exchanging This may affect sound quality. Clean the ear pieces daily. standard ear pieces depends on the type of ear piece. For all types of ear pieces: In section "Components and names", your Hearing Care Clean the ear piece Professional has marked your type of ear piece. right after removal with Exchanging Click Domes a soft and dry tissue. To remove the old Click Dome, follow the instructions This prevents that on the packaging of the Click Domes. Be careful not to cerumen becomes pull the receiver cable. dry and hard. For Click Domes or Click Sleeves: Squeeze the tip of the ear piece. Take particular care that the new Click Dome clicks in place. Check the firm fit of the new Click Dome. click... -
Page 14: Professional Maintenance
Important safety information Exchanging Click Sleeves Turn the Click Sleeve inside out. This section contains important safety information regarding the power cell. For more safety information, Grasp the Click Sleeve and refer to the safety manual supplied with the hearing the receiver (not the receiver instruments. cable) with your fingers and pull the Click Sleeve off. WARNING Take particular care that A power cell (lithium-ion rechargeable battery) is the new Click Sleeve clicks permanently built into your hearing instrument. click noticeably in place. Incorrect use of the power cell or the hearing instrument can cause the power cell to burst. Risk of injury, chemical hazard, fire or explosion! Follow the safety instructions for power cells in this section. Professional maintenance Observe the operating conditions. Refer to Your Hearing Care Professional can perform a thorough section “Operating, transport and storage professional cleaning and maintenance. conditions”. Custom-made ear pieces and wax filters should Pay special attention to protect your hearing be exchanged as needed by your Hearing Care instruments from extreme heat (e.g. fire, Professional. microwave oven, inductive oven or other Ask your Hearing Care Professional for your individual high-induction fields) and sunlight. Do not crush, recommendation of maintenance intervals and for short-circuit, inicinerate or heat power cells or support. -
Page 15: Further Information
Further information WARNING Incorrect use of the power cell or the hearing instrument can cause the power cell to burst. Safety information Risk of injury, chemical hazard, fire or explosion! For more safety information, refer to the safety manual Replacement and repair have to be performed by supplied with the device. Service Center only. Therefore: Do not repair or replace the power cell yourself. Accessories Do not use the hearing instruments when You can use the smartphone app for convenient remote their performance after charging reduces control of your hearing instruments. The app also allows considerably. you to deactivate signal tones, to create individual sound profiles and many more functions. In the unlikely event of a power cell leaking, bursting or exploding: You can also use a remote control. ■ Keep away from all flammable materials. Consult your Hearing Care Professional for further information. ■ If the electrolyte comes into contact with the skin, eyes or other parts of body, flush Operating, transport, and storage conditions immediately with water. Consult a physician for medical advice. The hearing instruments operate in the following environmental conditions (also valid in between uses): In any of the above cases, return your hearing instruments to the Hearing Care Professional. Operating conditions Discharging Charging Temperature 0 to 45 °C 10 to 30 °C (32 to 113 °F) -
Page 16: Disposal Information
During extended periods of transport and storage, please Disposal information observe the following conditions: To avoid environmental pollution, do not throw power cells or hearing instruments into household Storage Transport trash. Temperature 10 to 25 °C -20 to 60 °C Recycle or dispose of power cells or hearing (recommended) (50 to 77 °F) (-4 to 140 °F) instruments according to local regulations. Temperature 0 to 40 °C -20 to 60 °C (maximum range) (32 to 104 °F) (-4 to 140 °F) Symbols used in this document Relative humidity 20 to 80 % 5 to 90 % Points out a situation that could lead to serious, (recommended) moderate, or minor injuries. Relative humidity 10 to 80 % 5 to 90 % Indicates possible property damage. (maximum range) Atmospheric 700 to 1060 hPa 700 to 1060 hPa Advice and tips on how to handle your device better. pressure Note that you have to charge the hearing instruments "Made for iPhone", "Made for iPad", ... -
Page 17: Troubleshooting
Troubleshooting Country-specific information Problem and possible solutions USA and Canada Certification information for hearing instruments with Sound is weak. wireless functionality: ■ Increase the volume. ■ Charge the hearing instrument. M-Core R-Li ■ Clean or exchange the ear piece. ■ HVIN: RFM002 Hearing instrument emits whistling sounds. ■ Contains FCC ID: SGI-RFM002 ■ Reinsert the ear piece until it fits securely. ■ Contains IC: 267AB-RFM002 ■ Decrease the volume. ■ Clean or exchange the ear piece. Sound is distorted. ■ Decrease the volume. ■ Charge the hearing instrument. ■ Clean or exchange the ear piece. Hearing instrument emits signal tones. ■ Charge the hearing instrument. Hearing instrument does not work. ■ Turn the hearing instrument on. ■ ... -
Page 18: Service And Warranty
Service and warranty Serial numbers Instrument Receiver unit Left: Right: Service dates Warranty Date of purchase: Warranty period in months: Your Hearing Care Professional... - Page 19 M-CORE R-LI Manual del operador www.rexton.com...
- Page 20 Contenidos Mantenimiento y cuidados Audífonos Moldes Bienvenido Mantenimiento profesional Los audífonos Información importante de seguridad Tipo de audífono La importancia de conocer el audífono Información adicional Componentes y nombres Información de seguridad Controles Accesorios Programas de audición Condiciones de funcionamiento, transporte y Características almacenamiento Información sobre la eliminación Uso diario Símbolos utilizados en este documento Carga Solución de problemas Conexión y desconexión Información específica por país Cambio al modo de reposo Servicio y garantía Inserción y extracción de los audífonos Regulación del volumen Cambio del programa de audición Más ajustes (opcional) Situaciones de escucha especiales Al teléfono Transmisión de audio con iPhone Bluetooth ...
-
Page 21: Bienvenido
Bienvenido Los audífonos Gracias por elegir nuestros audífonos para que le En este manual del operador se describen acompañen en su vida cotidiana. Como todas las cosas características opcionales que sus audífonos nuevas, es posible que tarde un poco en familiarizarse pueden tener o no tener. con ellos. Solicite al especialista en audición que le indique qué características son válidas para sus audífonos. Este manual, junto con la asistencia de su especialista en audición, le ayudará a conocer las ventajas y la calidad Tipo de audífono de vida superior que le ofrecen los audífonos. Sus audífonos son un modelo con auricular en el canal Para obtener el máximo beneficio posible de los (RIC, por sus siglas en inglés). El auricular se coloca audífonos, se recomienda que los lleve a diario y durante dentro del canal auditivo y se conecta al instrumento todo el día. Esto le ayudará a adaptarse a ellos. por medio de un cable del auricular. Estos audífonos no ATENCIÓN se han diseñado para niños menores de 3 años ni para personas cuya edad de desarrollo esté por debajo de los Es importante que lea detenidamente este manual 3 años. del operador y el manual de seguridad de principio a fin. Siga la información de seguridad para evitar El audífono está equipado de manera permanente con daños o lesiones. una pila (recargable de ion de litio). Esta característica permite cargarlo fácilmente con el cargador inductivo. Antes de utilizar los audífonos por primera vez, La funcionalidad inalámbrica proporciona características cárguelos completamente. Siga las instrucciones audiológicas avanzadas entre los dos audífonos. del manual del operador del cargador. Los audífonos incorporan la tecnología Bluetooth low energy*, que permite intercambiar datos ... -
Page 22: La Importancia De Conocer El Audífono
La importancia de conocer el audífono Componentes y nombres Se recomienda familiarizarse con el nuevo audífono. Con ➌ ➍ el instrumento en la mano, intente utilizar los controles y recordar su ubicación en el instrumento. Esto facilita ➏ la localización de los controles para pulsarlos al llevar el ➊ ➎ ➋ audífono puesto. Si tiene problemas para pulsar los controles de los audífonos cuando los lleva puestos, puede preguntar al especialista en audición si hay ➊ ➎ Molde Conmutador disponible un telemando o una aplicación para (control, interruptor de smartphone que permita controlar los audífonos. ➋ Auricular encendido/apagado) ➌ Cable del auricular ➏ Indicador lateral (rojo = oído derecho, ➍ Orificios del micrófono azul = oído izquierdo) y conexión del auricular... -
Page 23: Controles
Puede utilizar los moldes estándar siguientes: Controles Con el conmutador podrá, por ejemplo, cambiar de Moldes estándar Tamaño programa de audición. Su especialista en audición ha Click Sleeve programado las funciones deseadas para el conmutador. (ventilado o cerrado) Función del conmutador Click Dome™ único Pulsación corta: (abierto o cerrado) Subir/Bajar programa Click Dome semiabierto Subir/Bajar volumen Función de Tinitus: subir/bajar nivel Click Dome doble Transmisión de TV activada/desactivada Pulse durante unos 2 segundos: Los moldes estándar son muy fáciles de Subir/Bajar programa sustituir. Obtenga más información en la sección Subir/Bajar volumen "Mantenimiento y cuidados". Función de Tinitus: subir/bajar nivel Transmisión de TV activada/desactivada Moldes a medida Pulsación durante más de 3 s: Carcasa personalizada Encender/Apagar L = izquierda, R = derecha Click Mold™ También puede utilizar un telemando para cambiar los programas de audición y ajustar el volumen de los audífonos. Con nuestra aplicación para smartphone, dispone incluso de más opciones de control. -
Page 24: Programas De Audición
Uso diario Programas de audición Para garantizar un uso cómodo y fácil de sus audífonos, estos cuentan con un elemento de control integrado. Además, ofrecemos una aplicación para iPhone y Android que facilita aún más el manejo de sus dispositivos. Póngase en contacto con su especialista en audición si desea descargar e instalar la aplicación para smartphones. Obtenga más información en la sección "Cambio del programa de audición". Carga Coloque los audífonos en el cargador. Siga las instrucciones del Características manual del operador del La función de Tinitus genera un ruido para cargador. En el manual distraerle de los acúfenos. del operador del cargador también encontrará consejos útiles para la carga. Indicación de nivel bajo de batería Se oirá una señal de aviso para indicar que la batería se está agotando. Se repetirá la señal cada 20 minutos. Según el nivel de uso de los audífonos, tiene aproximadamente 1,5 horas para cargar los audífonos antes de que dejen de funcionar. Tenga en cuenta que el tiempo de ejecución de la batería se reduce si se utilizan demasiadas funciones al mismo tiempo. -
Page 25: Conexión Y Desconexión
Conexión y desconexión Dispone de las siguientes opciones para conectar y Con el conmutador: desconectar los audífonos. Conexión: Mantenga pulsada la parte inferior del conmutador hasta que la melodía de inicio comience a Mediante cargador: reproducirse. Suelte el conmutador Conexión: Saque los instrumentos del cargador. mientras se reproduce la melodía. Se reproduce la melodía de inicio en los audífonos. Se restablecen el volumen Se restablecen el volumen y el programa de audición y el programa de audición predeterminados. predeterminados. Desconexión: Mantenga pulsada Desconexión: Coloque los audífonos en el cargador. la parte superior o inferior del Tenga en cuenta que el cargador debe estar conectado a conmutador durante varios segundos. la fuente de alimentación. Para obtener más información, Se reproducirá una melodía de consulte el manual del operador del cargador. apagado. Consulte también los consejos sobre la carga en el manual del operador del cargador. -
Page 26: Cambio Al Modo De Reposo
Cambio al modo de reposo Inserción y extracción de los audífonos Puede poner los audífonos en modo de espera (standby) Los audífonos se han ajustado para el oído derecho e con un control remoto o la aplicación para smartphone. izquierdo. Las marcas de color indican el De este modo se silencian los audífonos. Cuando se lado: sale del modo de espera, se recuperan el volumen y el ■ Marca roja = Oído derecho programa de audición utilizados anteriormente. ■ Marca azul = Oído izquierdo Nota: Inserción de un audífono: ■ En el modo de espera, los audífonos no están Para Click Sleeves, asegúrese de que la curva de apagados completamente. Siguen consumiendo algo Click Sleeve esté alineada con la curva del cable del de energía. auricular. Por este motivo, se recomienda utilizar el modo de Correcto: espera solo durante períodos breves. ■ Si desea salir del modo de espera, pero no tiene a mano el control remoto o la aplicación: Apague y vuelva a encender los audífonos (utilice el conmutador o colóquelos brevemente en el cargador hasta que se enciendan una o más luces LED naranjas). En ese caso, se restablecen el volumen y el programa de audición predeterminados. Incorrecto:... - Page 27 Sujete el cable del auricular por la curva más próxima El filamento de sujeción opcional ayuda a al molde. retener de forma segura el molde en el oído. Para colocar el filamento de sujeción: Introduzca con cuidado ➊ el molde en el canal auditivo Doble el filamento de sujeción y colóquelo con cuidado en la parte Gírelo un poco para que se inferior de la cavidad de la oreja asiente bien. (consulte la imagen). Abra y cierre la boca para evitar la acumulación de aire en el canal auditivo. Levante el audífono y deslícelo por la parte superior ➋ de la oreja ATENCIÓN Peligro de lesiones. Inserte el molde cuidadosamente en el oído y no profundice demasiado. ■ Puede resultarle útil insertar el audífono derecho con la mano derecha y el audífono izquierdo con la mano izquierda. ■ Si tiene problemas para insertar el molde, utilice la otra mano para tirar suavemente del lóbulo de la oreja hacia abajo. Esto abre el canal auditivo y facilita la inserción del molde.
-
Page 28: Regulación Del Volumen
Extracción de un audífono: Regulación del volumen Levante el audífono y Los audífonos ajustan automáticamente el volumen a la deslícelo por la parte superior situación auditiva. ➊ de la oreja Si prefiere el ajuste manual del volumen, pulse la Si su audífono está equipado parte superior del conmutador para aumentar el con molde a medida o un volumen o la parte inferior para disminuirlo. Click Mold, extráigalos tirando Consulte la configuración del conmutador en la de la pequeña cuerda de sección “Controles”. extracción hacia la parte de atrás de la cabeza. Una señal opcional puede indicar el cambio de volumen. Cuando se haya alcanzado el volumen máximo o Para todos los demás moldes: Sujete el auricular mínimo, es posible que oiga un tono de aviso opcional. del canal auditivo con dos dedos y tire de él con ➋ cuidado No tire del cable del auricular. ATENCIÓN Peligro de lesiones. En casos muy raros, el molde podría permanecer en el oído al retirar el audífono. En este caso, pida que un profesional médico se lo extraiga. Limpie y seque los audífonos después de utilizarlos. Obtenga más información en la sección "Mantenimiento y cuidados". -
Page 29: Cambio Del Programa De Audición
Situaciones de escucha especiales Cambio del programa de audición Según la situación de escucha, los audífonos ajustan automáticamente el sonido. Al teléfono Es posible que sus audífonos también tengan varios Cuando esté al teléfono, sostenga programas de audición que permitan cambiar el sonido el receptor del teléfono un poco por si es necesario. Un tono de aviso opcional puede indicar encima de la oreja. El audífono y el el cambio de programa. receptor del teléfono deben estar Para cambiar el programa de audición, presione alineados. Gire el receptor ligeramente brevemente el conmutador. hacia fuera, de modo que la oreja no quede totalmente cubierta. Consulte la configuración del conmutador en la sección “Controles”. Para obtener una lista de Programa de teléfono los programas de audición, consulte la sección Al utilizar el teléfono puede ser necesario un volumen "Programas de audición". determinado. Pregunte a su especialista en audición para Se ha aplicado el volumen predeterminado. configurar un programa de teléfono. Cambie al programa de teléfono siempre que esté al Más ajustes (opcional) teléfono. También puede usar los controles del audífono para Si se ha configurado un programa de teléfono para cambiar otras características, por ejemplo, el nivel de la los audífonos, aparece en la lista de la sección Función de Tinitus. "Programas de audición". Consulte la configuración de los controles en la sección "Controles". -
Page 30: Transmisión De Audio Con Iphone
Mantenimiento y cuidados Transmisión de audio con iPhone Los audífonos son del modelo Made for iPhone. Esto significa que puede atender llamadas telefónicas y Para evitar daños, es importante cuidar los audífonos y escuchar música de su iPhone directamente en los seguir unas reglas básicas que pronto se convertirán en audífonos. parte de su rutina diaria. Para obtener más información sobre dispositivos iOS Audífonos compatibles, emparejamiento, transmisión de audio y otras funciones útiles, póngase en contacto con su Limpieza especialista en audición. Los audífonos tienen una capa protectora. No obstante, si no se limpian periódicamente, pueden producirse Bluetooth daños en los audífonos o daños personales. Su audífono está equipado con tecnología inalámbrica Limpie los audífonos a diario con un paño Bluetooth para permitir la transmisión de audio desde suave y seco. teléfonos móviles u otros dispositivos compatibles. No utilice nunca agua corriente ni sumerja los dispositivos en agua. En un avión, se puede restringir el uso de la funcionalidad Bluetooth, especialmente durante el No aplique nunca presión durante la despegue y el aterrizaje. Si este es el caso, puede limpieza. desactivar la tecnología inalámbrica Bluetooth en sus Pregunte a su especialista en audición sobre los audífonos a través de la aplicación para teléfonos productos de limpieza recomendados y los kits de inteligentes. mantenimiento, o pídale más información sobre cómo mantener los audífonos en buen estado. Secado El cargador seca los audífonos mientras se cargan. También se pueden utilizar productos convencionales ... -
Page 31: Moldes
Moldes Almacenamiento ■ Almacenamiento a corto plazo (hasta varios días): Limpieza Apague los audífonos con el conmutador o colóquelos Puede acumularse cerumen (cera del oído) en los en el cargador con tensión. moldes. Esto puede afectar a la calidad del sonido. El cargador debe estar conectado a la fuente de Limpie los moldes a diario. alimentación. Si el cargador no está conectado a la Para todos los tipos de moldes: fuente de alimentación y coloca los audífonos en el Limpie el molde cargador, estos no se apagarán. con un paño Tenga en cuenta que si apaga los audífonos con suave y seco un control remoto o por medio de la aplicación justo después de para smartphones, los audífonos no se apagarán extraerlo. completamente. Entrarán en modo de espera y De este modo seguirán consumiendo algo de energía. se evita que ■ Almacenamiento a largo plazo (semanas, meses, el cerumen etc.): En primer lugar, cargue completamente los se seque y se audífonos. Apáguelos con el conmutador antes de endurezca. guardarlos. Se recomienda el uso de productos de Para Click Domes o Click Sleeves: secado durante el almacenamiento de los audífonos. Apriete la punta del molde. Deberá cargar los audífonos cada 6 meses a fin de evitar una descarga completa irrecuperable de ... -
Page 32: Mantenimiento Profesional
Sustitución Sustitución de Click Sleeves Sustituya los moldes estándar aproximadamente cada Dé la vuelta al Click Sleeve tres meses. Sustitúyalos más pronto si observa grietas u de dentro afuera. otros cambios. El procedimiento para sustituir los moldes Sujete el Click Sleeve y el estándar depende del tipo de molde. En la sección auricular (no el cable del "Componentes y nombres", su especialista en audición auricular) con los dedos y ha marcado el tipo de molde. tire del Click Sleeve para extraerlo. Sustitución del Click Domes Ponga especial cuidado en Para retirar el Click Dome anterior, siga las que el nuevo Click Sleeve instrucciones que aparecen en el embalaje del click quede bien colocado Click Domes. Tenga cuidado de no tirar del cable del (deberá oír un clic). auricular. Mantenimiento profesional El especialista en audición puede realizar una limpieza y un mantenimiento exhaustivos y profesionales. Los moldes a medida y los filtros de cera deben sustituirse según sea necesario por un especialista en Asegúrese de que el nuevo audición. Click Dome quede bien colocado. Solicite a su especialista en audición una recomendación personalizada de los intervalos de mantenimiento y Compruebe que el nuevo asistencia. Click Dome encaje click firmemente. -
Page 33: Información Importante De Seguridad
Información importante de seguridad ADVERTENCIA El uso incorrecto de la batería o del audífono En esta sección se presenta información de seguridad puede provocar que la batería reviente. importante sobre la batería. Para obtener más ¡Riesgo de lesiones, riesgo químico, peligro de información de seguridad, consulte el manual de incendio o explosión! seguridad suministrado con los audífonos. Las tareas de sustitución y reparación solo deben ADVERTENCIA realizarse en el Centro de Servicio. Por lo tanto: El audífono contiene una batería (pila recargable No repare ni sustituya la batería usted mismo. de ion de litio) integrada de forma permanente. El No utilice los audífonos si su rendimiento se uso incorrecto de la batería o del audífono puede reduce considerablemente después de la carga. provocar que la batería reviente. En el caso improbable de que una batería ¡Riesgo de lesiones, riesgo químico, peligro de presente fugas, estalle o explote, siga los incendio o explosión! siguientes pasos: Siga las instrucciones de seguridad para las baterías que figuran en esta sección. ■ Mantener alejado de todo material inflamable. Respete las condiciones de funcionamiento. ■ Si el electrolito entra en contacto con la piel, Consulte la sección “Condiciones de los ojos u otras partes del cuerpo, enjuague funcionamiento, transporte y almacenamiento”. inmediatamente con agua. Consulte a un Tome las precauciones necesarias para médico para obtener atención. proteger los audífonos del calor extremo En cualquiera de los casos anteriores, devuelva los (p. ej., fuego, horno microondas, horno de ... -
Page 34: Información Adicional
Información adicional Durante largos períodos de transporte y almacenamiento, respete las siguientes condiciones: Almacenamiento Transporte Información de seguridad Temperatura De 10 °C a 25 °C De -20 °Ca 60 °C Para obtener más información de seguridad, consulte el (recomendada) (de 50 °F a 77 °F) (de -4 °Fa 140 °F) manual de seguridad suministrado con el dispositivo. Temperatura De 0 °C a 40 °C De -20 °Ca 60 °C Accesorios (intervalo máximo) (de (de -4 °Fa 140 °F) smartphone app se puede utilizar para manejar 32 °F a 104 °F) cómodamente los audífonos. La aplicación también Humedad relativa Del 20 % al 80 % Del 5 %al 90 % permite desactivar determinados tonos de señal para (recomendada) crear perfiles de sonido individualizados y muchas más Humedad relativa Del 10 % al 80 % Del 5 %al 90 % funciones. (intervalo máximo) También puede utilizar un telemando. Presión De 700 hPa De 700 hPa Si desea más información, consulte a su especialista en atmosférica a 1060 hPa a 1060 hPa... -
Page 35: Información Sobre La Eliminación
Símbolos utilizados en este documento ADVERTENCIA Riesgo de lesiones, fuego o explosión durante el Indica una situación que podría provocar lesiones transporte. leves, moderadas o graves. Transporte las baterías y los audífonos según la Indica posibles daños materiales. normativa local. Consejos y sugerencias para manejar mejor el Información sobre la eliminación dispositivo. Para evitar la contaminación medioambiental, no tire "Made for iPhone", "Made for iPad" las baterías ni los audífonos en la basura doméstica. y "Made for iPod" significan que un accesorio electrónico Recicle o elimine las baterías y los audífonos según la se ha diseñado para conectarse específicamente a un normativa local. iPhone, iPad o iPod respectivamente, y el desarrollador ha certificado que cumple los estándares de rendimiento de Apple. Apple no es responsable del funcionamiento de este dispositivo ni de su conformidad con los estándares de seguridad ni con las normativas. Tenga en cuenta que el uso de este accesorio con un iPhone, iPad o iPod puede afectar al rendimiento de la conexión inalámbrica. -
Page 36: Solución De Problemas
Solución de problemas Información específica por país Problema y posibles soluciones EE. UU. y Canadá Información de certificación para los audífonos con El sonido es débil. funcionalidad inalámbrica: ■ Suba el volumen. ■ Cargue el audífono. M-Core R-Li ■ Limpie o intercambie el molde. ■ HVIN: RFM002 El audífono emite silbidos. ■ Contiene ID FCC: SGI-RFM002 ■ Vuelva a colocar el molde hasta ■ Contiene IC: 267AB-RFM002 que quede bien asentado. ■ Baje el volumen. ■ Limpie o intercambie el molde. El sonido se distorsiona. ■ Baje el volumen. ■ Cargue el audífono. ■ Limpie o intercambie el molde. El audífono emite tonos de aviso. ■ Cargue el audífono. El audífono no funciona. ■ Conecte el audífono. -
Page 38: Servicio Y Garantía
Servicio y garantía Números de serie Instrumento Unidad auricular Izquierda: Derecha: Fechas de servicio Garantía Fecha de compra: Período de garantía (meses): Su especialista en audición... - Page 39 Copyright © 2020 Rexton. All rights reserved. Copyright © 2020 Rexton. All rights reserved. Derechos de autor © 2020 Rexton. Derechos de autor © 2020 Rexton. Todos los derechos reservados. Todos los derechos reservados. Manufacturer and Local Contact Manufacturer and Local Contact Rexton Rexton A Division of Sivantos, Inc. A Division of Sivantos, Inc. P.O. Box 59008 P.O. Box 59008 Minneapolis, MN 55459 Minneapolis, MN 55459 Document No. 04103-99T01-6000 EN,ES-USA/D10981038 Document No. 04103-99T01-6000 EN,ES-USA/D10981038 Order/Item No. 10981038 1.0 V11011083 1K SIV-7376-20 Order/Item No. 10981038 2.0 V11011083 1K SIV-7376-20 Master Rev01, 12.2019 Master Rev01, 06.2020 © 12.2019, Sivantos GmbH. All rights reserved © 06.2020, Sivantos GmbH. All rights reserved www.rexton.com www.rexton.com Hearing Instruments Made in Singapore Hearing Instruments Made in Singapore *10981038*...
Need help?
Do you have a question about the M-CORE R-LI and is the answer not in the manual?
Questions and answers