
Subscribe to Our Youtube Channel
Related Manuals for Draper 01774


Summary of Contents for Draper 01774
- Page 1 Original Instructions Version 2 - February 2024 34kW INFRARED DIESEL SPACE HEATER 01774...
-
Page 2: Preface
All photographs and drawings within this manual are document is part of the product; retain it for the life supplied by Draper Tools to help illustrate correct of the product, passing it on to subsequent holders. operation of the product. -
Page 3: Table Of Contents
2. Contents 1. Preface 9. Spares, Returns and Disposal 1.1 Product Reference 10. Warranty 1.2 Revisions 11. Explanation of Symbols 1.3 Understanding the Safety Content of This Manual 1.4 Copyright © Notice 2. Contents 3. Product Introduction 3.1 Intended Use 3.2 Specification 4. Health and Safety Information 4.1 General Health and Safety Precautions for This Heater 4.2 Additional Safety information for this Heater... -
Page 4: Product Introduction
Supplied with automatic ignition and fitted with a photocell safety device with heat protection. 3.2 Specification Stock No. 01774 Part No. DSH-IR30-B Motor: Rated voltage 230V AC... -
Page 5: Health And Safety Information
WARNING! DO NOT use this product if it is • ALWAYS observe the correct clearances between the damaged or leaking in any way. Contact Draper heater and surrounding objects: Tools for repair and replacement options. − Outlet: 2.5m (8ft) ... -
Page 6: Electrical Safety
4. Health and Safety Information • NEVER place objects on the engine while it is in use and WARNING! DO NOT use fuels such as petrol, keep all air vents clear of dust, dirt and other obstructions. benzene, paint thinners or other oil compounds in this heater under any circumstances. -
Page 7: Connection To The Power Supply
If the power supply cord is damaged, it must be replaced by Draper Tools, an authorised service agent or similarly qualified personnel in order to avoid a hazard. The damaged or incomplete plug, when cut from the cord, shall be disabled to prevent connection to a live electrical outlet. -
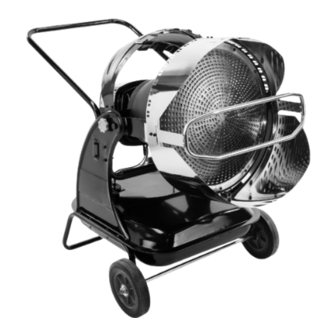
Page 8: Identification And Unpacking
5. Identification and Unpacking 5.1 Product Overview (14) (15) (17) (12) (13) (16) (10) (11) (18) (21) (19) (20) Digital display (12) Power indicator Fuel pipe (13) Power switch Return pipe (14) Protective umbrella Front guard (15) Rear cover Filter access plate (16) Temperature control dial Fuel cap (17) Upper reflector... -
Page 9: What's In The Box
If any part is occurred during shipment. damaged or missing, do not attempt to use the product. Please contact the Draper Helpline; contact details can be found at the back of this manual. 1 x Upper reflector... -
Page 10: Preparing The Heater
6. Preparing the Heater 6.1 Assembly Fig. 3 Fig. 1 3. Pass the wheel axle (G) through the holes at the ends of the wheel support frame (F). 1. Remove the handle (E) from its shipment position and 4. Slide a wheel (H) and 17mm washer (L) onto each end align it with the open holes on the vertical supports of the axle and secure them in place using the two (18) so that it is angled slightly upwards. -
Page 11: Acceptable Fuels
6. Preparing the Heater CAUTION! Kerosene deteriorates over time. Do not use old kerosene in this heater. 6.3 Fuelling the Heater WARNING! ALWAYS ensure that the heater is switched off, disconnected from the mains power and has completely cooled before adding fuel. - Page 12 6. Preparing the Heater Ensure that the temperature control dial (16) is set to the lowest position and the power switch (13) is in the ‘OFF’ position, then connect the plug directly to a power outlet. WARNING! DO NOT attempt to adjust the angle of the heater during or immediately after use.
-
Page 13: Operating Instructions
The heater automatically shuts down if the unit is tilted by an angle of 20° or greater in order to protect the ground from heat damage. If the power cut-outs activate frequently, the heater may need to be serviced. Contact Draper Tools for support. – 13 –... -
Page 14: Maintenance And Troubleshooting
• Any maintenance to the plug and power cord MUST Servicing be performed by Draper Tools or its authorised agent. • The heater should be inspected at least once a year by • The heater should be inspected at least once a year by suitably qualified personnel. -
Page 15: Troubleshooting
Contact Draper Tools for support. The ignition has failed. Contact Draper Tools for support. Temperature The control sensor cable is damaged Contact Draper Tools for repair and replace- control sensor or disconnected. ment options. error The temperature control sensor is Contact Draper Tools for repair and replace- damaged or faulty. -
Page 16: Spares, Returns And Disposal
Draper Tools Product Helpline for details of your nearest authorised agent. Draper Tools will endeavour to hold any spare parts, if applicable, for seven years from the date that it sells the final matching stock item. -
Page 17: Warranty
This warranty period covers parts and labour for 12 months from the date of purchase. Your Draper Tools guarantee is not effective until you can Where tools have been hired out, the warranty period produce, upon request, a dated receipt or invoice to covers 90 days from the date of purchase. -
Page 18: Explanation Of Symbols
11. Explanation of Symbols Class I appliance Read the instruction manual WEEE – Warning! Waste Electrical & Electronic Equipment Do not dispose of this product with domestic waste Danger of electric shock UK Conformity Assessed Rated voltage European Conformity Rated input Do not cover Do not incinerate or throw onto fire Do not abandon in the environment... - Page 19 Notes – 19 – – 19 –...
- Page 20 Telephone Sales Desk: +44 (0) 23 8049 4333 General Enquiries: +44 (0) 23 8026 6355 General Fax: +44 (0) 23 8026 0784 Please contact the Draper Tools Product Helpline for repair and servicing enquiries. © Published by Draper Tools Limited...
Need help?
Do you have a question about the 01774 and is the answer not in the manual?
Questions and answers