
Subscribe to Our Youtube Channel
Related Manuals for Draper 04745


Summary of Contents for Draper 04745
- Page 1 Original Instructions Version 1 2.8KW/2.4KW INFRARED CABINET HEATER 04745, 04746...
-
Page 2: Preface
All photographs and drawings within this manual are document is part of the product; retain it for the life supplied by Draper Tools to help illustrate correct of the product, passing it on to subsequent holders. operation of the product. -
Page 3: Table Of Contents
2. Contents 1. Preface 1.1 Product Reference 1.2 Revisions 1.3 Understanding the Safety Content 1.4 Copyright © Notice 2. Contents 3. Warranty 4. Product Introduction 4.1 Scope 4.2 Specification 5. Health and Safety Information 5.1 General Health and Safety Precautions for This Heater 5.2 Connection to the Power Supply 6. -
Page 4: Warranty
This warranty period covers parts and labour for 12 months from the date of Your Draper Tools guarantee is not effective until you can purchase. Where tools have been hired out, the warranty produce, upon request, a dated receipt or invoice to period covers 90 days from the date of purchase. -
Page 5: Product Introduction
Draper Tools accepts no responsibility for improper use of this product. Part of our core range, this product is suitable for enthusiasts and tradespersons alike. -
Page 6: Health And Safety Information
• NEVER allow the power cord to come into contact • Important: DO NOT use this product if it is damaged with other heated objects or direct the heater at the in any way. Contact Draper Tools to discuss repair and power cord or supply. replacement options. -
Page 7: Connection To The Power Supply
Where a BS-approved three-pin plug is installed (Stock other openings in the heater body. No. 04745), the value of the fuse fitted is marked on the • The fireguard of this heater is intended to prevent pin face of the plug. Should the fuse need replacing,... -
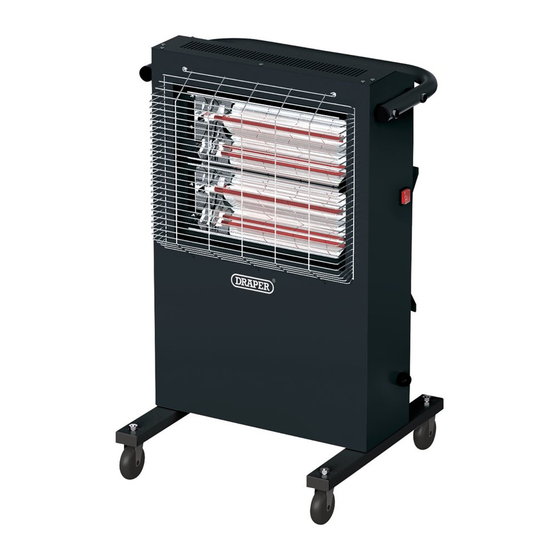
Page 8: Identification And Unpacking
6. Identification and Unpacking 6.1 Product Overview (16) (19) (18) (10) (11) (12) (13) (14) (15) (17) Power switch Control panel (15) Down button Upper heating element LCD display (16) Thermostat sensor Lower heating element (10) Standby button (17) Handle Reflectors (11) Shutdown timer button (18) Wheel castors Fireguard... -
Page 9: What's In The Box
If any part is occurred during shipment. damaged or missing, do not attempt to use the product. Please contact the Draper Helpline; contact details can be found at the back of this manual. 1 x Infrared heater cabinet... -
Page 10: Preparing The Heater
7. Preparing the Heater Important: Read and understand all the safety 2. Attach the handle to the heater unit (Fig.2). instructions listed in this manual before attempting to a. Position the handle (B) so that it extends around assemble or use this product. the back of the heater and the holes align. -
Page 11: Operating Instructions
8. Operating Instructions Important: Before use, read and understand all the safety instructions listed in this manual. WARNING! DO NOT leave the heater unattended (10) while it is connected to the power supply or switched The heater is controlled using the soft-touch control panel (8) on the top of the unit. -
Page 12: Enabling The Lower Heating Element
8. Operating Instructions 8.3 Enabling the Lower Heating Element To change the target temperature, press the up (14) and down (15) buttons while the default display is shown until the desired temperature is shown on the LCD display (9). The target temperature value is represented by a flashing number on the display. -
Page 13: Using The Remote Control
8. Operating Instructions 8.6 Using the Remote Control 2. While the clock is flashing, use the up (14) and down (15) buttons to select the number of hours for which the countdown will run. Important: ONLY the hour value can be changed. The maximum value is 23:00. -
Page 14: Automatic Power Cut-Outs
8. Operating Instructions 8.7 Automatic Power Cut-Outs The heater is equipped with three features that will automatically initiate standby mode under specific circumstances: Feature Shutdown conditions Shutdown timer The heater enters standby mode when the timer reaches 00:00 once initiated. Tilt switch The heater enters standby mode if the unit is tilted either forward or... -
Page 15: Maintenance And Troubleshooting
Removing and Replacing the Fireguard) and wipe them • Any maintenance to the plug and power cable MUST gently with a fine dry cloth. Replace the fireguard when be carried out by Draper Tools or its authorised complete. representative. CAUTION! The surface of the reflectors is very soft. DO • Any repairs to the heater must be carried out by... -
Page 16: Replacing The Heating Elements
9. Maintenance and Troubleshooting 9.4 Replacing the Heating Elements Important: This product is not supplied with replacement elements. Contact Draper Tools to discuss replacement options. WARNING! ALWAYS ensure that the heater is disconnected from the power supply and has cooled thoroughly before attempting to access and maintain the heating elements. -
Page 17: Troubleshooting
Check the heating elements for is damaged. damage and replace them as necessary; see 9.4. The ambient room temperature value The thermostat sensor or connection Contact Draper Tools for repair or is significantly inaccurate. is faulty. replacement options. – 17 –... -
Page 18: Returns And Disposal
10. Returns and Disposal For servicing, repair and replacement options, please contact the Draper Tools Product Helpline for details of your nearest authorised agent. Any servicing or repairs carried out by unauthorised personnel will invalidate your warranty. At the end of its working life, dispose of the product responsibly and in line with local regulations. -
Page 19: Explanation Of Symbols
For indoor use only. DO NOT expose to rain Rated input (04746) Earthed 9553 WEEE – Rated heat output (04745) Waste Electrical & Electronic Equipment Do not dispose of Waste Electrical & Electronic Equipment in with domestic rubbish 8188 Rated heat output (04746) - Page 20 Telephone Sales Desk: +44 (0) 23 8049 4333 General Enquiries: +44 (0) 23 8026 6355 General Fax: +44 (0) 23 8026 0784 Please contact the Draper Tools Product Helpline for repair and servicing enquiries. © Published by Draper Tools Limited...
Need help?
Do you have a question about the 04745 and is the answer not in the manual?
Questions and answers